Make a greenhouse with reinforced film with your own hands. Guide: how to build a greenhouse with your own hands from film. Greenhouses under film: collapsible ready-made structures
Advantages and disadvantages of greenhouses made of polyethylene film, popular frame designs. The choice of material for the covering and methods of its fastening, technology for assembling the building.
Features of the design of greenhouses made of polyethylene film

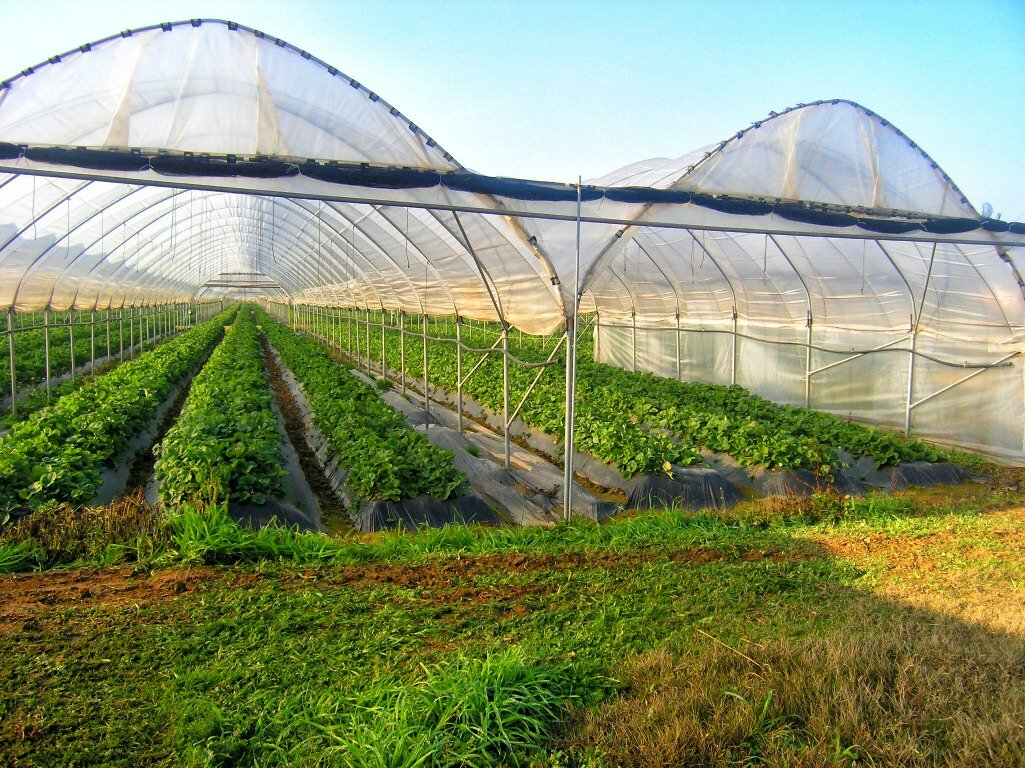
A typical polyethylene-lined greenhouse is a lightweight structure with a translucent top. There are many prefabricated buildings, each of which has certain advantages. Before you make a greenhouse from film, you need to choose the right design that is suitable for a specific summer cottage.
The most popular bases for polyethylene are arched (metal or plastic) and wooden frame-type structures. As a rule, their dimensions do not exceed the specified values: length - 6-7 m, width - 2.4 m, height - 2.5 m.
An arched greenhouse has a roof made in the form of an arc. It has the following advantages:
- Easy installation;
- Low cost of building materials for the construction of the frame;
- Good illumination due to the large area of polyethylene coverage;
- In winter, snow does not accumulate, so the film does not need to be removed during this period.
From the point of view of operation, structures are divided into winter and summer. Winter ones are made of reinforced film and have a complex structure, including various systems - heating, fire protection and others. They are often buried 1-2 m into the ground.
Summer buildings are usually made quickly dismantled to be dismantled for the winter. The frame is made of plastic, metal or wood.
Advantages and disadvantages of greenhouses made of polyethylene film

Greenhouses have been covered with polyethylene since the last century. Users note the following positive aspects of the material:
- It is the cheapest of all products of similar purpose. Its use allows you to save financial investments in construction.
- Greenhouse film does not allow moisture to pass through and reliably protects crops from rainfall.
- It is elastic and can withstand high tensile loads. The ability to stretch makes installation easier.
- The product can be conveniently mounted on a frame made of any material.
- The film allows oxygen and carbon dioxide to pass through and does not absorb ultraviolet radiation or most of the solar spectrum. The coating diffuses direct sunlight, which increases the yield.
- The dimensions of modern polyethylene products remain unchanged throughout their entire service life. They do not change under the influence of wind and precipitation.
- Fungus does not take root on the film, it is non-toxic and odorless.
- The material is safe for plants.
- Resists acids and alkalis well.
- It is characterized by poor weather resistance, so it quickly fails. Over time, even a dense product becomes fragile.
- Reduced transparency due to the property of the material to electrify and attract dust. The greenhouse covering must be washed frequently to increase its light transmission characteristics. The film also becomes cloudy under the influence of oxygen, moisture and ultraviolet radiation.
- Loss of shape due to elasticity, which leads to sagging of the panel.
Film greenhouse construction technology
The methods for constructing structures of various designs are largely similar. Construction is carried out in several stages. Each of them is described below.
Selection of polyethylene film

The structure is covered with a panel, which is selected depending on many factors. The coating must be removed at the beginning of winter. Even high-strength film cannot withstand the test of frost, wind and snow.
- The main characteristic of polyethylene is its density. The ability to withstand the load from wind and precipitation and transmit light depends on it. The larger it is, the worse the lighting inside. Products of low density are easily torn and may fail before the end of the season. The best option to meet these requirements is considered to be a material with characteristics of 150-200 microns.
- The width of the panel depends on the size of the structure. Small tunnel greenhouses (for example, for cucumbers) can be covered with samples 3 m wide.
- For large stationary buildings, it is recommended to buy 6-meter products. They are usually sold folded in half, in the form of sleeves, 3 m wide. Before stretching, the sections are cut.
- If the width is not enough, the individual parts are glued or welded.
- Unstable film. It transmits up to 80% of thermal and ultraviolet energy, so it is cold under it at night. It is characterized by low wear resistance, despite the addition of light stabilizers, which increase mechanical strength. Service life - 5-6 months. One of the few advantages is the low price.
- Stabilized hydrophilic film. It contains stabilizing additives that increase resistance to light. They are often produced in various colors - blue, orange, pink. They are distinguished by a special surface structure that allows condensation to form. Moisture rolls down without forming drops. The material is impregnated with antistatic agents that prevent the accumulation of static electricity and attract dust. The surface always remains transparent. The canvas does not transmit infrared rays, so little heat escapes through it at night. Reducing daily temperature fluctuations increases garden productivity.
- Light scattering film. Depending on the additives, it can reflect light or absorb ultraviolet light. The product distributes light evenly over the entire area. If the area is located in the shade, it is necessary to choose a material that allows more light to pass through. Under such a covering, unpleasant moments do not arise when leaves on a plant are burned due to a drop of water. The risk of damage to cucumbers, which are recommended to be watered in the middle of the day, is reduced.
- Heat retaining film. Has an increased level of thermal energy absorption. The temperature underneath is 1-3 degrees higher than in other structures. Its use can increase productivity by 10-30%. It is easily recognized by its matte white shade. But the coating has a small margin of safety and can withstand only 9 months of use.
- Reinforced film. Durable material, reinforced with dense threads forming 6x12 mm cells. The coating can last more than 2 years. You don't have to take it off for the winter. But it transmits thermal energy 10-12% lower than other samples.
Preparatory work

To quickly assemble the greenhouse and start using it, prepare for the process in advance.
Perform the following operations:
- Choose a place to build. Greenhouses are built on a level, well-lit place with an average level of humidity, with soil of the same composition.
- It is recommended to prepare the soil in the fall so as not to waste time cultivating it on nice spring days. The area needs to be dug up, fertilized, and leveled with a rake.
- Carry out work that cannot be done after installing the structure, for example, if the greenhouse is year-round, install a heating system under the beds.
- Compact the soil in places where power elements are installed.
- Treat wooden elements with antiseptic agents. Without protective impregnation, lumber will rot in a few years.
Installation of a frame under polyethylene film

Let's consider assembling the base of the greenhouse of the most popular shape - arched. The strength elements of the frame are made of metal or plastic pipes. The first option is more durable, and such a structure does not need to be dismantled for the winter. The advantages of the plastic frame include simple installation, without the use of welding or adapters to connect the elements together. It is recommended to develop a drawing of a greenhouse for film, which should show all the elements of the structure and methods of their fastening.
For work you will need the following materials:
- Pipes - metal or plastic with a diameter of 25-30 mm. A film is attached to them.
- Tarred timber or logs with a cross section of 100x100 mm, treated with antiseptic agents, which are used as a base. The massive lower part of the structure will give the structure rigidity.
- Metal pins or reinforcement about 1 m long and 15-20 mm in diameter, with which the base is attached to the ground.
- Metal rods 80-100 cm long, onto which plastic pipes are placed. The pins must be of such diameters that plastic pipes can be placed on them.
- You will also need additional pipes, which are laid at the top of the arches and on the sides of the structure, in two rows, to give it rigidity.
The work is performed in the following sequence:
- Assemble a box of beams that will serve as a support for the entire structure and provide it with rigidity. Place it on a previously prepared place.
- Drive metal pins into the ground at the corners of the box to secure the product.
- Along the long sides of the base, drive metal rods into the ground to a depth of 50 cm, onto which the arches will be placed. The same amount should come out. The distance between them is 50-60 cm.
- Place plastic pipes on each pair of pins located on opposite sides of the box so that an arc is formed. The length of the element can be determined experimentally. To do this, you will need assistants: one puts the pipe on the pin, the second holds it in the middle of the greenhouse, and the third marks the cutting location for the second pin. The remaining pipes can be cut according to the first sample, using it as a template.
- Secure the elements in place with mounting loops that are attached to the box with screws.
- Strengthen the structure with supports made of timber with a section of 5x5 cm, placing them at the ends of the structure.
- Place a plastic pipe on top of the arches, which will provide stability to the greenhouse.
- Secure the sides of the pipe with two rows of purlins. Secure them with bolts or welding. It is possible to fix metal elements with a bolted connection, but for this it is necessary to weld brackets to the arches. Do not drill holes in the arches, you will weaken the structure.
- Knock down the door frame and secure it to one of the ends of the greenhouse.
- Make a door frame according to the dimensions of the box. Cover it with film and secure it in place.
- Make ventilation vents in the same way. They are installed at the ends of the structure, above the door, as high as possible.
- If the building is large, you can build shelves with earth inside.
- After constructing the frame, secure the film.
Attaching the film to the frame

Polyethylene is not the strongest fabric; its weakest area is the attachment point. This is where it breaks due to friction or stretching when heated. Therefore, there are special fixation rules that depend on the base material - wood, metal, plastic. Let us consider in detail the methods for installing greenhouse polyethylene film.
When covering a greenhouse with a wooden frame with film, you must adhere to the following rules:
- Beams in places where polyethylene is attached should be sanded and painted with light paint that reflects sunlight.
- The simplest way is to use glazing beads or slats that press the fabric. They are fixed with nails. This option has disadvantages - over time, the wood dries out, and the material is held in place only by nails. In this case, the polyethylene quickly breaks.
- To extend the life of the coating, treat the slats with an antiseptic and paint, and use screws instead of nails. Screw the fasteners every 20-25 cm.
- A more reliable method of fastening is to use pads. They are made from wooden planks 10 cm long and width equal to the thickness of the frame. Round the edges of the block and sand it. Cover the surface of the workpiece with rubber glue and wrap it in several layers of plastic film. Make the required number of overlays, based on their placement in increments of 20 cm.
- Stretch the fabric and coat it with rubber glue in the place where the pads are installed. Place the workpiece in the intended place and secure it with wood screws.
- You can use plastic packaging tape to secure the cover, which does not deteriorate and cannot be deformed. It is attached to the lumber with a stapler.
- A more economical way is to cut strips from old linoleum, glue them to the film and secure them with a construction stapler.
- To secure it around windows and doors, cut the fabric to excess, wrap it around the counter several times, and then nail it.
It is allowed to use coarse mesh or cord to secure the panel. Before using the rope, first tension the panel and secure it temporarily. Secure the cord to the bottom corner of the greenhouse. Throw it over the top and pull it tight. Then pass the cord under the longitudinal rail and throw it back in a zigzag. The cord is also stretched from the inside so that the covering rests on it.
The film does not need to be unfolded or cut. Pass the cord through the sleeve and secure it at the bottom of the greenhouse. Throw the workpiece over the structure and repeat the operation. Pull the next cut with an overlap of 15 cm over the first one. This method increases material consumption, but extends its service life.
It is best to attach the canvas to the fittings with special clothespins.
Plastic hardly heats up in the sun, so it does not require insulation. In stores you can find special clips for fixing the film to the frame, but you can make them yourself. To do this, cut pieces of pipes 8-10 cm long and cut them lengthwise. Sand the edges of the cuts with sandpaper and remove sharp edges and corners. To fasten, stretch the plastic and press it against the pipes using manufactured clamps.
Film welding rules

With large greenhouse sizes, the question often arises of how to connect the individual parts of the polyethylene film. The problem can be solved by welding the parts using one of the proposed methods.
Welding with a soldering iron is performed in the following sequence:
- Wrap a flat rail with a cross-section of 25-40 mm in thick fabric.
- Place it on a flat table with the wide side.
- Place the edges of the pieces of polyethylene overlapping on the rail and secure with a weight.
- Cover the joints with newspaper to prevent the plastic wrap from sticking to the instrument.
- Heat the soldering iron or iron to 120-140 degrees.
- Practice on a scrap piece of polyethylene to determine the speed of movement of the tool. You can’t keep it in one place for a long time, but moving it quickly is also not recommended.
- Iron the joints with an iron or soldering iron.
How to make a greenhouse from film - watch the video:
There are a large number of greenhouse structures covered with plastic film. They do not require much time to manufacture, but to obtain a good result, the assembly procedure must be performed carefully due to the low strength of the canvas. To properly build a greenhouse from film with your own hands, you should study the sequence of work in advance and not deviate from it.
Today, many gardeners prefer to grow plants indoors. To do this, they build greenhouses, which are designed to grow plants in more comfortable and suitable conditions for heat-loving plants. Film greenhouses have a number of advantages. They have high characteristics that make them popular among greenhouse owners.
Greenhouses under film: types
Film greenhouses are a common type of greenhouses, which are inexpensive, reliable and relatively durable. The choice of greenhouse type depends on many factors. First of all, you should understand the climatic conditions of the region and the varieties of plants grown. It is necessary to decide what greenhouse conditions need to be created for active growth and fruiting of plants.
You can choose a film quickly and easily if you know the criteria by which it should be evaluated.
When building a greenhouse with your own hands, it is important to pay attention to the choice of material for the frame, as well as the size of the frame itself and the dimensions of the film - they must fit, otherwise the design of the greenhouse will be incorrect. Covering the frame with film should be done extremely carefully, since there is always the possibility of damage to the polyethylene. It should be noted that large greenhouses are much more difficult to cover - you cannot do without helpers. For a small area, the Volya Perchina greenhouse is suitable.

Types of frames:
- Pvc. It is rarely used, although it has excellent characteristics. It is resistant to rust and does not deteriorate from exposure to chemicals. It is not affected by acid, alkali and other aggressive fertilizers.
- Aluminum. Durable frames that have excellent performance. They do not rust and do not deteriorate from exposure to temperature and moisture. The downside is their high cost.
- Metal. The hat profile can not rust for more than ten years. Such a frame is not stable when there is strong snow pressure on it. The frame, made of profile pipe, is easy to install and can withstand heavy loads.
- Wood. Unfavorable material. Which requires a lot of effort to maintain. It should be covered with materials that protect the wood from moisture, humps and other microorganisms. The process of installing a wooden frame takes a lot of time and effort.
Greenhouses may differ in different types of structures. Frames are available: prefabricated and dismountable. Having decided on the type and type of frame, you can begin to select the material for covering the greenhouse.
High-quality greenhouse made of film
Today, many greenhouse owners choose film as a material for covering the greenhouse frame. It costs less than polycarbonate coating. It is easy to install, allowing you to do all the work yourself.
The choice of film type depends on the characteristics. They will allow you to choose the appropriate film for a particular greenhouse.
Inexpensive farm greenhouses are most often constructed from a metal frame and plastic film. When choosing a film, it is important to pay attention to the fact that the winter greenhouse should have a denser and frost-resistant coating. Reviews about each type of polyethylene film can be found on the Internet on specialized websites.
Types of foam greenhouses:
- Polyethylene. You should choose a film with a high density - it will last much longer than a thin film.
- Reinforced. The polyethylene film is additionally reinforced with a frame made of polyethylene or polypropylene. This coating has a long service life, unlike conventional polyethylene film.
- Polyvinyl chloride. Has high density. The film is very transparent, so it allows a large amount of light into the greenhouse. However, the film cannot withstand very low temperatures.
- Perennial polyethylene. The material contains sealants and plasticizers. This film is antistatic, light transmitting, and heat insulating. This allows you to deal with such a common problem as condensation.
The Hungarian-type greenhouse is widely known - its temperature and humidity levels are stable, even if the heater is running in the greenhouse. The greenhouse can be equipped with an additional cover. It is important to carefully install the frame and stretch the polyethylene, otherwise the material may burst, which will lead to new costs and loss of time.
Large greenhouses made of film
Building a large greenhouse is different from installing small structures. Before starting construction work. It is necessary to draw up a plan and drawings of the future greenhouse. This will allow you to determine the dimensions, calculate the amount of materials and material costs. It is important to think in advance about heating for a greenhouse with a large area.
It is good if the metal greenhouse is covered with a high-density film. In this case, there is no need to worry about its premature damage.
If you don’t have the time and desire to build a greenhouse, you can buy ready-made structures. Reviews and recommendations about different types of greenhouses can be found online. For example, user Sergei Mozgovoy advises buying greenhouses produced by Kakhovka. They are reliable, durable and inexpensive.

Tips for arranging large greenhouses:
- You should not assemble a large greenhouse yourself. To avoid difficulties and possible damage to the coating, you need to seek help from an assistant.
- To cover a greenhouse with a large area, dense polyethylene should be used.
- It is important to take care of the heating system for a large greenhouse in advance.
- It is necessary to install high-quality lighting systems in the greenhouse.
Large greenhouses should be installed in areas with a large area. For small areas, a tunnel greenhouse is suitable. Large and small greenhouses can be covered with the popular type of film “Svetlitsa”.
Film greenhouse construction
You can implement a project to build a polyethylene greenhouse yourself. To do this, you need to decide on the type of frame and film to cover it. However, the technology for arranging the greenhouse will be almost the same.
It is important to choose a suitable place - it should be located on a hill and well lit by the sun.
The soil on the site should be stable, uniform and not very wet. The frame can be made of wood. Aluminum, PVC or metal. It is important to note that durable metal frames are popular.

How to build a frame:
- Prepare the site;
- Assemble the box;
- Treat the box boards with antiseptic compounds;
- Drive metal rods into the ground;
- Drive in the reinforcement bars;
- Place plastic pipes on the fittings and secure them;
- Install diagonal supports;
- Strengthen the ends of the frame;
- Cover the frame with film.
When designing interiors, it is important to use space correctly. If the size of the greenhouse allows, for convenience, you can install racks for growing plants. A small greenhouse can simply be filled with fertile soil.
Film cover for greenhouses in winter
The choice of materials for covering the frame of a greenhouse for a summer residence largely depends on climatic conditions. In winter, it is very important to properly equip the greenhouse, otherwise the plants risk dying. Professional gardeners advise insulating the greenhouse with special heating and lighting devices.
It is important that a polyethylene greenhouse has high-quality ventilation. Evaporation from irrigation can lead to excessive condensation.
The accumulation of moisture leads to the spread of fungi and bacteria that infect plants. Heating should be thoughtful, it should not dry out the air too much. In winter, the greenhouse windows can be covered with roller curtains to avoid drafts.

Film Features:
- Strength;
- Moisture resistance;
- Tightness;
- Light transmittance.
To store the temperature, durable types of films are used, the calculation of which is very important when covering the frame. Before assembling the structure, it is necessary to think through the entire project. Good conditions for growing plants in a greenhouse in Krivyanka.
DIY film greenhouses (video)
There are different types of films, the choice of which depends on the region in which the greenhouse will be installed. And also on the variety and variety of plants that they plan to grow. An overview of different types of materials will allow you to choose the one suitable for a particular greenhouse. In winter, it is important to pay attention to the interior design. Lathing and choosing the right heating system are very important.
In this article we will talk about how to make a greenhouse from film over the weekend. Facilities for growing early vegetables or seedlings are in growing demand everywhere. And this is not surprising, since the price of a kilogram of strawberries on the market in May makes you seriously think about building your own small greenhouse.
Choosing the best option
Actually, before starting construction work, let’s decide which film greenhouses are suitable for assembly on a summer cottage. Over the long period of operation of quick-assembled structures intended for early growing of plants, many different modifications have been developed.
The following varieties are most widespread among domestic summer residents.
- Arched frame design assumes the presence of a roof made in the shape of an arc.

This design has a number of advantages, including:
- Easy to assemble with your own hands;
- Relatively low cost of construction;
- Versatility in terms of the use of covering material (polyethylene film or polycarbonate sheet can be used with equal success);
- Frame strength and resistance to mechanical loads;
- Optimal degree of illumination due to the uniform distribution of sunlight over the entire area of the structure.
By the way, the arc-shaped structure does not accumulate snow in the upper part, and therefore the greenhouse can be used without disassembling it for the winter.
- Single-pitch design does not imply a separate location, but adjoining the wall of any building. To achieve better results, summer residents attach these greenhouses to the southern wall. This solution allows not only to ensure optimal heating of the internal space, but also to save space.

The only noticeable drawback of this arrangement is that the snow does not slide off the roof on its own and must be removed as it accumulates.
- Gable structure provides a better degree of snow sliding from the roof, which is an obvious advantage in regions with high rainfall.

Important: The disadvantage of this type of structure is its relatively low durability, since ordinary polyethylene film lasts no longer than two or three seasons, after which it requires complete replacement.
Nevertheless, this type of greenhouse is the easiest to manufacture, and therefore, let’s consider the technology of its construction.
- Winter greenhouses made of reinforced film are heated, and therefore technically complex structures, in which everything must be thought out, from an effective heating system to fire safety measures.

In such structures, increased demands are placed on the strength of the frame, since the structure must withstand significant loads of accumulated snow.
- It is a structure buried in the ground. The structure is technically complex, as it is buried 1-2 meters into the ground.

Construction of even a small greenhouse using this technology requires digging a pit, insulating the walls with thermoblocks, installing a heating system, etc. As a result, the construction of such greenhouses is rarely resorted to due to the originality of the design and the complexity of implementation.
Technology for constructing a summer greenhouse at a summer cottage
It doesn’t matter what you decide to build - a greenhouse made of reinforced film or a greenhouse covered with single-layer polyethylene, the technology for implementing the project is largely similar.
First, let's select a location. It is desirable that this be a flat, well-lit area with the same type of soil composition and a relatively low degree of humidity.
- Boards and timber pre-impregnated with antiseptic. For maximum durability, the wooden elements in the greenhouse structure can be covered with several layers of drying oil, burned with a blowtorch, or impregnated with hot resin.
- PVC pipes.
- Polyethylene reinforced film.
- Metal reinforcing bars 1 m long.
- Screws and nails.
- Door and window hinges at the rate of 2 hinges per window and 3 per door.
- Metal loops for fastening PVC pipes
Let's start construction:
- We prepare a flat area by compacting the soil around the perimeter where the walls of the structure will be located.
- Along the perimeter of the site, we assemble a box from pre-prepared boards, which will give the frame the required strength.

Important: treat the boards with an antiseptic compound (sold in most hardware stores). If this is not done, the box will collapse within a few years and the entire structure will lose its durability.
- At the corners of the assembled box, metal reinforcement bars are driven into the ground, which ensure the stability of the structure.

- Along the long sides of the plank box, we drive reinforcing bars into the ground, which will serve as the basis for the arcs on which the film will be attached. The rods are hammered at a distance of 50-60 cm from each other. Each rod must be buried at least 50 cm into the ground and the same amount must remain above the ground level.
- We put pre-prepared plastic pipes onto reinforcement located parallel to both sides of the box so that an arc is formed.

- Using mounting loops, the pipes are fixed in one place. The mounting loops are attached to the screws using a screwdriver.

- At the corners of the frame we make diagonal supports from timber with a cross-section of at least 50 x 50 mm.

- We strengthen the ends of the structure with timber supports.
- We attach a longitudinal plastic pipe along the top of the arches, which will provide the required stability of the frame.

- We cover the frame with plastic film or other greenhouse covering material. The film is attached using special staples and wide tape.
- We build a door frame from one end of the timber.

- We knock down the door according to the shape of the box, cover it with film and hang it on the hinges.
- We make ventilation vents in the same way as the doors were made. The vents should be located at both ends, the closer to the top, the better.
Interior arrangement of the greenhouse
Structures covered with plastic film are the best choice for growing early vegetable crops or seedlings. Such greenhouses do not require a heating system.
An important condition for the full operation of any greenhouse, regardless of size, is the rational use of internal space. Therefore, if you decide to make an ordinary small-sized greenhouse, we limit ourselves to filling fertile soil on top of the soil. If the constructed structure is of sufficient size, we arrange racks inside into which soil is poured.
Conclusion
A properly built greenhouse or greenhouse is a unique opportunity to grow early vegetables and thus save a considerable amount of money on trips to the grocery store.

The instructions for assembling a greenhouse given in the article are the simplest project that anyone can implement. You can build such a structure from pre-prepared materials in one weekend.
Another advantage of such a greenhouse is the complete absence of expensive aluminum profiles, such as are used in factory buildings. As a result, a greenhouse can be built without fear that it will be taken away in your absence, as is the case with factory-made, quick-assembled greenhouses.
Do you have any difficult questions or are you interested in more useful information on this topic? Watch the video in this article.
Having even a small plot of land, it is difficult to do without a greenhouse. Grow seedlings, get an early harvest, protect them from possible frost, from heat, make plants bloom earlier - all this can be done with the help of this device. Moreover, making a greenhouse with your own hands is not difficult. There are very simple designs, there are more complex ones, but the manufacture of any of them does not require special education.
The frame for a greenhouse can be made of wood (boards), metal (angle, profile pipe or fittings) or PVC pipes (round or square). Cover the greenhouse with the same materials as : film, spunbond (also called agrofibre or non-woven covering material), polycarbonate and glass. Since the size of greenhouses is smaller (plants in greenhouses are maintained from the outside), the requirements for them are not so stringent: even strong winds are not afraid of them.
Greenhouse sizes
Since in a greenhouse the plants are served from the outside, its width is chosen so that it is comfortable for you to process plants planted closer to the middle. You determine this experimentally: sit down and try to reach some area with your hand. Measure the distance. You get the width of the greenhouse with a one-sided approach. This is if the greenhouse is located in such a way that it is impossible to get to it from the other side (near a wall, for example). If you can approach from both sides, you double this result.

The distance is different for each person: height and physical condition affect. You should not chase savings by making it wider than necessary. You will have to spend a lot of time weeding, loosening, fertilizing, and other work. A couple of hours in an uncomfortable position, and there is no strength left. Therefore, it is better to make the greenhouse a little narrower, but to make it convenient to work: while enjoying your work, you spend less effort.
And the length of the greenhouse is chosen based on the layout of the site. It's arbitrary.
A simple greenhouse made of arcs under film or spunbond
This greenhouse is made of several boards, knocked down to the required dimensions, arcs of PVC pipes, which are attached to a wooden base. The tops of these arcs are connected at the top by a beam or the same pipe. If it is a timber, it needs to be well processed, rounding the edges so that the film does not tear.

How to secure the arches
How to attach arcs of PVC pipes to a greenhouse frame. They are most often secured using metal perforated tape. Take a small piece of it about 5-6 centimeters, screws and a screwdriver. And they are secured on both sides. To be on the safe side, you can do it twice.

In exactly the same way, you can fasten them from the inside to hold them tighter by adding bars.

Another option: drive in pieces of reinforcement near the frame, place pipes on them and only then secure them with clamps to the frame boards. This option is more reliable.
How to attach the film
You can attach the film to PVC pipes using double-sided tape. But only if inexpensive polyethylene film was used: it is impossible to tear it off without damaging it, and polyethylene lasts no more than a year. So for a seasonal greenhouse this is a “cheap and cheerful” option. The second method is special clips for fixing films and anything that can replace them - a piece of an old hose cut lengthwise, a clamp for pipes that are used for installing pipelines, office binders, etc.

It also makes sense to secure a block on both sides along the edges of the film. To do this, the film is cut to a length greater than necessary, a block is wrapped in the excess and the film is secured to it. Now you have a piece of film with bars attached to its short sides. Leave one on one side, throw the second on the other. Now you don’t need to press the film to the ground with stones: the block holds it well. It is also convenient to open the greenhouse for ventilation; wrap the film and place it on top.

You can use small nails to attach the film, but place washers under the caps. It is faster to work with a construction stapler with staples. To prevent the film from tearing at the attachment points, it is padded with something. You can use thick braid or just a strip of fabric, and hammer fasteners into it.

More powerful option
If there is a need to make a greenhouse with PVC arches more reliable, wooden posts are nailed to the board base in the center of the short side. A board is attached to them on the edge, in which holes are pre-drilled with a diameter larger than the outer diameter of the pipes.

During installation, the pipe is threaded through the hole. You can fasten it on the sides as suggested above, or you can do it another way: first install pins in the bars and put the pipe on them.

The simplest greenhouse
The good thing about PVC pipes is that they are easy to bend. Also because they weigh little. An ideal option for a lightweight, portable greenhouse, especially if combined with spunbond. This material can be sewn. Take a piece with a density of 30 kg/m2 and make drawstrings in it in increments of 50-60 cm. For the drawstring, stitch across a strip of the same material about 10 cm wide (it is stitched on both sides). Insert pipes cut into the required lengths inside.

Now all this can be installed on the bed: stick pegs in two rows on one side and the other of the bed, and place a pipe on them. You immediately get a ready-made greenhouse. And what’s more convenient: you open and close the plants simply by collecting or straightening the spunbond on the arc. This is a very convenient temporary greenhouse: as soon as it is not needed, it can be removed and folded in a couple of minutes.

Greenhouse - it couldn't be simpler
This greenhouse is good for seedlings, but you can make it for peppers and eggplants. A stand is nailed in the middle of the base. There are two inclined boards attached to it. The cross section results in a triangle. If you need a long greenhouse, the same structure is installed approximately every meter. All tops are connected with a long bar or pipe. This greenhouse has a simple and convenient design.
Cucumbers are grown with it only until they begin to curl. Under the cucumbers, the covering material is removed, posts are nailed (screwed) to the sides, and twine is pulled between them.


Greenhouse “Breadbox” and “Butterfly” - photo
This design is called a “bread box” because it looks exactly like a plastic bread container. Its lid also rises up, hiding behind the second half. If you look at the photo, you will understand everything.

There are two types of such products: opening on one or both sides. If it is shallow, you can work with a lid that opens on one side. If the width is more than a meter, it will be easier to work if there is access from both sides. This design with two opening sides has its own name: “Snail”.
A film or spunbond is stretched over the manufactured frame, but polycarbonate is more popular for this design.
The second design differs in the type of door opening. Its vault is also made on arches, but opens on hinges upward (see picture).

They can be installed directly on the ground or on a prepared foundation made of bricks or timber. In some cases, the lids do not open immediately from the ground, but there is a small side of 15-20 cm.
From scrap materials
Turning unnecessary things into useful products - our people have no equal in this. They make greenhouses from things you would never even think of.
For example, you can easily make a greenhouse with your own hands from old window frames. When replacing windows, do not rush to throw them away. They can be used to make an excellent greenhouse. Moreover, the designs may be different. The simplest is a body made of boards, to which a window frame (with glass, of course) is attached on top as a lid.

To ensure that the plants receive maximum light, one side of the frame is made higher (which faces south or east). There are different frames, any of them can be used for these purposes. As proof, here is a photo gallery of greenhouses made from frames that were made with their own hands by zealous owners.
They make greenhouses out of barrels. Cover with an old umbrella made of transparent film or cut-off plastic water cans.


A homemade greenhouse can be made from a plastic or foam box. Although “do” is a strong word. All you need to do is stretch the film.


Mini-greenhouses for seedlings
For those who grow seedlings for their own vegetable garden or flower garden, large volumes are useless. We need small greenhouses. Moreover, many grow seedlings on balconies. All of the above designs can be used for a balcony in reduced sizes. For very small plantings, you can even take plastic egg trays. On one side there will be a container for soil and a lid instead of a shelter. Look at the photos for other ideas.
 The use of plastic bottles is already common, only the shape is non-standard. The bottle is only cut and a glass with seedlings is inserted inside, or you can plant it directly in the lower part... And this is a portable mini-greenhouse for plants
You can assemble a greenhouse with your own hands in a few hours. There is no need to build any complex structures. Everything is very simple, economical and practical.
There are several reasons why film is used to cover a greenhouse. Let's highlight the most significant:
- material very light Accordingly, the process of installation and installation of the structure is greatly simplified;
- such a greenhouse is good allows air to pass through And sunlight, providing optimal conditions for growing plants;
- the film has light weight, but is characterized by high wear resistance and reliability.
Among cons I can name only one, but it is very significant - the film is afraid of cuts.
 It is worth highlighting in a separate category covering nonwovens. They are increasingly used for arranging greenhouses and greenhouses. There is a wide range of products on the market; you can choose, for example, spunbond, agrompan, agrotex and others.
Distinctive advantages nonwoven materials:
- they transmit UV rays and moisture well, but are characterized by the presence of a stabilizer, which completely eliminates the harmful effects of sunlight on grown plants;
- non-woven materials guarantee the maintenance of an optimal microclimate because they do not absorb excess moisture. The soil also does not dry out;
- the greenhouse itself heats up quickly and cools down slowly;
- Caring for such a surface is as simple as possible.
Gardeners often wonder: is it possible to use ordinary cling film as a covering material for a greenhouse? The answer will be clear: No. The fact is that these products are made from high-density polyethylene. Due to this, it does not have high strength.
Choosing material for the frame
The frame is of key importance in the structure of the greenhouse, since it provides it sustainability in relation to strong gusts of wind and temperature changes. That is why the frame, first of all, must be reliable.

Agrofibre for greenhouses and other covering materials
In addition to film, a number of other materials can be used to cover a greenhouse. In particular:
- glass. It insulates the room well and allows light to pass through. But each sheet of glass weighs a lot, which requires a reinforced frame. The material itself is very fragile;
- agrofibre. Synthetic fabric with properties similar to non-woven fabric. Available in an incredibly wide range. Its most famous varieties are agrospan, agrotex, spanbnot, agril, as well as pegasus-agro, lutrasil and others;
- cellular polycarbonate. It is characterized by high translucency and thermal insulation. The strength of the sheets is enough to withstand heavy hail, gusts of wind, and snowfall. The material is light and flexible, so it is often used to create arched structures.
Methods of attaching the film to the frame
Several methods can be distinguished:
- strip nailed at the ends. Non-reinforced film often breaks on nails due to strong gusts of wind. And this method allows you to avoid unpleasant consequences: the material is attached only to the ends of the structure;
- lath. It involves using wooden slats, screws or nails to secure the film. Packing tape is also suitable: you can secure it with staples;
Note! This option is only suitable for wooden frames!
- clips, clamps. Sold at any hardware store. Significantly simplifies the procedure, and is also inexpensive;
- eyelets and elastic cord. The fixation system involves snapping the PVC into the profile together with the film (on the side walls, roofs, ends of the structure).
Note! Suitable only for strong film, preferably with the addition of a cuff.
- rope, tourniquet, elastic cord. The main condition that must be adhered to is to tie the greenhouse in the form of a Z, that is, diagonally between two parallel cords;
- net. First of all, the greenhouse is covered with film, then with mesh. The latter is tied to the body.
Film Bonding Methods
 All methods of film gluing can be divided into hot And cold.
Hot. You need to prepare a soldering iron (or iron) and fluoroplastic tape.
- We place the film sheets on top of each other. The overlap width should be 1-2 cm;
- Using an iron or soldering iron tip, slowly pass it over the surface through fluoroplastic tape.
Most likely, it won’t work out right away, so it’s better to practice first.
There is another method that involves using blowtorch and wide strips of metal(5-10 cm).
- We place two sheets of film between a flat surface and strips of metal so that an overlap of 1-1.5 cm is obtained;
- Using a blowtorch, heat the joint.
Note! It is important not to overheat the metal, otherwise the film underneath will simply melt!
Cold. They assume the use of various adhesives, such as BF-4, BF-2, "Moment". Before starting work, the areas of intended gluing on the surface of the film are processed chromic anhydride(a 25% solution is suitable).
If you use polyamide film, glue will do PC5. But after gluing, the seam will need to be additionally ironed with a heated iron (approximately up to 50-60C).
You can also use special superglue for gluing plastic film. In this case, the seam will be not only strong, but also even.
Note! Hot melt adhesive is not suitable for gluing seams!
Preparatory stages
Not only its effectiveness, but also the qualitative and quantitative characteristics of the crop directly depend on the choice and compliance with installation rules.
You can choose one of the types of structures, based on the tasks assigned to you:

- according to the period of use - spring-summer and;
- by type of construction - hangar, block and tunnel;
- by construction method - rack, hydroponic or ground;
- by purpose - seedlings and;
- by type of coating used - polymer, glass or film;
- according to the material from which the frame is made - wooden, aluminum, plastic, galvanized.
After you decide on the type of structure, you need to choose the most suitable place for its installation, focusing on to the cardinal points. In this regard, there are two main positions:
- latitudinal: the sides of the structure are oriented in the north and south, the facades are oriented in the east and west;
- meridional: the side slopes face west and east, while the greenhouse facades face north and south.
To install the greenhouse it must be sunny. Ideally, choose an area where the snow cover melts earlier.
The area allocated for the construction must be carefully prepared:
- it needs to be cleared of debris;
- check that there are no holes in the ground;
- the surface must be flat: the presence of a slope will inevitably lead to distortion of the structure.
If it is not possible to find a completely flat area, a foundation for the greenhouse must be laid. You can use various materials: timber, blocks, concrete.
Step-by-step instructions for installing a greenhouse under film
Step 1
We carefully prepare the area allocated for construction. Compact the soil well. We strengthen the box of boards in the corners with reinforcement. 
Step 2
We fix several reinforcement rods along the perimeter of the foundation. It is important that they are at an equal distance from each other. A structure with an area of 3x6 m will require about 35 rods.
We dig the rods into the ground to a depth of half a meter and carefully strengthen them.
Please note: the height of the rods must be at least 0.6 m above the ground.
Step 3
After the rods are strengthened, you need to put PVC pipes on them (cut in advance). This will allow you to connect the reinforcing bars located opposite each other. 
Step 4
Using a screwdriver, we fix the PVC pipes with metal loops.
Step 5
We carry out additional strengthening of the structure using timber (a section of 50 x 50 mm is ideal) 
Step 6
We strengthen the corners of the structure with timber. This will significantly increase its reliability. 
Step 7
We connect several PVC pipes together. It is important that their total length is equal to the length of the greenhouse. The next step is to fix the long pipe to the transverse ones. 
Step 8
Cover the finished structure with film. You can use any of the methods described in this article (section “Methods of attaching film to the greenhouse frame”) 
Step 9
We cover the front and back parts of the frame with film.
In the place intended for the doorway, the film is adjusted inside.

Step 10
- We take measurements of the doorway;
- We knock down the beam, according to the data received;
- We fix the film and trim off its excess;
- We fix the door to the greenhouse frame using metal hinges;
- We install the windows in the same way.

Conclusion
If desired, you can build such a greenhouse in a couple of days. This is a summer option that does not require heating or special care. At the same time, your costs for purchasing materials will be minimal.
Useful video
How easy it is to build a greenhouse under the film with your own hands, see the video below:
If you find an error, please highlight a piece of text and click Ctrl+Enter.