DIY ceiling tile stands for kindergarten. Master class “Ceiling tile stand” for the city methodological association of educators. Making various crafts
If your child goes to kindergarten, or if you yourself go there as an employee of the teaching staff, then sooner or later you will definitely be faced with the problem of creating stands for kindergarten. The thing is that most kindergartens simply cannot afford ready-made stands. So parents and educators, led by the head of the preschool educational institution, have to somehow solve this problem on their own or at their own expense. And, let us note, many are very successful in this matter! And they find a completely predictable solution, namely, they make stands for the kindergarten with their own hands. How? And this is what we are about to find out.
Where to begin?
In fact, coping with this problem through the joint efforts of parents, children and educators is quite simple. The main thing is to generate ideas. However, our teachers, who work with almost sheer enthusiasm, have no problems with this. What kind of stands might a kindergarten need? These are informational or thematic stands. Information stands are intended primarily for parents, and thematic ones for children.
Information about the daily routine, menu, announcements and news is posted at the stands for parents. Stands for children are used as visual teaching materials. They help in the training and development of kindergarten students, and also play an important role in interior design. Therefore, depending on the purpose, stands can be made from different materials. And, of course, you need to start with the search for materials and the further implementation of the generated ideas.

Information stands
It turns out that information stands are much easier to make than thematic ones. The choice here is limited. What stands can be offered to parents for familiarization? “For you, parents”, “Menu”, “Our birthday people”, “Class schedule”, “Daily routine”, “Announcements” and some other standard information stands for kindergartens.
If the kindergarten is not able to purchase ready-made stands, then you can make them yourself. To do this, use any flat surface, starting from a wall and ending with panels made of chipboard or plywood. In addition, you will also need wallpaper or self-adhesive film, overhead letters cut out of cardboard or colored paper, and patch pockets made of transparent hard or soft materials. These can be shopping pockets industrial production, homemade pockets from the same plexiglass or pockets made from a frame frame with a transparent film stretched over it.
In the end, you can use ordinary colored holders on needles (for wooden stands) or on magnets (for metal boards). In this case, it is quite possible to do without pockets by attaching sheets of information directly to the stand. You can do without pockets by also making frames from polymer building molding or ceiling plinths. Such frames (like letters or pockets) are attached to stands using double-sided tape and can always be easily replaced or moved to another location.
And as decor, you can use drawings cut out from wallpaper (with children's prints), decoretto film (decorative wall stickers) with thematic images, and printouts of drawings downloaded from the Internet or made in Photoshop. You can also decorate stands with available materials: braid or ribbons, appliqués, collages. However, this already depends on the individual abilities of parents and educators.

Thematic stands
Thematic stands are almost no different from information stands in terms of manufacturing technology. But there are much more possibilities for their design! The thematic stand is based on a shield, which should be durable, but light, since it will probably have to be moved when used for classes. Such a base can be a sheet of plywood or chipboard, plexiglass or ordinary ceiling tiles. Last option not the simplest, but the cheapest. The tiles are firmly glued together to form a shield the right size, and then this shield is covered with wallpaper or self-adhesive film.
You can use almost any materials that are safe for children to decorate your stands. These can be drawings, printouts, applications, fabrics, and natural material(shells, cones, straws, etc.). For example, for an astronomical stand, you can use black glossy self-adhesive and dark blue or silver embossed wallpaper. The sun and planets can also be cut out of paper, textured wallpaper or the same ceiling tiles, cover by acrylic paints or gouache or covered with multi-colored self-adhesive film. The orbits of the planets on such a stand can be laid out using colored cords or yarn, and the same mittens or sunglasses will generally come in handy for the “Seasons” stand.
But the stand "My Motherland" will not require special efforts from educators and parents in the design. For example, in the center of the stand, you can place a map of the country, which is easy to buy in a bookstore or print on a color printer. The image of the coat of arms can also be printed. The words of the national anthem can also be printed or typed from overhead letters. And the highlight of such a stand will be the flag - a real canvas of the flag, made of real fabric.
The Time of Day stand can be made interactive with a real clock face and moving hands. For the “Learning to count” stand, you can use a metal shield, decoretto film and ordinary fridge magnets in the form of animals, which will be used instead of numbers when teaching counting. These magnets can also be made from salt dough or plastic.
In short, there are so many dreamers, so many fantasies! By the way, children turn out to be very useful assistants not only in the manufacturing process, but also at the stage of generating ideas. So don't neglect their help. After all, all this is done, first of all, for them, and children's eyes, which see the world in a completely different way than adults, will look at these stands.
Placing information corners is one of the important requirements in kindergarten. There should be information for parents about the daily routine, thematic and educational materials. Buying ready-made boards is not cheap. All that remains is to use your creativity.
What material should I use to quickly and inexpensively decorate a room? Ceiling tiles – the best option. The most necessary thing is a little effort, creative thought, and time. The result will not be long in coming.
Three in one: inexpensive, fast and effective
A do-it-yourself tile stand is the optimal solution for preschool educational institutions and schools, as it is characterized by many advantages:
- low cost;
- ease;
- ease of processing;
- speed of production;
- availability of necessary materials;
- different design options.
Foam products can be processed in any way, so the originality of the stand is the main feature of the information corner. To do it yourself, you need to stock up necessary tools, materials, imagination, and the resulting result will surprise you with its brightness, colorfulness, highlighting the group in kindergarten.
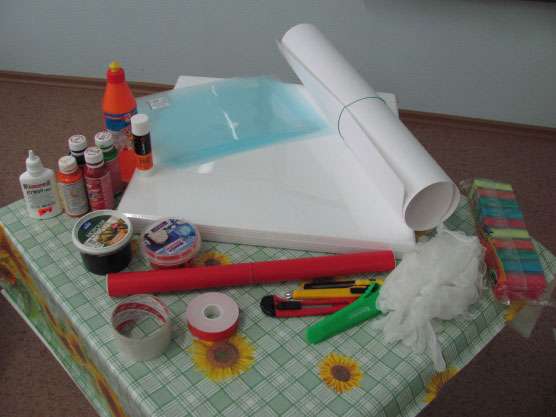
Necessary materials
To make your own kindergarten stands from ceiling tiles, you need to visit hardware store. To create, you will need several tools and some materials:
- stationery knife;
- scissors;
- two types of adhesive tape: painting and stationery;
- double-sided adhesive tape;
- PVA glue;
- colors;
- acrylic paint;
- brushes, sponges, gloves;
- decorative means.
The design of the layout is limited by imagination, and with a few efforts the information corner will be ready.
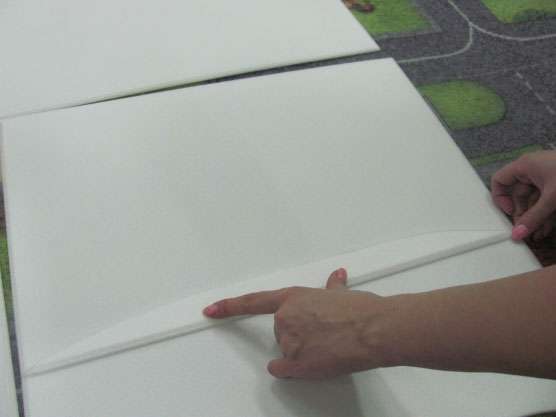
How to make stands from ceiling tiles
Easiest to do. The first step is to develop a layout and design. To make the task easier, you can use computer graphics editors. After this, the required number of tiles are fastened together, and the surface is given the desired shape.
When the background is dry, additional details are made. Windows are created using folders or files, double-sided tape, adhesive tape or ceiling plinth. Subtitles can be cut out of tiles according to a template or paper letters can be attached, previously covered with tape to increase their service life. Pictures, figures and other objects serve as decorative elements. Everything should be placed in the designated places and glued.
To make a themed stand, you need to create a base from polystyrene foam and give it the desired shape. The main thing: do not forget to fasten the parts of the tile on the back side. Using paint and color, a background is created. The header can be made from polystyrene foam, paper, cardboard, painted with the desired colors and glued. The surface is decorated with decorative elements: pictures, butterflies, letters, patterns. If necessary, windows are made.
Expanded polystyrene tile stand:
- an easy way to save money
- decorate the interior of a kindergarten group
- create an effective didactic tool
For production you will need:
- some time
- efforts
- fantasy
- children's help
- parents
- educators
Thanks to the available materials, creating an information corner will not be difficult, and the simplicity of the methods and minimal costs will save parents’ resources and budget.
An example of making a stand in pictures step by step


Larisa Zubareva
After the renovation, our group had to be registered again. What should we use to decorate the information and parent corners? Of course, there is a huge selection of materials from which you can brightly and colorfully decorate the room. There were many ideas. But, as always, we have the question of finances. And I opted for a rather simple option - ceiling tiles. It is affordable, easy and simple to work with, paints well, cuts well, is light in weight and the result is excellent mobiles. For decoration purposes, you can attach it to any wall.
I bring to your attention my works from ceiling tiles. Stands and panels. They are quite easy and simple to make, with just a little imagination and creativity. I painted the work with façade paint with added color. The paint goes on very smoothly without streaks.
This panel decorates the central wall of the group

Health Corner


Stand That's How We Live


Who didn’t enjoy making paper crafts as a child, especially if your parents were present with you?
They cut out snowflakes, folded cockerels and boats - a special chic. Back then they didn’t know that this creativity was called origami. It would seem that everything is clear in the name: ceiling tiles - put them on top. But no!
Composition of tiles suitable for crafts
Who, after renovation, did not collect the remains of tiles, baseboards, their pieces and trimmings, glue? And it’s a pity to throw it away - what if it comes in handy, but suddenly it may never come. Perhaps our instructions will allow you to take a fresh look at the used material, and your children will enjoy communication and joint creativity with you on New Year's Eve.
For clarity, we offer several photos showing handmade crafts:
It is necessary that children's crafts hang on the Christmas tree in the most visible place, because the main thing is not the price of the toys, but the importance of joint production.
- cuts well with a knife or scissors, paints and glues well;
- Household packaging foam allows you to produce voluminous crafts and various gizmos;
- Combine tiles of different thicknesses in your crafts.
Making various crafts
Let's start with simple crafts, like in mathematics - from simple to complex.

Christmas tree pendants
Coming New Year, preparing Christmas tree pendants or toys:
- Trace the outline of a heart, bell, tulip, star or snowflake with a pencil, and use a paper knife or just scissors to cut out your outline sketches;
- They should be fairly simple. Consider attaching crafts. As an option, loops of thread will be glued to the toy with glue, or holes will be made in the crafts and threads will be pulled through them;
- Help young children cut out pictures. Do not make complex figures, so as not to discourage either yourself or your children;
- , from which the blanks are prepared, let it lie in wait;
- From simple colored paper, various candy foils, sparkles, rhinestones, beads, we will prepare a whole heap of decorations for our drawings;
- We attach and decorate tile crafts with PVA glue: cutouts from colored paper, sparkles, rhinestones, beads;
- You can sit and paint everything. It is preferable to use gouache, tempera, felt-tip pens or artistic oil paints. If you have time to dry them, oil paints take a long time to dry;
- Pencils, even the softest ones, do not draw, but press through the material of the blanks; it is not advisable to paint with them;
- For the Christmas tree, of course, it is better to prepare figures of Father Frost, Snow Maiden and snowflakes. They are distributed either one at a time in different places, or garlands are prepared from them.
Attention: To avoid melting of the foam, the paint composition should not contain acetone or other active substances.
Volumetric Christmas tree

Volumetric herringbone made of ceiling tiles – original idea and it’s very easy to prepare:
- You only need 10 pieces or more of foam, and a circle is drawn on each. The principle of the nesting doll is from a large circle to a small one. A large circle is the base, a small circle is the top, and inside there is a pyramid made of circles of different circumferences;
- We cut teeth on each contour of the circle, imitating branches with needles;
- A fairly stiff wire or a thin metal rod is taken onto the tree rod, a baked electrode can be used, and one end is inserted into the stand;
- The mugs are painted green and strung onto a rod from below.
Valentines
Have you tried making your own Valentine's Day cards and surprising your loved ones? Everything starts for the first time - so let's try to experiment.

- The Valentine card is cut out in the shape of hearts, painted as desired, backed with paper, glitter, foil, decorated, and smeared with transparent glue. Manicure glitter is poured onto these artistic spots of glue, ribbons and butterflies are glued;
- You can make a postcard in the form of a book. Two identical square or rectangular polystyrene foam plates go on it; the edges are fastened with a paper strip glued to both halves;
- Letters and numbers for teaching reading and counting to small children are cut out from ceiling tiles;
- Various parts to collect educational toys and build entire cities with cars, trees, flowers;
- Various details are glued onto a large sheet of cardboard, and a picture of the city, a swamp with reeds and frogs is created, Vasnetsov’s paintings are recreated, and warning signs about danger on the roads are made.

Volumetric paintings

Cut-out paintings made from the remains of foam tiles can be compared to wood carvings - and this aerobatics. A sharp stationery knife is used to remove all excess and leave a drawing previously applied with a felt-tip pen to the tile, or pressed from paper with a sharp pencil;
The reverse side is either covered with colored paper and the drawing is hung on the wall on a loop, or a stand or leg is prepared for it.
Attention: The walls of schools, gymnasiums, and lyceums are decorated with such crafts.
House models
From the leftovers you can make houses of various sizes and complexity with your own hands. All parts of the house are made separately: walls, roof, doors, windows and much more.
- They cut out interior items, furniture and household appliances from tiles.
- Using scraps of fabric, imitation curtains, upholstery and other home textiles are made.
- All parts are painted and glued with transparent glue. The process is quite labor-intensive, but very exciting.
You can create copies of architectural monuments or simply beautiful buildings. The cost of raw materials is quite insignificant, and the result is impressive.
flying models
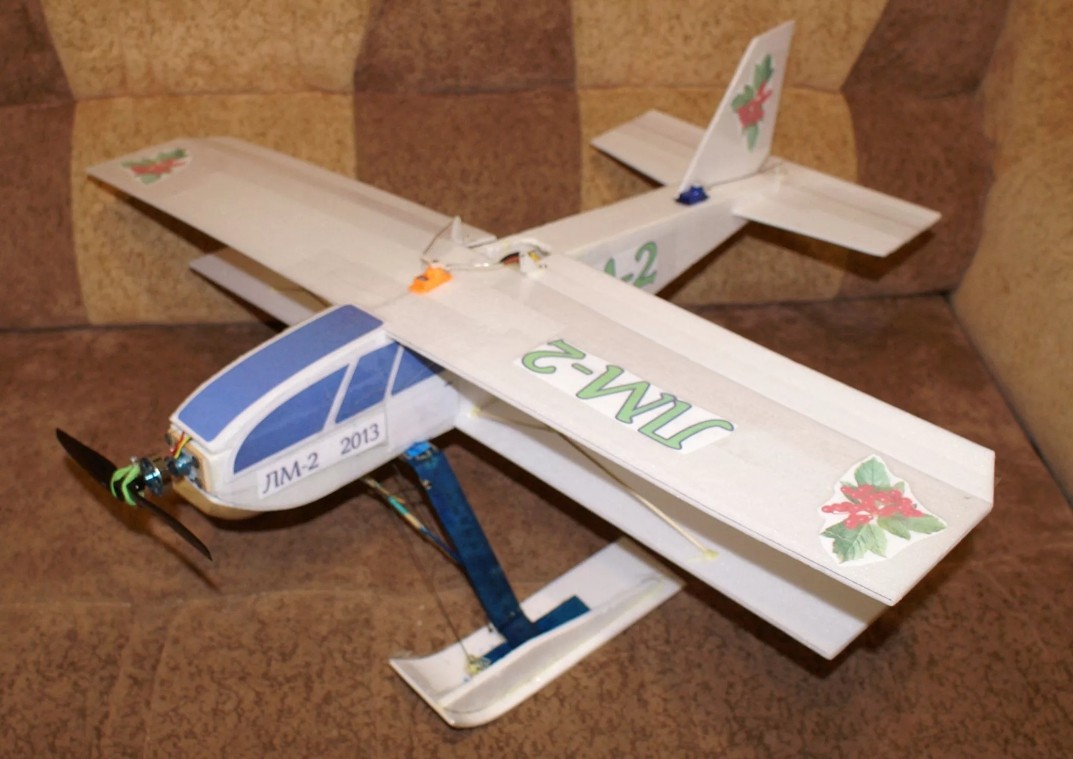
Many exemplary dads, who not only love to launch airplanes themselves, but also prepare flying models with their children and enjoy their flights, make crafts from foam plastic.
They are more reliable than a kite, and watching them fly is much more interesting. A glider made from ceiling tiles turns out to be very light, maneuverable, well controlled, and rests on air flow and flies for a long time.
To make it, you need to prepare:
- Ordinary, without relief pattern tiles;
- PVA glue;
- Reiki 4x4 from pine;
- Buttons, clothespins;
- Pins or needles;
- Templates, pens, markers;
- Stationery knife, small skin on a bar, plasticine.

Responsible work requires a scientific approach. It is necessary to make a drawing and make airframe templates:
- A printout of the drawing is pasted onto the cardboard, the template is applied to the tile, with buttons you need to attach and trace the wing, stabilizer and keel;
- Remove the templates, then use a medical scalpel or a stationery knife, allowing 1-2 mm, to cut out the blanks;
Attention: Do not touch the lines of the blanks, remember about the allowances.
- We begin processing the workpieces, having previously marked the boundary lines;
- A profile is given to the stabilizers and the wing using a sanding block, back and forth translational movements;
- Try not to spoil the part, process with smooth movements. The profile can also be given with a heated iron, but this requires skills;
- Got the details the desired shape? Start gluing with PVA glue.
Warning: Do not use moment glue, which will turn the plane into an amorphous substance similar to porridge.
- A rail of 18-25 centimeters on both sides is smeared with glue and placed for 5 minutes to saturate the wood;
- The stabilizer and wing are coated along the center line with glue, fastening is done with clothespins, the keel is attached to the wing with pins along the same center line;
- After 5-8 hours, the structure dries, settles, and you can begin setting up the model;
- The glider is launched from the hand, and its flying properties are visually determined;
Tip: Your glider goes up sharply - place a piece of plasticine on the nose. It dives - sculpt plasticine onto the tail or bend the stabilizer a little, which will balance the structure.
Now you know what else, besides cladding, ceiling tiles are suitable for. Of course, this is only a small part of what can be invented and made. Try inviting your children to come up with their own crafts, and you will be surprised by their imaginations and desires.