The peeling of the feather of the rooster of clay. Cock of plasticine. Necessary materials and tools
The new 2017 is the year of the red (fiery) rooster, and its own figure or image will be the most sought-after graduate. Handwriters "Cross" have a kind tradition: to new Year holiday prepare thoroughly. And this year will not be an exception. Many of us will do or already make a rooster with their own hands, or even one, but several at once! After all, it is necessary to please the relatives and close to the needlework symbol of the year, and the fascinating process of creating this character itself in various techniques Hend Made.
Creating a kind of guide to master classes from the Internet is also the tradition of our needlework site, which was born a year ago. For you, dear masters, we picked up a lot of only the best master classes on the network. Enjoy watching, discuss and choose the most colorful rooster! And then sew / link / Draw / Tube / Glowing it. So, in what technique you can work on the eve of the New Year holiday?
If you do not have time to work - it does not matter. The article has links to craftsmen who sell ready-made work.
Petushki paper and paper
Making postcards together with kids
If you are not a professional cardmaker, then before proceeding to creating cards, be sure to read our article "Learning to make New Year's postcards with your own hands in Scrapbooking technique." In it, you will find not only many ideas, but also get acquainted with the basic rules for creating postcards.
You can put any cocks for any cockerel with your child. If the baby himself is difficult to think of how to draw a rooster with his own hands, then show him this step-by-step instruction:

And then, the case of technology. Cut the rootier and make the central part of the composition. For example, such a simple, but cute can be your postcard. In the paper, use the New Year's paper and bright red ribbon, add snowflakes, twigs and other festive attributes. When there is a basic idea, the process of creating a postcard becomes much easier!

Photos from the site http://itsapatchworklife.blogspot.ru
If the child loves to paint black and white pictures, give him such an opportunity. Print the postcard template with a root on a dense cardboard and let the baby be accepted for work. Next, cutting the blank-ball, you can add a postcard with volumetric snowflakes, adhesive semi-grams imitating new Year's balls etc. And so on. Give your will with your baby fantasy))

You will come in handy
Another 8 templates for coloring, as well as 2 step-by-step instructions for drawing more realistic roosters you will find in the archive that can download quickly and free!
Take an idea with a loaf on a stick, as in Elena Yurchenko's postcard. Its cocks are cut out of felt, you can cut them out of paper.

Colored paper roosters
Colored paper appliqué can also be placed on a greeting card. But this applique and itself can act as a postcard. To draw and carefully cut all the details, the children will need help parents, but they will be able to glue themselves.

Funny Petushkov from Paper offers to make OLGA-15 in their master class.
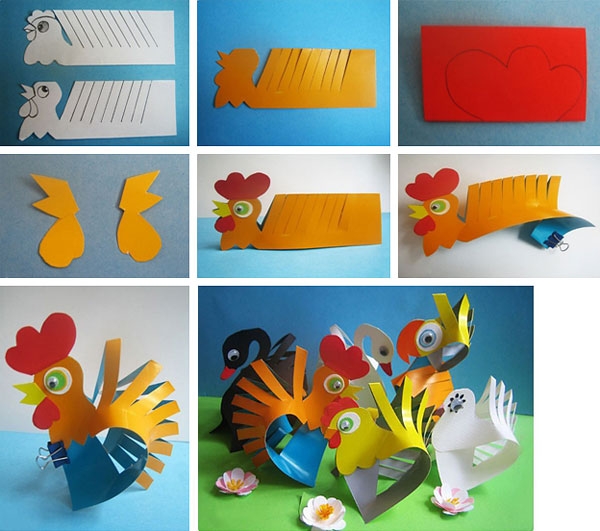
The billet of the rooster is a rectangular sheet of flexible paper or fine cardboard, folded in half down. Its size is 13.5 × 10 cm. By the fold line, we make 7-10 inclined slots (approximately 1 cm). The angle of their inclination is 50-70 degrees, and the depth - ¾ of the height of the folded sheet.
Ekaterina Ivanova in his video lesson shows how to make a red rooster in Origami technique:
Roosters in a quilling technique
A very busy idea is to lay out of paper for queen only a luxurious roasty tail. It's not so freezing how to upload a whole cockerel, and it can be very impressive! Here you are as the basis of a rooster without a tail (as he looked in the original, see the photo below).

Print it on a color printer, and fantasize the tail later. As an example, one such work (though the tail here is modest, but you will try, right?))

And if you do not be afar to make a whole rooster in a quilling technique, you can take this finished postcard as a basis:

Or this template:

Cheat Sheet for the main elements of queen to help you:

Applique from buttons
But completely stunning handsome-roosters laid out from multicolored buttons, semi-graysin, insurance and beads! As a basis, you can take the contours of the roosters from our archive (link just above).


Knit roasts crochet
Many needlewomen with a crochet on "you" and will be happy to contact the cocks from multicolored threads. And the "Cross" will help to decide on the model and will offer several master classes according to this type of needlework.

Svetlana can also buy roosters knitted with knitting needles.


Roosters from fetra
The fastest and most difficult options for creating a symbol of 2017 are a rooster of felt. The material is easy to process, keeps the shape of the toy, does not require the processing of seams. On the contrary, manual seams in the face of the product give it a special color and charm.


Photos from https://madeheart.com


Photos from the site http://ktototam.ru/
A piece of rooster neatly carved from a thick felt will be a christmas toy, and a suspension.

Photos from the site http://ktototam.ru
And if you decorate the felt cocks with embroidery, flowers and other decorative elements, it turns out at all incredibly beautiful!

Photos from the site http://mmmcrafts.blogspot.ru

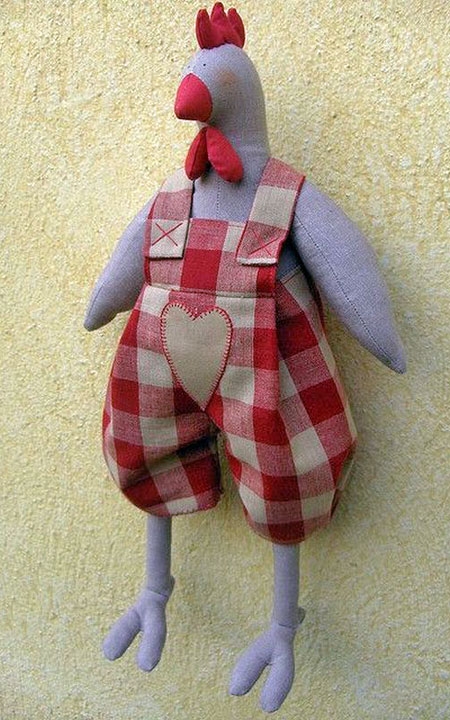
Tilda Roosters
Well, and how to do now in our life without a tilde-rooster? On the site ToySew master class on tailoring this popular toys.

Master Vetic in his blog placed patterns of the rooster and peas chiches based on the patterns of the tilde. An interesting couple will turn out if you make efforts and patience!

And for inspiration:

Cockerel Jurik from Orange Toys
Funny video video about his Tilde Petukhov removed Maria Fedorova (the link to the patterns is in the description of the video!):
Cochetic coffee toys
With tildes, compete with aromatic, or coffee, toys. There are roosters and in such a technique.

Coffee rooster can be like that:

Photos from http://zabavochka.com
You can easily sew it yourself, using one of the treated above. About all the intricacies of the creation of coffee toys "Cross" told in this master class.
If you think that you yourself can not cope with such work, contact the master. Yulia Charikova made enough branded toys with the smell of coffee and put them on sale at this address.

Interior Fur Toys
Oksana Svyzanskaya will show his vision of the rooster and shows how to sew it right on the finished patterns. Her rooster sews from artificial fur, but who will say that it does not happen or is it not good?)


In the workshop, everything for creativity (Dljatvorchestva) is a lot of blanks and for painting, and for decoupage. Choose and create!

Here is such beauty you can get:


If you do not want to make a souvenir in the form of a rooster, you can decorate any wooden surface with a rooster image. Here the space for creativity is simply unlimited !!! Here are just a few examples for inspiration:


Wallaries of wool roosters
Other masters of toys from wool are obtained like real! We admire and inspire! And if you really want to get one of these handsome people, look for them at the Fair of Masters (the link is on each photo).


Ethy gathered in one place a lot of different felted pegs and offered the MK to create one of them. Very nice it turns out!
Embroidered cross, beads and roosters
You may have more than other types of needlework love embroidery. Then you can put the symbol of the year on the pillowcase for the pillow, arrange it in the form of a panel, paintings in a frame or brook. The main thing is that you get the soul image of the rooster. And if you give your work, find out the preferences being beloved.
More than 50 different schemes for embroidery roosters and cocks you will find in a special album
It is not by chance that the modeling is considered one of the most exciting and healthy hobbies for the development of shallow motility. Via polymer clay You can cut off the whole world from your fantasies, in addition, with clay figures, you can perfectly play whole performances on the plots of your favorite books and cartoons, and you can invent fairy tales yourself, but for this you need enough clay heroes. In many works, such a hero was Cockerel Golden Grab. Children, of course, will love such a bright and colorful toy as a rooster of polymer clay, so start cooking the necessary materials And you can try to sculpt.
Perhaps you have never been sculpted from clay, and you may seem that this material is some sophisticated for a child or very dirty. Let your doubts. After all, clay - the material is very interesting, factory. If you or your child sometime sculpted from plasticine, then for you there will be no problem to work with clay. Working techniques with these materials are almost the same. Just take our advice to armared and everything will definitely work out!
What do you need for this?
To make a cocks from clay, to begin with, you may need to find a master class video tutorial that clearly shows the technique of making a clay figure. Finger over the appearance of the rooster from clay, or look for a suitable picture that will inspire you to create a new toy. After the end of the laying stage, the rooster figure is burned, and after the firing it is usually painted in different bright colors, for which acrylic paints or gouache come. You can also use ready-made color clay, which will significantly speed up the work process. The technician on the laying of the rooster of the polymer clay is enough, but we offer to learn the famous techniques of Dymkovsky and Filimonovsky toys. They will love you!
Lepim from the clay of the rooster in the Filimonian technique

Clay cock - Filimonovskaya machinery
How is a polymer clay rooster: consider the master class on the technique of Filimonovsky toys. For this technique, it is characteristic that the toys are obtained in the form of whistle, except for turks and roosters that should not whistle. Simple technique step-by-step instruction presented below:
- Divide a large piece of clay on three pieces, one is more - for the body, a slide of smaller is a stand, from the remaining clay, make small pieces of rooster - scallop, eyes, keyboard, beard.
- To make a body, roll carrots from a piece of clay clay. Its form will become the basis for the future rooster, try to be very neat with it.
- In the middle of your carrot from clay, it will be necessary to make a fold at an angle of 90 degrees. The narrow end of the shape is designed for the head, and the wide will be a lush tail. In working with clay, small cracks can sometimes appear, but it is not scary, they can easily be smelted with wet fingers.
- Squeeze the tail between the palms so that it becomes flat and large. Then to give the tail necessary formcan neatly cut up an excess knife.
- For fastening small parts with the base, you need a slip - very liquid clay, such as glue for modeling, it is made from a clay small bowl with water, which is stirred by a brush to get a slip.
- Make a small culnic cake and cut in half, that's ready to scallop. Send it with the help of a shrimp on the top of a cockerel.
- A small ball turns into a beard, which is attached to a rooster under the beak.
- The stand encloses the cone-shaped form. At the base, it is necessary to put a wooden sharp wand, so that with the help of simple movements, rolls the cavity inside the cone with the help of unacceptable movements.
- At the top of the cone slip, put a rooster.
- Wait for a complete clay drying at least 4-5 days, and then burn in the oven at high temperatures.
- Coloring clay acrylic paints or gouache (with pva glue)
The cock made of clay with your own hands on the technique of Filimonovsky toys is ready!
Cock cock - Dymkovskaya machinery
The second old technique modeling the rooster of clay is a Dymkovskaya toy. Want to be a master of making exclusive Dymkov toys? Such a thing will not be analogues in any house, because it is done in a single copy, and not serial production at the factory.

Clay cock from Dymkovsky masters
- First they make the basis of the cockerel.
- Then add details from the ridge, eye, beard.
- For further work you will need toilet paper, water and brush to salary the figure toilet paper In 5 layers.
- After the paper is finally dried, secure everything with PVA glue.
- Drain the rooster with paints using the samples of Dymkovsky toys as an example.
Now you also have a statuette of a rooster on the technique of the Dymkovsky toys. We wish inspiration to visit you more often, and you pleased with new toys close!
If you liked our site or got the information on this page Share it with friends and acquaintances - press one of the buttons of social networks at the bottom of the page or at the top, because among the piles of unnecessary garbage the Internet is quite difficult to find really interesting materials.
We will not have time to come to my senses, as the window is winter, and next and New Year. The symbol of the Future of 2017 will be a rooster, so why not make hands for friends with the image of a rooster. For example, a polymer clay magnet. This occupation will like even kids.
Necessary materials:
- Paper rooster pattern
- Polymer clay (prohibited),
- Working surface (sheet of paper, tile or glass),
- Blade or stationery knife,
- Rolling pin (or deodorant can),
- Tools (stacks),
- Polymer clay varnish
- Soft tassel
- Magnet accessories,
- Glue "Moment",
- Toothpick,
- Wet wipes

Polymer clay petula
Polymer clay before work it is necessary to spin well in the hands so that it becomes elastic and soft. During work, it is recommended to wipe your hands as much as possible with wet napkins, so as not to be staining the clay - it is very attracting any dirt.
1. Cut off the paper pattern of the rooster, do not forget about the wings (three different sizes). You can also separately cut the tail, torso and scallop so that it is easier to be easier during operation.

2. Prepare the basis for the magnet. Soften in the hands of a piece of polymer clay so that it becomes a pliable. For the basics you can use balances from previous works (weed plastic). Roll the clay into the layer with a thickness of 3-5 mm, the required size so that the template is completely placed. Carefully cut down the contour of the rooster figure.

3. Transfer for convenience the basis for a magnet to another sheet of paper or glass. From a piece of clay of the desired shade, roll the reservoir (2-3 mm thick) and cut the cock torso using a separate pattern. This item can be done with the color transition. The resulting workpiece attach to the base, gently shed fingers to remove all air bubbles that could form between layers.

4. With the help of a tool or toothpick (needles), make punctures to mimic the rooster.

5. From the polymer clay of an orange shade, make the beak and foot: cut out the neat parts and attach to the base. Tip: To obtain an orange shade, you need to mix 3 pieces of yellow clay with one piece of red (depending on the desired tone).

6. For scallop, a small piece of red polymer clay roll into a layer with a thickness of about 5 mm and cut out using a pattern.

7. Attach the obtained item to the base and speak well along the edges, trying to leave a slightly convex. Using stack (toothpicks) at the bottom, make shallow grooves for greater naturalness.

8. Reliable a rooster - make it an eye from a small black pea.

9. For the bottom of the tail, roll a piece of clay light (contrast) shade and attach to the base. Schedule well so that the layers are glued. This item is necessary for the greatest volume, as well as it will be viewed in some places.

10. From small pieces of polymer clay different shades, roll the sausages of various lengths and size. One edge is drowned, forming a long drop. Slip a little.

11. Alternately attach the obtained parts to the base. Toothpick or needle, give natural look by imitating feathers. It is worth noting that the texture needs to be applied alternately: first the bottom row of feathers, then the upper one. It is necessary in order to preserve the volume of the tail, and it did not look like a flat detail as a result.

12. The bottom of the wing is desirable to make a contrast color so that it does not merge with the body. Therefore, roll a light plastic in a small layer and cut the detail along the contour of a larger template. Attach to the base, imitating the opership at the edges.

13. In the same way, do with the rest of two details: the average should be dark. Complete the wing, imitating the toothpick of the leaf. Polymer clay rooster is ready for baking. While the detail is still "raw" can be tentate something. Bake in the oven at a temperature indicated on the packaging of polymer clay. Each manufacturer has time and temperature of the baking differ. For clay FIMO necessary temperature -110 -130 s and time - 30 minutes.
Tip: The oven after baking a polymer clay must be thoroughly rinsed with warm water with soap.

14. When the billet for the magnet will cool, you can glue with the "moment" adhesion (the basis for the magnet). For the brilliance and better maintenance of the magnet, cover the surface with a layer (or two) varnish for polymer clay. Leave in a ventilated room to complete lacquer drying.

15. Polymer clay rooster - 2017 symbol is ready to decorate your refrigerator.

16. Also Magnet handmade May be an excellent unique gift for friends.

Creative success!

It is customary to make a symbol, focusing on the instructions of the Eastern calendar. Coming 2017 year Consider year of PetushSo in this article we will talk about.
First, the rooster must necessarily be bright, secondly, for its manufacture you need to use only the techniques understandable to children and safe materials. For example, fabric or felt aircraft can be performed only by schoolchild children, since such work implies the use of a sewing needle, paper should also be cut into scissors, so this option does not suit children from kindergarten. There is another popular material -. It is bright and malleable, it is easily able to perform various geometric shapes from it and combined into a single product. Just from plasticine and you can loose cockerel to the new year 2017. The only nuance that parents and educators should remember - they must follow the kids so that children do not try externally appetizing pieces of taste.
How to blind a rooster of plasticine - craft to the new year 2017
In this lesson shows the modeling bright poultry From plasticine, all the necessary materials and stages of work are listed.
For the petula of the rooster, prepare:
- plastic tool from the plasticine collection;
- Plasticine bars - the brightest of the collection;
- additionally matches for stability.
How to make a New Year's Rooster
The rooster is customary to portray bright, multicolored, especially since the year is approaching fire birdTherefore, red, orange, yellow and green lumps are suitable for work.
The body of the body can be made green and spherical. This is a simple and understandable detail on which all other parts of the craft will be attached. Think some green plasticies and roll the ball.

Prepare a small orange ball for modeling the neck (about 4 times smaller than the original green blank).

Orange ball deposit to the circle board. Stack apply a slightly stack over the entire circumference.

Attach the orange neck to the main ball.

From above to the protruding tubercle, take another green ball, very small. This will be the head of the figure.

Put small points-eyes on the head, add the beak - orange, small, curved to the bottom.

Very important details, which will complete the appearance of a cockerel - this is a red beak and a beard. Make them of red plasticine.

Stick red blanks to the bird's head.

To make a lush tail, you can use one or more shades of plasticine. All used pars are suitable. Shot a few multicolored sausages (approximately the same length and thickness).

The tail must be lush, spread. Collect all the prepared sausages in the bouquet, glue the plasticine at the base. Ends sausage-feathers Bend back.

Stick the tail to the back of the body.

To make wings, you can use any plasticine, such as orange. Make flat cakes. First, the cakes can be a round form, but they should be pressed on one side, sharpen and pull out. Figure drawing is easily applied with a stack in the form of short notes.

Enclose 2 symmetrical wings on the sides.

To make a stable leg, you can prepare a single cone and separate fine sausages for your fingers.

Collect your fingers fan. Stick the paws to the bottom (acute) part of the cone. In the middle, draw a longitudinal line. For greater reliability and stability at this stage, you can still take advantage of the match.

Attach the legs to the bottom of the cockerel to complete the figure.

Symbol of 2017 - bright plasticine rooster Ready. This is great new Year's pallet. To decorate the interior of a plasticine product, you should definitely freeze it in the refrigerator.


See also phased master classes, how to make plasticine:


Did you like the product and want to order the same by the author? Write to us.
Another interesting:
Look also.
The new year is approaching and most people seek not just to decorate their home to acquire new Christmas toys, but also buy a figure-symbol of the coming 2017. Since the approaching New Year is the year of the fiery rooster, then I suggest just to blind a Christmas tree in the form of a cock with my own hands, and clay will serve as a material for the modeling. The modeling of different figures from clay is, quite a fascinating activity that does not require special costs, but will bring you a lot of positive emotions. And the New Year's toy is a cockerel from clay - made with her own hands will be much more interesting than purchased in the store. My small master class accompany step-by-step photosSo you will easily understand what and how to do.
To work, we will need:
- clay;
- jar with water;
- paints;
- tassels;
- a thread.
How to make a cock made of clay with your own hands
I note that you can make a toy from purchased, polymer clay. Also, clay can be mined himself, the ambulance somewhere near the house, if there is such an opportunity. If you choose the second (independent) option, then the clay will need to sift well or rinse, cleaning from plant residues and pebbles. Also, you can still buy chamotte clay in a construction store.
And so, we take a piece of peeled or chammed clay, moisturize it to the state of plasticity, if it is dry. Well smear to expel excess air and remove lumps.
After: I ride a ball, we make a deepening in it, so that the toy would be a hollow inside and was light. As a result, we get a hollow cone inside. Following the fingers, we begin to form the caller we derogate your head and beak, make the base for the tail.

We take two more small pieces of clay, make squeezes from them and cut the tail and scallop with a knife, we make a hole for the thread in the scallop. We make a knife on the head and on the crest.

Welcome water and glue into place.

I carry out the operation with the tail of the rooster.

After all parts of the cockerel are ready and glued into place, storm irregularities at the craft shoulder, wasting your fingers in the water. When your cockerel acquires smooth outlines to wait until he gets up. It will take no more than one day.
Now, you can crime to its coloring.

For this procedure, any paints will be suitable. We still need tassels, desirable, of different sizes. Well, at least two: small and medium.
Coloring the clay cock as you will tell fantasy. Of course, it is desirable, take bright colors. Cockerel is fiery. 😉 Paint on clay dries very quickly. So, after staining, insert the thread in the scallop and everything, the New Year's toy - the symbol of the year is ready.

The cockerel from clay can stand on the table, shelf or decorate the Christmas tree. The toy made with his own hands will always please the eye and never bounces. Besides that she will serve beautiful decoration Your New Year's Eve and will create a more sincere atmosphere in the house, it can be used as a gift for the new year. And he will probably like his friends and relatives. 🙂