Clock with coffee beans. Coffee clock. Master classes and many interesting ideas. Handmade kitchen clock
A kitchen clock is a necessary, useful and, in general, ordinary thing. Few people think about their design, because the main thing is that they show the time correctly, helping to control the process of preparing various dishes.
But try to make a wall clock for the kitchen with your own hands - and you will notice that the atmosphere in this room has subtly changed.
Of course, we are not talking about assembling and adjusting the clock mechanism yourself - you should use a ready-made one, bought in a store or removed from an old watch. But you can really get creative with the design of the dial.
Handmade kitchen clock
Many of us have some kind of hobby related to needlework. These skills can be used to make watches, even if you think it is impossible. In fact, watches can be knitted, embroidered, woven, drawn, etc.
Don't believe me? Look at the following photos.


As you can see, a little imagination and skill - and your kitchen will acquire a real designer item self made.
If you don’t know how to sew, embroider, or draw, you can come up with something else, no less interesting (see also the article about). You might like one of the ideas we suggested in this article or video.
Watches made from scrap materials
Look into the cabinets and drawers in your kitchen, and you are sure to find many unnecessary or worn-out items that can still serve in another capacity. For example, an old pot lid, the only plate left from a set, or a flour sieve can be an excellent base for a watch.
And here are the options for using them:
- Unscrew the handle from the old lid and you will have a watch case with a finished hole in the center. The lid can be spray painted, painted, or decorated with stickers. A watch mechanism with a battery is attached to the back of it, and hands are attached to the front part.

- The simplest and most original kitchen clock can be made from disposable tableware: plates and plastic cutlery. This idea is not new, but still interesting. Exactly the same as in the previous case, all you have to do is glue the clock mechanism to the back and install the hands.

Advice. Instead of a disposable plate, it is better to use a more rigid base - a lid from a mayonnaise bucket or a circle cut out of thick cardboard.
- If you need a fairly large art object, take a large tray of any shape, drill a hole in the middle and, using good glue, attach twelve coffee cups to it. Further instructions are similar to the previous ones.

These ideas should not be copied literally, but used only as hints. For example, instead of a lid, an excellent case for a watch could be a frying pan with a handle or an old vinyl record.
Coffee clock
Coffee beans are a favorite material for making various crafts among craftsmen.. They can also be used to decorate watches. They are especially appropriate in the kitchen, as they will not only show the time, but also exude a magical aroma.

It is not necessary to make a watch with your own hands; you can use existing ones, and just decorate them with coffee beans, sticking them directly on the dial or on the bezel of the case. Although you can come up with your own composition. Watch the master class to understand how to work with this material and what it can be combined with.
Advice. Instead of coffee, you can use any other grains, as well as pasta. If you paint them with spray paint, you can create an interesting ornament or a whole picture.
Decoupage
Today this method of decoration has found a second life, because it allows you to create truly unique things. Its essence is extremely simple: it is a regular applique, which is coated with varnish on top to protect the design.
Sometimes craquelure varnishes are used, creating small cracks on the surface and giving the effect of antiquity.

For kitchen clocks, you can use paper napkins with a pattern that matches the style and color. They are glued to the prepared base with PVA glue diluted with water. After drying, you can draw on the outlines, stick or write numbers, and then cover it all with acrylic varnish.
Wooden clock
If you enjoy working with wood and the style of your kitchen calls for this kind of decor, you have a huge opportunity.
- You can make a DIY kitchen wall clock from a thin cut of wood (see also the article about). It just needs to be sanded, varnished or stained and a hole drilled for attaching the hands.

- Remember the old cuckoo clocks that used to hang in almost every village house? Their likeness can be made from wooden planks and decorated with salt dough figures.

- Another interesting idea that your children or grandchildren will love. Cut a circle from thick plywood, and drill 12 thin holes at its end at equal intervals. We won’t remind you about the clock mechanism and hands - everything is as usual. But the role of time indicators should be played by lollipops inserted into pre-made holes. Just don’t remove the wrapper from them ahead of time.

Advice. Make a supply of lollipops to insert them in place of those that will constantly and mysteriously disappear.
Conclusion


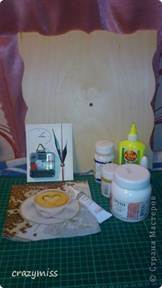
1. A glass blank of the desired size, I have 30 by 30 cm, with a hole in the center for the mechanism. Hole diameter 8mm.
2. A napkin with a matching coffee pattern.
3. Varnish for decoupage (acrylic on water based).
4. Acrylic paint (white, it would be nice to add a little yellow or brown to it to get a beige tint).
5. Black glass outline (gold, silver, bronze - for decoration).
6. Stained glass paint, I use Decola, the color is brown.
7. Brush, approximately No. 4, and a fan brush, also 4, PVA, multifora, rubber roller, alcohol or other degreasing liquid, cotton pads, toothpick.
8. Coffee beans.
9. Mechanism.
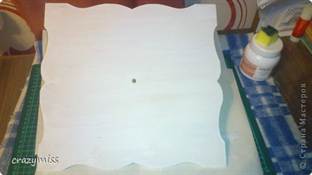
We take our glass and prepare it for work - we wipe the glass on both sides with a cotton pad soaked in a degreasing liquid. We divide the napkin into layers, take the layer with the pattern and tear it to the size of the glass so that it does not hang from the edges, otherwise it will be inconvenient to glue.


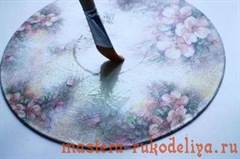
Place the napkin with the colored side facing away from you onto the glass. Take a fan brush and dip it in PVA. We first dilute the PVA 1 to 2 (1 part PVA and 2 parts water). We begin to gently moisten. Some recommend from
center, but I prefer to just do it from top to bottom, in parts, and smooth out the wrinkles that form along the way with wet hands. When the entire napkin is wet, straighten it well again, do not pull!!! It’s very easy to tear the napkin, put the wet multifruit on top and roll it with a roller. This will remove all unnecessary bubbles.


We look at the result and leave it to dry. After complete drying, coat the napkin with acrylic varnish. This must be done so that when applying paint, this same paint does not saturate the napkin and spoil the design. And if you don’t paint it with paint, the drawing will be too faded. Apply the varnish carefully, do not press on the brush, in a thin layer! After the varnish has dried, apply paint.


It is convenient to apply with a piece of sponge, “bump” the entire surface evenly and dry. If after drying it seems that there are gaps, then paint it a second time, just to be sure. I painted the second layer with gold paint.


Actually, we dry it again and varnish it again to strengthen and protect our work. After complete drying, preferably the next day, we begin to design the front part of our watch. Using a contour on the glass, we draw a border, up to which we fill it with grains. In principle, it is possible without a contour, the paint I use does not flow much, but I like it better with a contour.


Let the outline dry for 10-20 minutes and begin filling it with stained glass paint in small sections. If you pour a large piece at once, the paint will simply have time to dry while we are laying the grains. So it's better to do it little by little. We place the grains in random order, moving them towards each other with a toothpick so that they fit more tightly.


When all the desired space has been filled in this way, leave it to dry. In an hour everything will be fine. If there are outlines of other colors, you can outline the details of the picture and highlight them. We do not coat coffee beans with varnish! Then they look more natural and you can smell the aroma! The varnish will ruin everything, kill the smell and give an artificial shine.
We make the dial from improvised materials. You can simply put bold dots as an outline, or glue the grains to
ofe (you can paint them acrylic paint in any color and varnish), in this watch the numbers and other divisions are made of baked plastic from FIMO.

You can glue it to anything, for example a crystal (I have a special glue for creativity). You can also use glass half-beads marbles. All that remains is to insert the mechanism, set all the hands to 12 o'clock and bring it to the desired time. Insert the battery and the watch is ready!
I want to say that in the absence of glass, a watch can be made on anything. On a piece of plywood, on a vinyl record... They will look a little different, but still unusual and will delight you and your loved ones. If you have nothing at all, then buy an inexpensive one. cutting board, drill a hole for the mechanism and decorate! The unnecessary hole that is initially in such a board will be covered with a napkin and coffee. I will describe the principle of working with plywood or plate in a nutshell. First we prime the surface with a primer. Then we cover it with white acrylic paint (you can use car paint in cans). We glue a napkin onto the dry surface, only in this case with the bright side facing you. We also straighten it and cover it with varnish. We apply stained glass paint and coffee. You can also outline the drawing. We dry it, insert the mechanism and that’s it!!! We kindly ask, if you make watches using this MK, post the result in my forum, in the topic about watches. If you have any questions, ask them there! Happy creativity!
Wall clocks are not only necessary thing, but also stylish. Original and fashionable watches can radically change the mood of the interior and add zest. A wrist watch capable of subtly and elegantly confirming the status of their wearer. However, watches are now very expensive; in the modern market it is very difficult to find both high-quality, stylish watches at an affordable price. This master class “Do it yourself watches” will definitely be useful to lovers of needlework who want to learn how to make such an accessory themselves.
Wall coffee clock
How to make a wall clock with your own hands? These coffee clocks are quite easy to make, so they are suitable for beginner craftswomen.
The following materials will be useful for work:
- watch base preparation;
- clockwork;
- napkin with a coffee theme;
- coffee beans;
- priming;
- water-based varnish for decoupage;
- colored acrylic;
- contour on glass made of gold, silver and bronze;
- stained glass paint;
- sponge, brushes, paint rollers;
- paper file;
- toothpick;
- PVA glue.
First you need to prime the surface of the workpiece.
Paint one side with white paint, the other with brown.

Apply PVA glue diluted in a 1:2 ratio with water onto a dry surface. Wet the napkin and glue it on top. Cover with glue again. Attach a wet stationery file and roll it on top with a roller. This is necessary to ensure that there are no air bubbles on the surface. Then leave until completely dry. Then varnish.

Draw a contour to fill with coffee beans.

After waiting 10-20 minutes, you can start decorating with grains. To do this, cover a small piece with stained glass paint and carefully place the coffee on it in random order, moving it towards each other with a toothpick.


In an hour the paint will dry and everything will stick.
The dial can also be drawn with an outline, using special drawings or laying out coffee beans.


The table clock made from coffee beans is ready! This product can be hung in the kitchen.
Style from the record
In order to make such a clock from a record using the decoupage technique, you need:
— Find an unwanted vinyl record and remove the label in the middle. It is better to choose a plate with a white center rather than a red one, since white is better painted over with acrylic paint.

— Take a working clock mechanism.

— Prime the plate from a spray can. Dry.

- Paint the background with a sponge. The example shows golden acrylic. Wait for it to dry.

— Cut out elements for decoration from the decoupage card. Glue it. Then apply another layer of PVA. Use your fingers or a brush to remove any air bubbles from under the card. Dry with a hairdryer.

— Glue rice paper on top. Work with it in the same way as with a regular napkin.

— Apply at least three layers of varnish.
— Make marking drawings and stick numbers of the appropriate size. Instead of numbers, you can use buttons or butterflies.
— Cut a hole in the middle for the clock mechanism.

— Insert the mechanism, put on the hands.

— Glue the mechanism with glue.

The watch is ready!

Women's wristwatch

Necessary materials:
- watch;
- leather strap 70 centimeters long;
- chain with decorative elements;
- rivets;
- hole puncher.
First you need to take a new leather strap and cut it near the last hole.
Dedicated to all coffee lovers! I don’t know about you, but I can’t imagine the morning without a cup of aromatic, invigorating coffee..... Maybe that’s why I like coffee crafts special treatment. I bring to your attention wonderful ideas for watches decorated with natural coffee beans.


MASTER CLASS Coffee Clock

| To create a clock we will need: 1. A glass blank of the desired size, I have 30 by 30 cm, with a hole in the center for the mechanism. Hole diameter 8mm. 2. A napkin with a matching coffee pattern. 3. Decoupage varnish (water-based acrylic). 4. Acrylic paint (white, it would be nice to add a little yellow or brown to it to get a beige tint). 5. Black glass outline (gold, silver, bronze - for decoration). 6. Stained glass paint, I use Decola, the color is brown. 7. Brush, approximately No. 4, and a fan brush, also 4, PVA, multifora, rubber roller, alcohol or other degreasing liquid, cotton pads, toothpick. 8. Coffee beans. 9. Mechanism. |

We take our glass and prepare it for work - we wipe the glass on both sides with a cotton pad soaked in a degreasing liquid. We divide the napkin into layers, take the layer with the pattern and tear it to the size of the glass so that it does not hang from the edges, otherwise it will be inconvenient to glue.

Place the napkin with the colored side facing away from you onto the glass. Take a fan brush and dip it in PVA. We first dilute the PVA 1 to 2 (1 part PVA and 2 parts water). We begin to gently moisten. Some people recommend starting from the center, but I prefer to just do it from top to bottom, in parts, and smooth out any wrinkles that form along the way with wet hands. When the entire napkin is wet, straighten it well again, do not pull!!! It’s very easy to tear the napkin, put the wet multifruit on top and roll it with a roller. This will remove all unnecessary bubbles.


We look at the result and leave it to dry. After complete drying, coat the napkin with acrylic varnish. This must be done so that when applying paint, this same paint does not saturate the napkin and spoil the design. And if you don’t paint it with paint, the drawing will be too faded. Apply the varnish carefully, do not press on the brush, in a thin layer! After the varnish has dried, apply paint.

It is convenient to apply with a piece of sponge, “bump” the entire surface evenly and dry. If after drying it seems that there are gaps, then paint it a second time, just to be sure. I painted the second layer with gold paint. 


Actually, we dry it again and varnish it again to strengthen and protect our work. After complete drying, preferably the next day, we begin to design the front part of our watch. Using a contour on the glass, we draw a border, up to which we fill it with grains. In principle, it is possible without a contour, the paint I use does not flow much, but I like it better with a contour.

Let the outline dry for 10-20 minutes and begin filling it with stained glass paint in small sections. If you pour a large piece at once, the paint will simply have time to dry while we are laying the grains. So it's better to do it little by little. We place the grains in random order, moving them towards each other with a toothpick so that they fit more tightly.


When all the desired space has been filled in this way, leave it to dry. In an hour everything will be fine. If there are outlines of other colors, you can outline the details of the picture and highlight them. We do not coat coffee beans with varnish! Then they look more natural and you can smell the aroma! The varnish will ruin everything, kill the smell and give an artificial shine. We make the dial from improvised materials. You can simply put bold dots as an outline, or glue coffee beans (you can paint them with acrylic paint in any color and varnish them), in this watch the numbers and other divisions are made of baked plastic from FIMO.

You can glue it to anything, for example a crystal (I have a special glue for creativity). You can also use glass half-beads marbles. All that remains is to insert the mechanism, set all the hands to 12 o'clock and bring it to the desired time. Insert the battery and the watch is ready!
I want to say that in the absence of glass, a watch can be made on anything. On a piece of plywood, on a vinyl record... They will look a little different, but still unusual and will delight you and your loved ones. If you have nothing at all, then buy an inexpensive cutting board, drill a hole for the mechanism and decorate it! The unnecessary hole that is initially in such a board will be covered with a napkin and coffee. I will describe the principle of working with plywood or plate in a nutshell. First we prime the surface with a primer. Then we cover it with white acrylic paint (you can use car paint in cans). We glue a napkin onto the dry surface, only in this case with the bright side facing you. We also straighten it and cover it with varnish. We apply stained glass paint and coffee. You can also outline the drawing. We dry it, insert the mechanism and that’s it!!!
Crafts made from coffee beans can be varied: watches, cups, and much more. These hand-made masterpieces not only decorate the house, but also fill it with a subtle invigorating aroma. If you want to make the interior of your kitchen original, then a clock made with your own hands from coffee is exactly what you need! A clock made from coffee beans will make the kitchen cozy and homely warm.
Coffee varietyDecorating a watch with coffee beans is a simple task, but it requires patience. The watch can have any shape, it depends on what kind of base you have.
 |
 |
But the technology for making homemade coffee watches is practically unchanged. First you need to decide which part of the watch you want to decorate with coffee beans. This could be one of the corners, a frame or the entire dial. You can also make a figured decoration in the form of a wave, heart, circle, oval. Then you should prepare the necessary materials:
- coffee beans;
- glue;
- brush;
- paints and varnishes.

Now you can get to work. First, we lay out the desired composition or pattern of grains on the surface of the watch. When you are satisfied with the result, remember what the grain pattern looks like, or better yet, take a photo of it. Then remove the grains from the watch and lubricate its surface in the appropriate places with glue. Instead of glue, you can use stained glass paint. Start gluing the grains, making sure that the gaps between them are minimal.
 |
 |
 |
Wait until the glue dries, and then screw the hands, fix the numbers if you removed them from the dial before starting work. The finished work can be coated with a layer of transparent varnish. Single coffee beans, pre-painted in a contrasting color, look unusual. As you can see, there is nothing complicated about decorating a watch using aromatic coffee beans!