How to make a stuffed bird. Making stuffed animals with your own hands. Be careful with feathers
With the help of this article, you can gain some basic knowledge on how to make stuffed birds. The work is not difficult, but quite painstaking and definitely not for the squeamish. Using the example described below, you can make stuffed animals from almost any bird; this does not require any special knowledge or materials.
Materials and tools for creating a stuffed animal:
- copper sulfate;
- wire;
- brush (copper sulfate will be applied to it);
- tow (or other stuffing material, such as cotton wool or padding polyester);
- glue (moment);
- quick-drying varnish (you can use nail polish);
- balls or beads to create eyes;
- knife;
- decorative pins;
- threads with needles.


The process of making a stuffed animal:
Step one. Freeing the bird from the carcass
This is the most difficult, painstaking and unpleasant process. All the meat must be removed from the bird and this must be done as carefully as possible, as the skin can be damaged. The most difficult part will be the head, and you also need to pay close attention to the coccygeal part, you need to try not to cut the coccygeal gland. The skin also needs to be removed from the legs of the bird; it can be rolled up into a stocking, this is not scary. The work must be carried out with a very sharp knife using small, careful movements; a scalpel is perfect for these purposes. When the code with feathers is removed from the head, the eye slits need to be covered with a piece of plasticine.

You will also need a skull for the stuffed animal; it will need to be thoroughly cleaned both outside and inside. The skull should be washed and cleaned under running water; the brain should be removed by scraping. Finally, the skull is thrown into water and boiled for no more than three minutes.
As a result, after all the work to make the stuffed animal, what should remain is the skull and the removed skin.
Step two. We poison the skin of the bird
If the stuffed animal is not treated with chemicals, it will quickly disappear; it will simply be eaten by bacteria. For these purposes, a solution of copper sulfate is used. To create it, you need to take one teaspoon of vitriol and dilute it with 200-250 grams of water. Next, the author takes a brush and paints the skin from the inside; unpainted fragments must not be skipped. Once the poison is absorbed, the bacteria will no longer be able to feed on the skin. When working, you should try not to paint the wings, otherwise appearance stuffed animals may deteriorate.
As for the skull, it must be placed entirely in a solution of copper sulfate. Now you need to wait at least 6 hours until the vitriol is completely absorbed into the skin.

Step three. Making a frame for a stuffed animal
Next, you need to make a frame for the bird, that is, an artificial skeleton. It goes without saying that its dimensions should correspond to the size of the bird. To do this, take a ruler and take measurements of the length of the bird’s wings, legs, and you also need to measure the circumference of the chest and head. Well, then the wire is taken and the frame elements are made. Finally, cotton wool or padding polyester is wrapped around the wire.


Step four. We stuff the stuffed animal and sew it up
In order for the bird to have a filled shape, its body must be stuffed with some kind of filler, it can be cotton wool, rags, foam rubber, and so on. After this, the bird can be sewn up with a thread and a needle. You need to insert a wire into the legs; it is also used to fix the desired position of the wings.
Also at this stage you need to remember to make the bird’s eyes. For this purpose, various balls, beads, and so on are used. The eyes are inserted after stretching the skin onto the frame; you need to take tweezers and pull the code at the installation site. The color of the eye is not important, it will be colored after installation.
To make it convenient to fix the parts to be sewn, you can use decorative pins.


Step five. The final stage of creating a stuffed animal
Now the stuffed animal is almost ready, all that remains is to install it and do a little work with glue, paint and varnish. If the stuffed animal has feathers sticking out and you can’t just smooth them out, the feather can be carefully coated with glue and glued on. If the bird has any bright elements, for example, combs, etc., they will lose color later, to restore it, use nail polish of a suitable color.
As for the bird's beak, it needs to be cleaned with the finest sandpaper and then varnished, so it will look much more attractive. In order to paint an eye, you first need to paint the entire eye with varnish, and then make a pupil by placing a drop of paint or varnish in the right place. The author made the stuffed animal's eye completely black.
In order to make a stuffed bird, you need to have:
Wire, copper sulfate (or its solution), brush (for applying copper sulfate), tow (or any padding material (sintepon, cotton wool, etc.), glue (moment), quick-drying paints (in the review article, ordinary nail polish from women's cosmetics), beads/balls (for eyes), tweezers, scissors, knife, decorative pins, threads with a needle.


Through an incision in the chest, we free the bird from the carcass (meat). The hardest part to remove the skin from is the head and feet. In the tail, the most important thing is to leave the coccygeal gland (where the feathers grow) untouched. “Undressing” the feathered legs, they can turn out “into a stocking.” It's not scary, then you will bring them to the right position.
Having reached the head, remove it very carefully so as not to damage the feathers and the integrity of the skin. Use a small, sharp knife (preferably a scalpel). Don’t forget to cover the eye slits of the empty stuffed animal with a piece/ball of plasticine.

The bird's skull is cleaned of its contents by rinsing with running water and scraping. Any available objects (knife, tweezers). After that, stand in boiling water for no more than 3 minutes.
Of the entire trophy, what should be left on hand for future stuffed animals: an empty skull and skin with feathers, which must be treated (pickled) in copper sulfate to prevent the development of pathogenic bacteria.
The solution is made at the rate of 1 teaspoon of vitriol per 200-250 grams. water. Using a simple brush, we “paint” the stuffed animal’s skin from the inside. Avoid getting the blue solution on the feathers as unwanted coloration will occur. You can clean it, but there is a risk that the appearance will suffer.

We immerse the shard completely in the container with the solution.
The etching procedure should take about 6-7 hours.


Measurements at this stage play an important role. Let's find out the girth of the head, chest, length of legs, wings. Based on the existing centimeters, we prepare the future frame. We wrap tow (cotton wool, padding polyester) on a wire frame. We’ll “dress” the bird on it.
We insert wire into the limbs of the bird to give it the desired position and so that the body of the future stuffed animal has strength.


In places where it is necessary, we add padding material to the density so that there is no feeling of emptiness.


When everything is ready, the bird is sewn together with thread. To secure the parts to be sewn (for convenience), use decorative pins.
The bird's eyes are made from balls and beads of suitable size. Using a scalpel and tweezers, the skin in the incisions is lifted, and the “eye” is in its place. The original color of this part is not particularly important, since to give the desired effect, black varnish or quick-drying paint is used. For the same purpose, you can treat the bird's beak.

Upon completion of all work, examine the trophy. Feathers that stick out and cannot be positioned simply by smoothing them must be carefully glued. To do this, apply one drop of second glue at the base of the feather.
Some representatives of birds have bright spots in color (beards, combs, eyelids, etc.). A killed bird easily loses this feature. You can easily restore your former attractiveness by resorting to the same nail polish.
But not every trophy can turn into a work of art. It is best if you get the desired bird in the spring or late autumn. True, in the latter case you will have to tinker more, cleaning the skin from fat, and the plumage will not be so bright. It is also important how to get the trophy - by causing minimal damage. To do this, you need to shoot with a reduced or highly dispersed charge.
The trophy has been won. Don't grab it randomly. Gently lift it by the beak, thoroughly treat the bleeding areas with starch flour, insert a cotton swab into the wound and carefully, without breaking the feathers, place the bird in a bag and place it horizontally in a bag with a hard flat bottom.
It is best to start making a stuffed animal at home immediately after the hunt. If this is not possible, put the bird in the refrigerator and after a day or two, but not later, begin removing the skin. Longer storage causes the skin to deteriorate (especially for ducks), and the feathers become dull and begin to come out.
To remove the skin you need: a razor (blade), a scalpel or a sharp knife, scissors, sticks or wire for swabs, clothespins, paper clips, cotton wool, newsprint, starch flour, salt, water, solutions of arsenic and formaldehyde (though there are many make do with salt).
Now “stretch” the bird, achieve mobility of the legs, wings and neck. Place its head away from you and turn it slightly to the left, spread the feather on the chest part and make a light cut with a razor along the keel from the level of the wing to its end. Pull the skin from the abdominal part over the keel and make a cut again.
Now, with your fingers, begin to separate the skin from the carcass, first on the chest, gradually “digging” to the dorsal part, and then further down the stomach. As the skin is separated from the abdominal diaphragm, the incision should be continued to the anus. Here it is important to leave a kind of “reserve” of skin so as not to “reach” the beginning of the tail. This is one of the most delicate areas to work with, since if done ineptly, the tail can come off from the entire skin.
Having made a “dig” to the dorsal part at the level of the abdomen, you will see the articular part of the bird’s legs – the knees. Take the bird's leg from the outside with one hand, and with the other pull the skin off the knee. Make sure that a gap appears in the bend by lowering the skin as low as possible. Then use scissors to cut through the joint. Do the same work with the second leg.
Next begins perhaps the most difficult stage of the work. Continue alternately separating the skin from the carcass on both sides in the abdominal area, gradually “digging” towards the back and tail. Do this carefully: this is where skin tears most often occur. Make sure your fingers connect in this part and, with careful movements, expand the “bridgehead” towards the tail. Insert the scissors into the resulting opening and, making sure that the skin does not fall into the scissors, separate the tail from the abdominal part. Immediately insert the tampon into the resulting hole in the carcass, otherwise the abdominal fluid and intestines will immediately come out.
To protect the skin from contamination with blood, use clothespins, paper clips and starch flour. To prevent the feather from interfering with your work, turn the edges of the skin inside out and pin them with paper clips. If the skin begins to dry out, moisten it with a weak solution of salt water.
Having overcome the most difficult section, continue to remove the skin further, moving towards the wings and head. This operation can also be performed in weight. Then hold the bird by the abdominal part with one hand and peel off the skin with the other. If the latter is removed tightly and “pulls along” the bundles of muscle fibers, then make careful transverse cuts at the level of the carcass with a scalpel or razor. When the joint parts of the wing appear, continue to remove the skin from the collarbone, ensuring that there is sufficient space between the wing and the neck. Separate first one and then the second wing at the shoulder part from the carcass.
Further, however, the operation may reach a dead end. The fact is that the head of many birds, in particular woodpeckers and some ducks, due to the abundance of feathers and the size of the skull, does not fit into the neck cut of the skin. This is what you need to do here. Make a longitudinal cut along the skin and carefully remove the skin to the base of the skull. Having cut off the neck part, open the skull from the back of the head, remove the brain and, after saline or formaldehyde treatment, insert a pre-prepared frame.
The safety and durability of the stuffed animal will largely depend on how you process the removed skin. If you decide to interrupt the lesson, carefully process the skin, remove muscle fibers from it, clean the skull, wings, tail and preserve it.
If the feather of a bird, especially a white one, is stained with blood, the skin can be washed in warm, up to 50°, water using detergents– washing powders with bioadditives and bleaches. Wash in large quantities water, changing it several times.
The skin should be dried in a spacious container with a large amount of starch flour, which prevents the feather from “felling.”
When you begin to continue working, unpreserve the skin by moistening it with warm water from the inside.
It doesn’t matter where to start processing the skin, but the most convenient way is from the head part. Remove the brain matter and eyeballs. Sprinkle all cavities generously with fine salt, insert cotton wool into the eye sockets and under the beak. Then strengthen the fork frame in the skull with the wound neck part and turn out the skin. Remove the muscles from the collarbones of the wings, and in larger birds from the radius bones, and sprinkle everything with plenty of salt. Do the same with the bird's legs. Clean the tail part and also sprinkle generously with salt.
Having finished processing the skin, proceed to installing the frame. It can be made from aluminum or steel bendable wire. It is better not to use copper: it can be too soft, and when it oxidizes, it turns the bird’s legs blue or green. It is very important to choose a stiff wire for the leg frame. If you choose the wrong wire, you risk the fact that the scarecrow will constantly sag and fall, which will negate all the work you have done. Therefore, for large birds, such as a goose or capercaillie, a rigid steel wire is used that can hold the entire mass of the bird. Approximately the same wire is used for the wing, if you are planning to make a “bird in flight”.
Now cut off a piece of wire from the skein along the length of the bird with a small margin, that is, approximately to the middle of the tail. Make a fork along the length of the skull by winding the wire and sharpening it. Then wind cotton wool around the wire along the length and size of the neck and bandage it with threads. Strengthen the fork in the skull (you can use plasticine for this) and turn the skin inside out. Then cut off the wire for the wings. Also sharpen it and pass it through the articular part of the radius bones until it comes out at the beginning of the large flight feathers. It is better if the wire runs along the inside of the wing. Pull out the clavicle and tie it with threads to the insertion wire. Cut two more pieces of wire with a margin. Having sharpened them, begin to thread the paws “from the heel” through the leg.
There are two ways to thread the wire: through the bone and under the skin. The first method is more reliable, but labor-intensive. The second is simpler, but can lead to tearing of the skin on the leg. So take your pick. Having threaded the wire through the metatarsus until it comes out in the area of the joint, attach the bone to it, wind the cotton around the volume of the leg muscle, bandage it and stretch the leg lengthwise. Having completed the operation with the second leg, bend the wire to the size of the interleg space and attach it to the main frame.
Finally, take the last piece of wire, bend it in half and create a “fork”. Using the pointed ends, pass it through the rigidity of the tail and also attach it to the frame.
After treating the skin with salt again, you can begin stuffing the stuffed animal. For this purpose, it is best to use cotton wool, but tow and foam rubber can also be used; only straw and rags are not suitable. Straw quickly turns into dust, and rags do not allow the stuffed animal to be given the desired shape.
To properly stuff a stuffed animal, you need to know and have a good idea of the size and shape of the bird, otherwise it’s easy to turn a handsome wild goose into a domestic, belly-bellied gander. Remember that wild birds, as a rule, have highly developed and prominent pectoral muscles and practically no “belly”. Therefore, special attention is paid to padding the chest area.
First make a lining for the frame of the back and neck. The layer of cotton wool should be even, not very thick and, most importantly, not lumpy. A more important moment is stuffing the chest. Try to lay the padding material evenly and tightly. Gradually reduce the amount of cotton wool towards the stomach. Having stuffed the stuffed animal, sew it together. For this it is better to use a thick double thread. Start from the chest area, using your fingers to pull the seam together. While sewing, constantly add cotton wool, compacting the chest part. In small birds it is better to do this with tweezers. It’s okay if the skin doesn’t come together a little along the seam. If the pen is positioned correctly, this defect can be easily hidden.
When you are done with sewing, proceed to the last and very important stage: giving a natural pose to the stuffed animal and mounting it on a support. This is where you will need in-depth knowledge about birds. Remember that each species has its own habits and natural poses. Try to choose the most impressive pose to show the bird in all its glory.
When the pose is chosen, you need to mount the stuffed animal on a support or stand. To do this, drill holes in a knot or plank and sit the bird down, spreading its toes. After this it begins painstaking work on laying the pen, hiding defects that have appeared, and removing “extra” formations. This is done with tweezers, a soft brush and scissors.
Having laid down the feather, the bird is most often bandaged for further drying. The carcass is carefully wrapped with a strip of dry gauze or cloth, making sure that the feather styling is not disturbed. A cardboard stretcher is placed on the unfolded wing or tail, which, with the help of stitching, holds the feather in the desired position. The stuffed animal dries on its own, and this period can last up to a month.
No matter how well it is done, the stuffed animal will not become “alive” if you do not insert the eyes. There are several forms of eyes: cast glass, already painted and fastened with wire, and eyes made from various plexiglass by “extrusion”. Finally, taxidermists make eyes from various materials, paint them and varnish them.
So choose your own eyes of the appropriate color, size and shape. You can insert them immediately after completing work on the stuffed animal. But it’s better to let it dry a little, and then use nail clippers and tweezers to spread the eyelids and insert the eye. If the eyelids are drooping, they are raised or trimmed slightly. You can attach the eye to plasticine, which you place in the eye cavity, or to glue, which is less convenient.
After a couple of days, remove the bandage and see if the feathers and wings are neatly arranged. Eliminate defects, if any, and bandage the bird again for a week or two.
After final drying, the legs, eyebrows (in grouse) and beak will turn pale. This means that the natural color has to be restored. This should be done using grated lead of colored pencils and paint for coloring, applying them very thinly to the surface of the legs and beak. The eyebrows of grouse can be tinted well with lipstick of a suitable color.
A scarecrow for the garden is not just a tribute to tradition. A self-made garden scarecrow can become a reliable ally in the fight for the harvest of fruits and berries. There are special “horror stories” for birds, using which you can create a cute and terrible garden guard.
Classic straw garden scarecrow
When creating a garden scarecrow, you should take into account that it must be truly scary for feathered lovers of berries and vegetables. But what should be done to achieve this?
The garden scarecrow is made taking into account the fact that birds are afraid of:
- Shiny moving objects.
- Pops and rustling sounds.
- Birds of prey.
- Bird corpses.
- Of blue color.
All these things pose a real frightening threat to birds. If you make a stuffed animal with your own hands, taking into account all the subtleties, the winged thieves will fly away and stop visiting the dacha. Another option is allowed - to use the corpse of a bird for intimidation. It can be attached to one end of a stick and the other driven into the ground. You can hang the carcass of a dead bird on a tree. Then the feathered pests will avoid the garden. Another option is to make a garden dummy of a dead bird. Attach it higher so that it is clearly visible from all sides.
 Drawing for making a simple garden scarecrow
 But this version of a monster for a dacha looks very unattractive. Yes, and it is short-lived. It looks much more interesting if it is made from waste materials, fabric, or old clothes.
Scary and terrible
To make a garden scarecrow, various waste materials are suitable:
- Old DVDs.
- Plastic bottles.
- Cellophane bags.
- Tapes from old tape recorders.
- Medium-sized lightweight fabric scraps.
- Fringe.
Bird scarecrows are made from these items and scarecrows are sewn onto clothes. As required, all materials shine and shimmer in the sun, rustle and move with the slightest breeze.
The truly terrifying thing for birds is the scarecrow made from plastic bottles. It has established itself as a real guardian of order for the field and dacha. How to make a garden scarecrow with your own hands?
 Option for making a garden scarecrow
 For this craft you will need 20 kvass bottles and fishing line. A head is made from two bottles inserted one into the other. On one side, two eyes and a nose are glued from plastic covers. The neck of another bottle is cut off and the plastic is cut into strips 2 cm wide.
Next, using a fishing line, the finished hair is attached to the crown. To intimidate, you can twist horns from scraps and attach them to your head. Hands and feet do this: parts of the bottles are inserted into one another, and their ends are cut into strips along the edges.
The body is made of large scales. They are cut from the same bottles. They are attached to the fishing line in rows. It should be taken into account that the scales should “walk” in the sewn position. Therefore, the line tension should be minimal. The finished scarecrow is mounted on a stick. Standing at the top, it glitters under the bright rays of the sun and rattles in the wind. Does everything it should to repel feathered pests of the dacha.
Read also
Glazing of a combined greenhouse
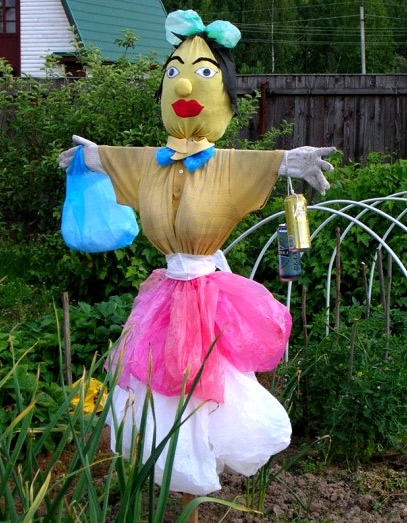
Another garden scarecrow is made with your own hands and plastic bags. First they make the head. Take a medium-sized canvas bag. They fill it with foam rubber, straw, and scraps of fabric. Thread a thick thread or fishing line along the edges and pull it a little, but not completely. There should be a small hole left in the head.
Eyes, eyebrows, lips are cut out of white plastic. Or you can sew them from multi-colored scraps. For hair, fringe from grandma's old bedspread is suitable. You can use the same scraps, cutting them into strips.
Next they make the torso. To do this, take two sticks and attach them to one another using a tourniquet to form a cross. On top, in the area where the sticks cross, attach another bag filled with something.
A loose old blouse is put on the body. You can still do this. Cut a hole in an old piece of light curtain.
 Garden scarecrow made from a piece of tarpaulin
 Thread a wooden neck into it. The panels are sewn together on the sides. Floating loose clothes come out. Next we start making the hands. Old garden cloth or rubber gloves are suitable for this. The voids must be filled with existing pieces of soft materials. The arms are attached to the crossbar on both sides.
At this stage you need to attach the head. It is threaded onto a longitudinal crossbar with a hollow hole. Then it is firmly fixed. Then it’s time to make a multi-layer skirt. For work you will need cellophane bags (garbage bags can be used). First, the first row of the skirt is assembled onto the fishing line. It is necessary that the bags are positioned freely. The first row is attached to the shaft. Then the operation is repeated. In total you need to make 3-4 rows.
 Frame design for a garden scarecrow
 Then the scarecrow is installed on the site. But the preparation of the garden monster does not end there. To make it more convincing that the scarecrow is “alive,” you should add a few more important touches.
A string is tied to one arm, on which hang several empty soda or beer bottles. 
For greater intimidation, a garland of multi-colored light rags is hung on the figure. The combination of blue and pieces of fabric fluttering in the wind is just a nightmare for sparrows, titmice, and crows. After all, birds do not encounter anything like this in nature.
At the very least, even today the garden scarecrow remains one of the effective, albeit short-term, means of protection against annoying birds that pose a threat to the harvest. To be honest, for a scarecrow to actually “work”, it also needs to rumble and move in the wind. However, the decorative effect is also worth something. If you don’t want to be considered incompetent, create a crop protector yourself. In this article you will find a description of the main details and step by step instructions on how to create a scarecrow for your dacha, as well as many ideas and photos of how you can make an unusual garden scarecrow with your own hands.
As a rule, a garden scarecrow performs 2 functions or roles at once:
- scaring away birds;
- decoration for the garden plot.
Indeed, if you want to have a well-groomed garden, not spoiled by feathered pests, let your garden scarecrow instill fear only in the birds, and not in your neighbors. Therefore, in any case, it should complement, “revive” and decorate the area, or rather be terribly unpleasant, scary for birds and unusual for people. Although a garden scarecrow most often looks rather untidy, rags are not at all a necessary attribute in the fight against very cunning garden pests.

In short, a garden scarecrow should really become a real decoration for your dacha, and it doesn’t matter whether you have a need to protect your crops. And in fact, why not do it just like that - for beauty and to give more aesthetics to your garden plot.
One way or another, for a garden scarecrow to really scare away birds, it should look a certain way:
- its dimensions must correspond to human ones;
- the appearance should be bright and noticeable;
- it should stand near the protected volume.
How to make a garden scarecrow with your own hands
Typically, any garden scarecrow is made based on the following components:
- frame (or torso);
- head;
- arms and legs;
- clothing and other accessories.
Frame
You can make it either metal or wood.
A wooden frame, as a rule, is made from two fairly thick boards of different lengths (or take 2 shovel handles). They are secured crosswise, driving a nail in the middle (or better yet, two, so that the scarecrow’s arms do not bend or wobble).

Boards (or cuttings) can also be secured using ordinary rope and a special knot. This fastening is no less reliable than a driven nail. 
The future body of the garden monster can be made using the same 1 shovel handle, attaching a hanger to it instead of arms.

For more information on how to make a monster in the garden on such a frame, see the following step-by-step master class.
Video: how to make a scarecrow on a wooden frame hanger
To make a metal frame, you will naturally need more time and also welding skills, or you will have to ask a neighbor for a favor or find a professional welder.

Video: how to make a country scarecrow with your own hands on a metal frame
Head
You can make the head of a garden scarecrow from various materials in a variety of ways.
For example, you can sew a head from two pieces of fabric, stuffing it with straw or some other sealant. Or take a regular fabric bag and stuff it with something to give it the desired shape.

And then embroider the eyes, nose, mouth on the face and sew on the ears.

Although you can also draw with paint or put on mask.

The most ordinary one will do 5 liter bottle.

It’s not a sin to make the head of a garden monster from garden pot, securely attaching it to the frame.

Often the effigy is made completely from hay, including his head.

You can use an old one as a head doll head or the head of someone who has spent his time mannequin.

Or you can not make a scarecrow face, but simply use tall hat, but to give it some form, in other words, to stuff it, no matter what you have to do.

Or just throw it on the frame straw hat

Arms and legs
If you want the garden scarecrow to be as human-like as possible, then you need to give it clear outlines of legs and arms.

It's very easy to create the arms of a garden scarecrow: you just need to put them on the ends of the frame gloves and stuff them with something, for example, the same straw.

The scarecrow's legs are made in a similar way: trousers, a bright dress or a skirt that can be seen from afar are put on the frame, and a clearly visible one is attached below shoes(for example, rubber boots or galoshes).

Clothing and other accessories
How elegantly you dress your garden scarecrow will determine its aesthetic appearance and, possibly, its fate.
Headdress
The most typical headdress for a scarecrow is hat.

However, the style and material of the hat can also be different.

It could even be hat with ear flaps.

You can put on your scarecrow granny headscarf.

It is not necessary to completely cover your head with a hat, this may be enough symbolic and decorative headdress.

Accessories
It won’t be trivial to put a garden scarecrow in the hands badminton racket.

And you can also create a whole composition: as if the girl is carrying on the rockerbucket with water, which I just collected from the well. 
It wouldn’t be a bad idea to give a stuffed flowerbed stroller into the hands of a stuffed animal.

Step-by-step instructions for creating a garden scarecrow
To make the simplest garden scarecrow, you will need the following materials:
- 3 cuttings from shovels (or strong and thick boards) of different lengths (one for the body - long, for the arms - a little shorter, for the legs - even shorter);
- 2 (or 4) nails and a hammer;
- head (bag filled with straw);
- clothing and other accessories.
Step-by-step instructions for creating a garden scarecrow with your own hands:
- Make a frame.
- Securely secure it in the ground.
- Attach the previously made head and put on the hat.
- Wear a shirt and pants or a dress (skirt) on the body, depending on gender.
- To make the appearance of the scarecrow more human-like, attach gloves instead of hands, and boots instead of feet.
Video: master class on creating a garden scarecrow with your own hands
What kind of garden scarecrow to make at the dacha: photo ideas for beautiful garden scarecrows
Frankly speaking, the most interesting sight is presented by various original garden scarecrows, pleasant in appearance.
Farmer
It is most popular to dress a garden scarecrow as a farmer or peasant, in other words, as a villager.

The figure of a stuffed animal dressed in a plaid shirt and jeans will not be critical.

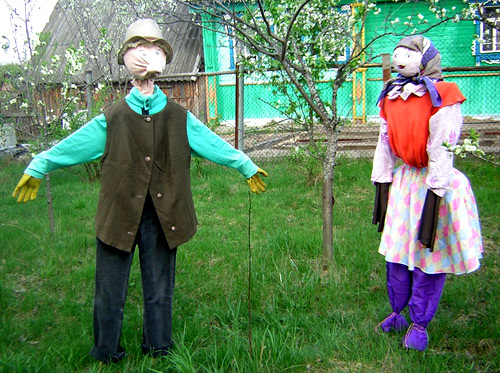
2 scarecrows
An interesting idea for decorating a garden would be to form a family of several scarecrows.
Two stuffed adults.

Two scarecrow children.

Using several stuffed animals and other garden items, you can form entire country compositions.
A fun ride in a wheelbarrow.

Husband and wife on a bench.

From pots
If you liked the idea of creating a head for a stuffed animal from a garden pot, then you can do everything Scarecrow made entirely from pots.

Another version of the battle scarecrow (knight) made from pots.

From plastic bottles
Used plastic bottles in catchy colors can be a lifesaver for developing a beautiful and creative image of a stuffed animal.

Another idea for creating a dark-skinned native scarecrow from plastic bottles.

Note! Still, scarecrows made from plastic bottles really turn out to be quite scary, so it’s better to make them
Fisherman
Such a stuffed animal stimulates interest not only in amateur gardening, but also in fishing. It’s as if it wants to say: “Everything will be cool here!”

Soldier
A scarecrow dressed in military uniform and a gas mask will look very intimidating.

Bandit or cowboy
There would be no shame in dressing the scarecrow in a cowboy or, perhaps, a bandit outfit.

Athlete
Whatever you say, a monster athlete is cool!

Bird
It will be quite funny and original if you make a scarecrow with a bird's head. As they say: we knock out wedges with wedges.

And here is a simpler, but also not boring in all respects, option.

Pumpkin
This pumpkin man is undoubtedly worthy of the flattering attention of gardening fans.

And it’s hard to take your eyes off this foppish figure of a pumpkin farmer. He's still handsome!
