Обзор системной компактной фотокамеры Panasonic Lumix DMC-G5. Обзор фотокамеры Panasonic Lumix DMC-G5 Объективы для panasonic lumix dmc g5
Чтобы раскрыть потенциал этой камеры мы облазили весь Манхеттен, фотографировали на ночном Бродвее и даже сходили в знаменитый зоопарк, расположенный в Центральном парке
Чтобы раскрыть потенциал этой камеры мы облазили весь Манхеттен, фотографировали на ночном Бродвее и даже сходили в знаменитый зоопарк, расположенный в Центральном парке.

Комплектация
В коробке с фотоаппаратом вы найдете телескопический объектив Lumix G 14-12mm f/3.5-5.6, бленду, батарею и зарядное устройство, кабель USB, наплечный ремень, а также краткое руководство пользователя и программное обеспечение.

Дизайн
Новинка точно понравится фотолюбителям-энтузиастам, ведь по своей форме и дизайну, а также габаритам Lumix DMC-G5 ближе к зеркальным фотоаппаратам. Корпус сделан из пластика и магниевого сплава с прорезиненными вставками.

Весит камера всего 562 г с аккумулятором и объективом. На лицевой панели камеры установлен байонет, кнопка фиксации объектива и лампа подсветки автофокуса.
На левой грани кроме ушка для нашейного ремня нет функциональных элементов, на правой же стороне за пластиковой заглушкой спрятаны разъемы.

На верхней панели находятся решетка динамика, клавиша подъема встроенной вспышки, стереомикрофон, горячий башмак, селектор режимов с кнопкой включения, а также клавиши спуска затвора, записи видео и включения интеллектуального режима.

На задней грани расположен большой поворотный дисплей, видоискатель с сенсором приближения, а также набор функциональных клавиш, которые разбросаны вокруг экрана.


Ну, и на нижней панели находятся штативное гнездо, а за крышкой спрятан отсек батареи и карты памяти.

Фотоаппарат доступен в черном, серебристом и белом цветовых решениях.
Эргономика
Беззеркалка не такая компактная, как большинство решений конкурентов. Фотоаппарат даже чуть больше предыдущей модели за счет более удобной, и соответственно, более крупной ручки.

На тыльной стороне находится прорезиненная накладка и небольшой выступ возле нее. Так что камеру легко держать одной рукой во время съемки.
В целом, устройство получилось эргономичным. Все основные клавиши и регуляторы находятся под пальцами, их не нужно искать.
Для открытия дисплея предусмотрены специальные пазы сверху и снизу. Крышка раскрывается на 180 ˚, дисплей поворачивает на 270 ˚. Это будет кстати при съемке объектов сверху или снизу.

Датчик приближения работает быстро и корректно, так что лишний раз не придется переключаться на видоискатель вручную.
Меню и управление
Для входа в меню используется только центральная кнопка пятипозиционного переключателя, тогда как настройки можно изменять как с помощью кнопок, так и с помощью сенсорного дисплея.

Меню простое и красочное. Оно состоит из пяти основных пунктов: установки для фото и видео, пользовательские и основные настройки камеры, а также режима воспроизведения.


Если вам не нужно работать с меню, то аппаратные кнопки навигации превратятся в кнопки быстрой настройки. Они помогут изменить режим автофокуса, установить нужные значения баланса белого и светочувствительности, а также включить серийную съемку.
Над крестовиной расположены кнопки входа в меню просмотра и смены отображаемой на дисплее информации. Кроме того, над экраном находится клавиша перехода в быстрое меню, которое можно настроить по своему усмотрению.
На верхней грани расположен селектор режимов, кнопка записи видео и клавиша включения интеллектуального режима. Над кнопкой спуска затвора установлен специальный рычажок, который может использоваться для управления электронным зумом (только с объективами G Vario X). В нашем же случае он работает как вспомогательный селектор настроек.
В правой части дисплея есть вспомогательная панель, которая отвечает за дополнительные настройки и применение цветовых фильтров в зависимости от выбранного режима.
Также присутствует возможность управления фокусировкой и точкой экспозамера касанием экрана.


Функциональность
Lumix DMC-G5K получил Live MOS матрицу размера 17,3 х 13 мм и разрешением 16 Мп. Сенсор получил улучшенные алгоритмы обработки. Ему помогает новый процессор Venus Engine 7 FHD, благодаря которому увеличена скорость работы камеры по сравнению с предыдущей моделью.

Беззеркалка сразу после включения готова к работе, она очень быстрая в плане наложения фильтров и обработки фото, но RAW записывается не мгновенно.
Скорость контрастного автофокуса впечатляет. Но его точность не самая лучшая, так что иногда придется помочь ему ручной или точечной фокусировкой.
Скорость серийной съемки составляет 6 кадров в секунду. Это касается максимального разрешения и съемки в формате RAW. В режиме следящего автофокуса этот показатель уменьшится до 3,7 кадров в секунду.
Фотоаппарат комплектуется объективом G VARIO 14-42 мм F3.5-5.6, который обладает неплохой резкостью и приятным художественным размытием. Он получил оптический стабилизатор MEGA O.I.S. Кроме того, его светосилы хватает даже для ночной съемки в городе. Так что не придется использовать встроенную вспышку.
Камера может похвастаться 8 режимами съемки: классические M/S/A/P, два пользовательских C1 и C2, а также два творческих режима. Последние позволяют наложить на снимок один из 14 фильтров или выбрать одну из 23 предложенных сцен. Хотелось бы отметить именно сценические режимы, которые предоставляют широкий выбор сценариев. Из них стоит отметить монохромный и теплый ночной пейзаж.


Интеллектуальное авто здесь приближается к идеалу. Камера почти всегда безошибочно определяет баланс белого и замеряет экспозицию. Этот вариант вполне подойдет любителям, ведь после включения кнопки iA вам не придется лезть в меню настроек.
Детализация снимков очень неплохая. Фотоаппарат вполне может конкурировать с начальными зеркалками и более дорогими беззеркалками с сенсорами большего размера. Цветопередача также максимально естественная.
Диапазон чувствительности ISO варьируется от 160 до 12800. Рабочими можно считать значения до ISO 3200, но и на более высоких значениях шумы не так заметны, как в DMC-G3.
Примеры фото:


Lumix DMC-G5 умеет снимать Full HD-видео с частотой развертки 50 и 60 кадров в секунду. В качестве форматов можно выбрать AVCHD или MP4. Видеозапись производится со следящим автофокусом. Кроме того, доступны регулировки цвета, контрастности, а также большинство сценических эффектов. Качество видео очень хорошее.
Примеры видео:
3-дюймовый сенсорный дисплей получил разрешение 920 000 точек, что почти в два раза выше по сравнению с предыдущей моделью.
Встроенный электронный видоискатель получил 100% покрытие поля кадра и разрешение в 1 440 000 точек.
Для подключения к компьютеру или монитору\телевизору фотоаппарат получил USB 2.0/AV Out и miniHDMI. А 2,5 мм Jack можно использовать для подключения пульта ДУ.
Время работы
Заряда литий-ионной батареи емкостью 1200 мАч хватит на более чем 300 снимков.

Впечатления
Сбалансированная в плане дизайна, легкая, эргономичная и максимально простая в управлении беззеркалка. Lumix DMC-G5K - это универсальный фотоаппарат, который отличается скоростью работы и фокусировки, большим количеством художественных эффектов и режимов, а также качеством и детализацией фото-видео. Камера вполне может соперничать с зеркалками начального и среднего уровней и всеми без исключения беззеркалками.

ОСОБЕННОСТИ:
. Компактный корпус .
. Эргономичность .
. Простота меню .
. Поворотный сенсорный дисплей .
. Встроенный видоискатель .
. Full HD видео .
. Скорость работы .
. Интеллектуальный режим .
. Художественные режимы .
. Качество фото и видео .
. Скорость серийной съемки .
. Скорость автофокуса .
. Большое количество сменных объективов .
СПЕЦИФИКАЦИИ:
- Модель Panasonic Lumix DMC-G5K
- Вес 562 г с объективом и батареей
- Размеры 12 x 8,3 x 7,1 см
- Матрица 17,3 x 13, Live MOS, 16 Мп
- Максимальное разрешение изображения 4608 x 3456 пикселей
- Разрешение видео 1080/60p
- Объектив f = 14 - 42 мм,F3.5-F5.6
- Байонет Micro 4/3
- Зум оптический - 3x, цифровой - 4х
- Формат изображения RAW, JPEG
- Формат видео AVCHD / MP4
- Дисплей TFT, 3" (920 000 пикселей)
- Стабилизатор изображения оптический MEGA O.I.S.
- Память карты SD, SDHC, SDXC
- Интерфейс USB 2.0, miniHDMI, A/V, remote
- Питание Li-Ion 1200 мАч
This year marks the 10th anniversary of Panasonic"s Lumix digital camera brand which makes it an appropriate year for launching some exciting new products. One of those is the Panasonic Lumix G5, the ninth model in the G-series which introduced the world to the Micro Four Thirds standard and mirrorless system cameras in the shape of the DMC-G1 , in 2008.
With its electronic viewfinder and SLR-like form factor the G5 is arguably the most direct competitor to "traditional" entry-level SLRs in the current Lumix lineup. It sits above the simpler GF5 and below the top-of-the-line and enthusiast models GH2 and GX1 .
Under the hood, the G5"s "newly developed" 16MP Live MOS sensor is what Panasonic calls a "digital sensor" with some of the processing happening on the chip itself. In theory this translates into improved high-ISO performance which is very welcome news, the more so because the G5"s maximum ISO setting has been increased to 12,800. The continuous shooting rate has also been bumped up compared to the DMC-G3 , from 4 to 6 frames per second, but almost certainly more important to most users is the increase in resolution for the touch-sensitive rear LCD, from 460,000 to 920,000 dots. The LCD now also comes with a feature that is called "Touchpad AF". It allows you to move the AF area across the frame with your finger on the LCD while you"re framing the shot through the EVF.
Video specs have also been improved. Like the GF5 the G5 now records video in the MP4 format, as well as the now-standard (for Panasonic) AVCHD. The latter Video clips shot in the MP4 format are easier to organize because they"re not stored in a separate file structure to stills, and are far more widely compatible when it comes to playback. However, shooting in the AVCHD format allows you to capture footage at 1080 60/50p, vs 1080 60i on the G3. In this mode the camera captures video a t a bit rate of 28 Mbps which is in line with Panasonic"s high-end consumer camcorders.
With most of the competitors in the mirrorless system bracket of the market offering a variety of digital filter it was only a matter of time before Panasonic followed. The G5 boasts nine new filter options in the camera"s Creative Control Mode (namely Soft Focus, Impressive Art, Cross Process, Star Filter, Miniature Effect, Dynamic Monochrome, One Point Color and Low key). As with the GF5 these filter effects can be previewed before they are applied and when the camera is set to intelligent Auto or intelligent Auto Plus mode it will suggest filter effects that it thinks might enhance your photo, based on an analysis of the scene.
All in all the G5 comes with some interesting improvements over its predecessor. We will have to see how many G3 users can be tempted into upgrading to the new model but on paper the G5 certainly looks like a compelling camera that should be attractive to a wide range of photographers. We are looking forward to putting the G5 through its paces to see what the sensor is capable of and what difference the new features make in real-life shooting. In the meantime we"ve produced a 3-page preview which should give an overview of the salient points.
Panasonic GF5 specification highlights
- 16 MP Live MOS sensor
- ISO 160-12,800
- 3.0", 920k dot touch-sensitive LCD with Touchpad AF control
- 1.44 million dots electronic viewfinder with eye sensor
- Full AVCHD 1080/60p video with 1080 30p MP4 recording option
- 6 frames per second continuous shooting, 3.7 fps with AF-tracking
- 14 Creative Control filter effects options
Differences between the G5 and the G3
- 16MP "digital" Live MOS sensor (vs analog)
- Maximum ISO of 12,800 (vs 6400)
- 6 frames per second burst shooting (vs 4 fps)
- 1080/60p AVCHD and 1080/30p video recording (vs 1080/60i)
- MP4 video recording option (vs AVCHD and 720p MJPG only)
- 3 inch 920,000 dot LCD screen (vs 460,000 dots)
- Eye-sensor below the EVF
- Function lever
- Touchpad-AF control
- Aluminium front plate (vs plastic)
- Position of the shutter button
- Redesigned rubber hand grip and four-way controller
- Improved battery life (320 shots vs 270)
- 14 filter options in Creative Control Mode (vs 5)
Compared to its peers:
 |
| The Panasonic G5 and Olympus" flagship Micro Four Thirds camera, the OM-D, have similar dimensions but the Panasonic comes with a rounded, contemporary design while the Olympus features a retro-style. The latter also comes with an all-metal body. On the G5 only the front-plate is made out of aluminium. |
|---|
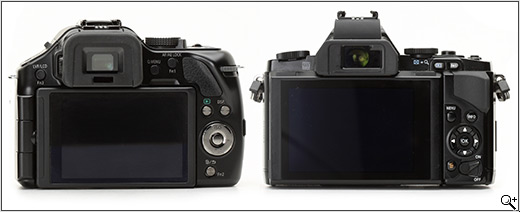 |
| Despite the different approaches to body design the control and button layout of the two cameras is not too dissimilar, with a four-way controller and a few buttons located to the right of the screen and a screen that can be flipped out and tilted. However, the Olympus features two control dials (G5 only one). |
 |
| The G5"s general size and shape are ver similar to the its predecessor G3 but in this front view the larger handgrip and the changes position/angle of the shutter botton are immediately visible. The new model has also gained an aluminium front plate. |
|---|
 |
| On the back we can see the new eye-sensor below the EVF and the new design of the four-way controller which is now shiny and silver. There"s also a new thumb rest next to the control dial and a slightly changed button-layout. |
Проблема решена
Достоинства: : - Возможности зеркалки в лёгком и компактном корпусе; - Подойдёт и начинающим фотографам (режим iA), и продвинутым любителям (режим iA+), и профи - широкий диапазон ручных настроек; - ISO 100 - 12800. Причем, благодаря сочетанию отличной матрицы и встроенного ПО обработки изображений, даже на iso 3200 шумы заметны только на увеличении 100% к оригиналу, а в нормальном масштабе почти не заметны и на 6400; - Видео 1920x1080 на 60 кадрах в секунду. Качество – не описать словами, а если смотреть на метровой плазме, то изображение просто завораживает. Звук, кстати, пишется стерео и очень хорошего качества; - Великолепные сюжетные режимы - их 23, с предустановленным набором характеристик на каждый режим. Одних только ночных - 4, плюс ночной портрет. Режим "ровная кожа" позволяет делать "автоматом" очень неплохие дневные портреты (всего портретных режимов - пять!!). Есть ещё 14 эффектов в дополнение к сюжетным режимам, что делает G5 привлекательным для совсем начинающих фотографов, и позволяет новичкам создавать очень качественные и интересные снимки; - Электронный затвор; - Поворотно-откидной экран 3" высокого разрешения, сенсорный; - Широкий режим фокусировки. Точечная фокусировка нажатием на сенсорный экран. Сверхбыстрая фокусировка: по оценкам Dpreview.com - порядка 0,1 с; - Следящий автофокус при съёмке видео!!! - Серийная съёмка 6 - 20 кадров/сек!!! - Режим HDR - великолепная детализация в тенях и отсутствие пересветов. - Электронный уровень - теперь новичок никогда не завалит горизонт! - Шикарный парк сменной оптики Panasonic - более 20ти объективов на все случаи жизни: макро и телевики, репортажники и портретники, ширики, фиксы - всё что угодно. Недостатки: : - Цена пока что. - Отсутствие в продаже версии body. Иных не заметил. Комментарий: Приобрел Panasonic G5 в январе 2013 года, на замену GF5 (тот отдал жене). G5 - девайс очень продвинутый, и составляет безусловную конкуренцию зеркалкам начального уровня, и даже становится на равных в ряд с некоторыми зеркалками среднего уровня (цена каковых - 40 и более К). Всё есть в обзорах и описании аппарата. Скажу, что покорило меня больше всего - это потрясающий режим iA+ (автоматический интеллектуальный расширенный). Panasonic G5 в этом режиме очень неплохо определяет сюжетную обстановку и выставляет параметры снимка самостоятельно. Но тут же, или на высококонтрастном сенсорном экране, или парой нажатий управляющего колесика, вы можете выставить свои параметры: яркость кадра (экспозицию), глубину резкости (диафрагму) и цветовую температуру (ББ). При этом, переэкспонированные участки на экране мигают черными зонами, что позволяет осуществить очень точную настройку экспозиции. Всё это делается в несколько секунд и пару кликов - и кадр-шедевр у вас готов! Ну и напоследок - об объективах. В качестве штатника я рекомендую однозначно Panasonic 12-35mm f/2.8 OIS Aspherical (H-HS12035). В качестве телевика - Panasonic 35-100mm f/2.8 LumixG X O.I.S. Эти два стекла закроют 98% ваших потребностей, так как Panasonic 35-100 отлично работает и как телевик, и как макрообъектив, и как портретник, а Panasonic 12-35mm – непревзойдённый репортажник и отличный видеообъектив.
Цифровая камера со сменной оптикой Panasonic Lumix DMC-G5X - обзор
Продолжаем тему цифровых беззеркалок со сменной оптикой, начатой с обзора Sony Alpha NEX-5N . Камера NEX-5N мне в принципе понравилась, но не без многих оговорок: у этого фотоаппарата серьезные проблемы с управлением, отсутствуют видоискатель и горячий башмак, дисплей заметно тормозит на солнце - в общем, разработчикам есть над чем подумать. Поизучав ситуацию с моделями беззеркалок Sony, я приобрел себе фотоаппарат Sony Alpha NEX-6 : у него как раз решены все те проблемы, которые я встретил у NEX-5N, а кроме того, штатный объектив SEL1650 (с диапазоном фокусов 16-50) - раза в три меньше, чем объектив E18-55, входящий в комплект NEX-5N. Но обзор этого фотоаппарата будет чуть позже, когда я его как следует потестирую, а в данной статье мы поговорим о камере Panasonic Lumix DMC-G5X , которая ко мне приехала на тест, за что спасибо компании Panasonic .

Panasonic Lumix DMC-G5X
Матрица - Live MOS (17,3 x 13,0 мм), 18,3 Мпикс (эффективных 16,1 Мпикс), 4608 x 3456
Кроп-фактор - 2
Формат снимков - JPEG, RAW (4912 x 3264)
Видео - AVCHD, AVC/H.264, MPEG4, 1920x1080, 60 кадров/с
Светочувствительность - 160 - 3200 ISO, Auto ISO, ISO6400, ISO12800
Выдержки - 60 - 1/4000 с
Вспышка - встроенная, до 10,50 м, подавление эффекта красных глаз, башмак
Дисплей - электронный, 920 000 пикселов, 3", поворотный, сенсорный
Видоискатель - Live View Finder (эквивалент 1 440 000 точек)
Карта памяти - SD, SDHC, SDXC
Порты - USB/AV, miniHDMI, Remote
Аккумулятор - 1200 мАч
Габариты - 120x83x71 мм, без объектива
Вес - 396 г, без объектива
Средняя цена - 28 тысяч рублей Технические характеристики объектива в комплекте: Модель - H-PS14042
Чувствительность ISO - 160 - 3200 ISO, Auto ISO, ISO6400, ISO12800
Первичный цветовой фильтр - есть, 37 мм
Фокусное расстояние - f = 14-42 мм (28-84 мм в эквиваленте 35 мм камеры)
Диапазон диафрагмы - F3.5 (Ш) - F5.6 (T)
Минимальная светосила - F22
Оптический стабилизатор изображения - есть
Диафрагма - 7 лепестков / круглое отверстие
Привод трансфокатора - моторизированный
Нанопокрытие - есть
Вес - 95 г (без крышек) Комплектация Поставляется комплект вот в такой коробке.
 В комплекте: камера, объектив,
блок зарядки аккумулятора с адаптером,
ремешок, USB-кабель, диск с программным
обеспечением, документация.
В комплекте: камера, объектив,
блок зарядки аккумулятора с адаптером,
ремешок, USB-кабель, диск с программным
обеспечением, документация.
 Внешний вид и особенности
У камеры металлический корпус,
покрашенный в черный цвет (есть варианты
серебристого и белого корпусов),
снабженный удобными прорезиненными вставками
в местах, где фотоаппарат обхватывается
пальцами. Внешний вид камеры производит
очень хорошее впечатление, качество
сборки - ожидаемо отличное.
Фотоаппарат с объективом и
поднятой вспышкой.
Внешний вид и особенности
У камеры металлический корпус,
покрашенный в черный цвет (есть варианты
серебристого и белого корпусов),
снабженный удобными прорезиненными вставками
в местах, где фотоаппарат обхватывается
пальцами. Внешний вид камеры производит
очень хорошее впечатление, качество
сборки - ожидаемо отличное.
Фотоаппарат с объективом и
поднятой вспышкой.
 Объектив, конечно,
сверхкомпактный. С диапазоном 14-42 (эквивалент
28-84), а выглядит как классический фикс-"блинчик".
(Впрочем, у Sony NEX-6 китовый SEL1650 с
эквивалентом 24-75 по размеру почти такой
же.) При включении часть объектива
выезжает вперед, и он становится где-то в
два раза длиннее.
Вот тушка без объектива.
Объектив, конечно,
сверхкомпактный. С диапазоном 14-42 (эквивалент
28-84), а выглядит как классический фикс-"блинчик".
(Впрочем, у Sony NEX-6 китовый SEL1650 с
эквивалентом 24-75 по размеру почти такой
же.) При включении часть объектива
выезжает вперед, и он становится где-то в
два раза длиннее.
Вот тушка без объектива.
 Обратите внимание, как грамотно
сделан выступ справа под руку: пальцы
туда ложатся просто идеально!
Вид сверху. Перед башмаком
расположен стереомикрофон. Это самое
удачное расположение: в таком варианте
микрофон не может быть случайно закрыт
рукой.
Обратите внимание, как грамотно
сделан выступ справа под руку: пальцы
туда ложатся просто идеально!
Вид сверху. Перед башмаком
расположен стереомикрофон. Это самое
удачное расположение: в таком варианте
микрофон не может быть случайно закрыт
рукой.
 Вид сзади.
 Под заглушкой справа -
комбинированный порт USB/AV, miniHDMI (кабеля в
комплекте нет), порт для тросика удаленного
управления.
Под заглушкой справа -
комбинированный порт USB/AV, miniHDMI (кабеля в
комплекте нет), порт для тросика удаленного
управления.

На нижнем торце открывается
крышка с пружинной защелкой, под ней
отсек для аккумулятора и слот для карты
памяти.
 Слот для карты памяти
расположен перпендикулярно крышке,
поэтому вставлять карту и вынимать ее
очень удобно. Для сравнения, у Sony NEX-6
карта вставляется параллельно крышке, причем
очень близко к ней, и вот за это
разработчиков надо убивать: вставлять
карту - еще туда-сюда, а вот доставать -
сущее мучение. Если учесть, что я люблю
переливать фотографии не через кабель, а
непосредственно с карты, - удовольствие
это еще то.
Слот для карты памяти
расположен перпендикулярно крышке,
поэтому вставлять карту и вынимать ее
очень удобно. Для сравнения, у Sony NEX-6
карта вставляется параллельно крышке, причем
очень близко к ней, и вот за это
разработчиков надо убивать: вставлять
карту - еще туда-сюда, а вот доставать -
сущее мучение. Если учесть, что я люблю
переливать фотографии не через кабель, а
непосредственно с карты, - удовольствие
это еще то.

Отсек с картой и аккумулятором в Sony NEX-6
Дисплей здесь сконструирован
по типу, обычно принятому для зеркалок.
Он может поворачиваться в сторону на 180
градусов и вращаться вокруг центральной
оси на 275 градусов, что сильно облегчает
съемку в условиях, когда фотоаппарат
опущен вниз или, наоборот, поднят высоко
вверх.
 Управление фотоаппаратом
 -
крайне важно. В Sony NEX-5N с управлением были
очень большие проблемы. Здесь, к счастью,
продуманность элементов управления
просто на
порядок лучше.
Расположение элементов
управления справа сверху.
Управление фотоаппаратом
Управление фотоаппаратом -
крайне важно. В Sony NEX-5N с управлением были
очень большие проблемы. Здесь, к счастью,
продуманность элементов управления
просто на
порядок лучше.
Расположение элементов
управления справа сверху.
 1. Кнопка спуска
, удобно
ложащаяся под указательный палец.2. Рычажок-качалка
,
управляющая зумом трансфокатора и
настройкой некоторых функций.
3. Кнопка включения
видеозаписи
. Отличное решение! Когда
видеозапись включается на поворотном
колесе (как на многих зеркалках) - это
очень неудобно: если нужно быстро что-то
снять на видео, проходит немало
томительных секунд (аж три или больше),
пока вы включите данный режим. Ну и здесь,
в отличие от NEX-5N, кнопка видео
расположена так, что ее, с одной стороны,
случайно не включишь, но с другой - при
необходимости быстро начать съемки
видео можно включить мгновенно. Также
эту кнопку можно отключить в меню, если
по каким-то причинам она вам мешает.4. Кнопка iA
- включение
интеллектуального режима, то есть
полного автомата, при котором камера
сама подбирает оптимальные параметры
съемки. Очень удобно, что его
сделали отдельной кнопкой - это
позволяет не переключаться с уже
настроенных ручных или пользовательских
режимов, когда нужно что-то быстро щелкнуть
автоматом. .
5. Диск режимов
. На нем
выставляются следующие виды:
программный автомат (P), приоритет
диафрагмы (A), приоритет выдержки (S),
ручные настройки (M), пользовательские
настройки 1 и 2 (C1 и C2), сцены (SCN), эффекты (палитра).
6. Рычажок включения
.
Включение-выключение выполняется
рычажком, находящимся под диском
режимов.
Теперь об элементах управления,
расположенных справа на задней крышке.
1. Кнопка спуска
, удобно
ложащаяся под указательный палец.2. Рычажок-качалка
,
управляющая зумом трансфокатора и
настройкой некоторых функций.
3. Кнопка включения
видеозаписи
. Отличное решение! Когда
видеозапись включается на поворотном
колесе (как на многих зеркалках) - это
очень неудобно: если нужно быстро что-то
снять на видео, проходит немало
томительных секунд (аж три или больше),
пока вы включите данный режим. Ну и здесь,
в отличие от NEX-5N, кнопка видео
расположена так, что ее, с одной стороны,
случайно не включишь, но с другой - при
необходимости быстро начать съемки
видео можно включить мгновенно. Также
эту кнопку можно отключить в меню, если
по каким-то причинам она вам мешает.4. Кнопка iA
- включение
интеллектуального режима, то есть
полного автомата, при котором камера
сама подбирает оптимальные параметры
съемки. Очень удобно, что его
сделали отдельной кнопкой - это
позволяет не переключаться с уже
настроенных ручных или пользовательских
режимов, когда нужно что-то быстро щелкнуть
автоматом. .
5. Диск режимов
. На нем
выставляются следующие виды:
программный автомат (P), приоритет
диафрагмы (A), приоритет выдержки (S),
ручные настройки (M), пользовательские
настройки 1 и 2 (C1 и C2), сцены (SCN), эффекты (палитра).
6. Рычажок включения
.
Включение-выключение выполняется
рычажком, находящимся под диском
режимов.
Теперь об элементах управления,
расположенных справа на задней крышке.

1. Q.MENU - кнопка вызова быстрых настроек. Там есть предустановленные десять пунктов, но можно и самостоятельно выставить те настройки, которые вам чаще всего нужны. Отличное решение, это очень и очень удобно. 2. AF/AE LOCK - блокировка фокусировки и экспозиции, также первая функциональная кнопка (настраиваемая). 3. Задний диск - быстрое изменение различных параметров. Используется, например, для изменения выдержки/диафрагмы для ручных и полуавтоматических режимов, для выставления компенсации экспозиции. Может крутиться и нажиматься. 4. Воспроизведение - кнопка просмотра отснятых материалов. 5. DISP - переключение информации, выводимой на дисплей. 6. Курсоры с центральной кнопкой - стандартный элемент практически любого аппарата. Нередко комбинируется с поворотным колесом, но здесь этого нет. Курсоры служат для навигации, в режимах съемки с их помощью вызываются переключения для: вида фокусировки, ISO, баланса белого, режима работы затвора. Центральная кнопка вызывает большое меню настроек и в определенных ситуациях работает как кнопка "ОК". 7. Корзина/возврат/Fn2 - удаление фоторолика, возврат в навигации и вторая функциональная (настраиваемая) кнопка. Элементы управления слева.

1. LVF/LCD/Fn3
- принудительное
переключение между дисплеем и
видоискателем, третья функциональная
кнопка.
2. Колесо настройки диоптра
-
подстройка видоискателя под ваше зрение
3. Вспышка
- кнопка
открывания вспышки, находящаяся на
верхнем торце фотоаппарата. Что
интересно, автоматически вспышка тут не
открывается: она будет срабатывать,
только если вы ее открыли сами. И это
очень даже правильно.
Ну и нужно заметить, что
значительную часть переключений
различных параметров можно делать
непосредственно на сенсорном экране,
который мы сейчас и рассмотрим.
Работа
сенсорного
дисплея
По умолчанию на дисплей
выводится необходимая информация
основных настроек: режим, вид съемки,
вспышка, режим видео, тип файла, вид
фокусировки, замер экспозиции,
коррекция экспозиции, количество
оставшихся кадров.
 Здесь можно включить режим
наведения резкости по объекту,
указанному пальцем на экране, а кроме того, можно
включить режим мгновенной съемки
указанного объекта: просто ткнули в
нужное место, аппарат сфокусировался и
тут же сфотографировал.
Справа виден шеврон выезжающей
панели инструментов: она интерактивная,
зависит от режима съемки, также можно
настроить, какие пиктограммы туда
помещать.
Здесь можно включить режим
наведения резкости по объекту,
указанному пальцем на экране, а кроме того, можно
включить режим мгновенной съемки
указанного объекта: просто ткнули в
нужное место, аппарат сфокусировался и
тут же сфотографировал.
Справа виден шеврон выезжающей
панели инструментов: она интерактивная,
зависит от режима съемки, также можно
настроить, какие пиктограммы туда
помещать.
 В определенных режимах может
появляться и вторая закладка с
пиктограммами инструментов: например, в
режиме "интеллектуальный+".
В определенных режимах может
появляться и вторая закладка с
пиктограммами инструментов: например, в
режиме "интеллектуальный+".
 При нажатии на кнопку Display вид
информации может меняться - например, в
одном из режимов появляется полоса
выдержки-диафрагмы, причем в ручном
режиме съемки на полосе красным цветом
отмечаются соотношения, при которых
экспозиция выставлена явно неправильно.
При нажатии на кнопку Display вид
информации может меняться - например, в
одном из режимов появляется полоса
выдержки-диафрагмы, причем в ручном
режиме съемки на полосе красным цветом
отмечаются соотношения, при которых
экспозиция выставлена явно неправильно.
 В некоторых случаях, когда
рычажок зума и зубчатое колесо также
могут делать какие-то настройки (компенсация
экспозиции, выдержка, диафрагма), на
экране на секунду появляется подсказка
с их функциями. Причем переключаться
между компенсацией, выдержкой,
диафрагмой (или их соотношением - для
каких-то режимов) можно нажатием колеса.
В некоторых случаях, когда
рычажок зума и зубчатое колесо также
могут делать какие-то настройки (компенсация
экспозиции, выдержка, диафрагма), на
экране на секунду появляется подсказка
с их функциями. Причем переключаться
между компенсацией, выдержкой,
диафрагмой (или их соотношением - для
каких-то режимов) можно нажатием колеса.
 Еще один вид - вывод на дисплей
электронного уровня. Его также можно
подключать специальной пиктограммой.
Штука, кстати говоря, в некоторых
случаях очень и очень полезная.
Еще один вид - вывод на дисплей
электронного уровня. Его также можно
подключать специальной пиктограммой.
Штука, кстати говоря, в некоторых
случаях очень и очень полезная.
 Многие виды настроек можно
делать через кнопку быстрого меню. Там
все очень удобно и наглядно, а нужный
параметр мгновенно выбирается пальцем
на экране.
Вот это настройка вспышки.
Многие виды настроек можно
делать через кнопку быстрого меню. Там
все очень удобно и наглядно, а нужный
параметр мгновенно выбирается пальцем
на экране.
Вот это настройка вспышки.
 Настройки вида сжатия и формата.
 Настройка качества. Тут также
можно выбрать режим съемки в RAW в трех
вариантах: одновременно с качественным
JPEG, со стандартным JPEG, вообще без JPEG.
Настройка качества. Тут также
можно выбрать режим съемки в RAW в трех
вариантах: одновременно с качественным
JPEG, со стандартным JPEG, вообще без JPEG.
 Настройки режима фокусировки.
 Тип съемки: яркий, естественный,
монохром, пейзаж, портрет,
пользовательский.
Тип съемки: яркий, естественный,
монохром, пейзаж, портрет,
пользовательский.
 Через настройки быстрое меню
можно переключить в пользовательский
режим, после чего вы сможете задать до 15
пиктограмм настроек из 32 возможных.
Через настройки быстрое меню
можно переключить в пользовательский
режим, после чего вы сможете задать до 15
пиктограмм настроек из 32 возможных.
 Как я уже писал в разделе,
посвященном управляющим элементам, с
помощью курсоров вы сможете выставлять
настройки важных параметров: ISO, вид
спуска затвора, баланс белого, вид
фокусировки.
Как я уже писал в разделе,
посвященном управляющим элементам, с
помощью курсоров вы сможете выставлять
настройки важных параметров: ISO, вид
спуска затвора, баланс белого, вид
фокусировки.


 Меню настроек
А теперь заглянем в настройки
фотоаппарата. Они разбиты на пять групп:
запись, видео, пользовательские меню,
настройки и воспроизведение. При
включении интеллектуального
автоматического режима в настройках
также появляется пиктограмма
переключения с iA (автомат) на iA+ (это
автомат с возможностями дополнительных
подстроек).
Меню настроек
А теперь заглянем в настройки
фотоаппарата. Они разбиты на пять групп:
запись, видео, пользовательские меню,
настройки и воспроизведение. При
включении интеллектуального
автоматического режима в настройках
также появляется пиктограмма
переключения с iA (автомат) на iA+ (это
автомат с возможностями дополнительных
подстроек).
 Этот фотоаппарат позволяет
делать большое количество самых
разнообразных настроек. Рассматривать
каждую из них нет никакого смысла, тем
более что многие должны быть понятны
просто по названию. Поэтому я сейчас
покажу список всех настроек, а
отдельно будем останавливаться на самых
интересных.
Закладка "Запись".
Этот фотоаппарат позволяет
делать большое количество самых
разнообразных настроек. Рассматривать
каждую из них нет никакого смысла, тем
более что многие должны быть понятны
просто по названию. Поэтому я сейчас
покажу список всех настроек, а
отдельно будем останавливаться на самых
интересных.
Закладка "Запись".
 Тут интересны возможность
включения HDR
(съемка с расширенным
динамическим диапазоном, когда делаются
три кадра с разной экспозицией, а
результат совмещается) и режим
интеллектуального управления
динамическим диапазоном
(не совместим с
HDR).
Тут интересны возможность
включения HDR
(съемка с расширенным
динамическим диапазоном, когда делаются
три кадра с разной экспозицией, а
результат совмещается) и режим
интеллектуального управления
динамическим диапазоном
(не совместим с
HDR).
 Интеллектуальное разрешение
-
повышенная четкость контуров.
Ограничение ISO
- тоже полезная настройка.
Я обычно ограничиваю до 3200.
Интеллектуальное разрешение
-
повышенная четкость контуров.
Ограничение ISO
- тоже полезная настройка.
Я обычно ограничиваю до 3200.
 Подавление шумов
очень неплохо
работает при съемке в плохих условиях
освещенности. Отключение цифрового
увеличения
- полезная настройка.
Например, в Sony NEX-6 цифровое увеличение
почему-то не отключается, что жутко
раздражает. Электронный затвор
помогает
при съемке в плохих условиях освещения,
а кроме того, при его использовании
фотоаппарат может снимать абсолютно
бесшумно. (Для электронного затвора
недоступны выдержки более одной секунды
и использование вспышки.)
Подавление шумов
очень неплохо
работает при съемке в плохих условиях
освещенности. Отключение цифрового
увеличения
- полезная настройка.
Например, в Sony NEX-6 цифровое увеличение
почему-то не отключается, что жутко
раздражает. Электронный затвор
помогает
при съемке в плохих условиях освещения,
а кроме того, при его использовании
фотоаппарат может снимать абсолютно
бесшумно. (Для электронного затвора
недоступны выдержки более одной секунды
и использование вспышки.)
 Если объектив поддерживает
такую полезную штуку, как оптическая
стабилизация
, ее можно включить - очень
помогает в ситуациях, когда фотоаппарат
трясется.
Любопытная функция - определение
лица
. Можно зарегистрировать лицо
какого-нибудь знакомого или
родственника, задать для него имя, а при
съемке групповых фотографий аппарат
будет стараться фокусироваться на
зарегистрированном лице (лицах).
Если объектив поддерживает
такую полезную штуку, как оптическая
стабилизация
, ее можно включить - очень
помогает в ситуациях, когда фотоаппарат
трясется.
Любопытная функция - определение
лица
. Можно зарегистрировать лицо
какого-нибудь знакомого или
родственника, задать для него имя, а при
съемке групповых фотографий аппарат
будет стараться фокусироваться на
зарегистрированном лице (лицах).
 Также тут можно задавать
профили
: дети, домашние животные, пункты
поездок. Информация о выбранном профиле
будет храниться в фотографиях.
Также тут можно задавать
профили
: дети, домашние животные, пункты
поездок. Информация о выбранном профиле
будет храниться в фотографиях.
 Настройки закладки "Видео"
относятся к режиму записи видеороликов.
Настройки закладки "Видео"
относятся к режиму записи видеороликов.


 Закладка пользовательских
настроек. Тут можно быстрое меню
переключить в настраиваемый режим.
Закладка пользовательских
настроек. Тут можно быстрое меню
переключить в настраиваемый режим.


 Здесь можно отключить кнопку
"Видео"
.
Здесь можно отключить кнопку
"Видео"
.
 Установить касание
- включение
возможности пальцем указывать зону
фокусировки.
Установить касание
- включение
возможности пальцем указывать зону
фокусировки.
 Закладка "Настройки". Мировое
время
- можно выставлять домашнее
время и время в поездках. Также можно
выставлять дату поездки
- это
поможет потом автоматически отобрать
фото из поездки. Сигнал
- сигналы
фотоаппарата и звук затвора (для
электронного).
Закладка "Настройки". Мировое
время
- можно выставлять домашнее
время и время в поездках. Также можно
выставлять дату поездки
- это
поможет потом автоматически отобрать
фото из поездки. Сигнал
- сигналы
фотоаппарата и звук затвора (для
электронного).
 Экономичный режим
-
настройка выключения дисплея и перехода
фотоаппарата в спящий режим. Режим USB
- фотоаппарат можно подключать как к
компьютеру, так и к принтеру для прямой
печати.
Экономичный режим
-
настройка выключения дисплея и перехода
фотоаппарата в спящий режим. Режим USB
- фотоаппарат можно подключать как к
компьютеру, так и к принтеру для прямой
печати.
 VIERA link
- для управления
дистанционно с помощью пульта. Возобновляемое
меню
- запоминает местоположение
последнего выбранного пункта во всех
меню. Поверн. ЖКД
- автоматический
разворот вертикальных снимков при
просмотре.
VIERA link
- для управления
дистанционно с помощью пульта. Возобновляемое
меню
- запоминает местоположение
последнего выбранного пункта во всех
меню. Поверн. ЖКД
- автоматический
разворот вертикальных снимков при
просмотре.
 Сброс №
- сброс сквозной
нумерации файлов на 0001. Обновление
пикселей
- корректировка матрицы, в
случае если на изображении появляются
странные яркие пятна.
Сброс №
- сброс сквозной
нумерации файлов на 0001. Обновление
пикселей
- корректировка матрицы, в
случае если на изображении появляются
странные яркие пятна.
 Очистка сенсора
- продувка
матрицы от мелкой пыли. Выполняется
автоматически при включении. Если на
снимках остаются посторонние пятна (проверка
- надо снять лист белой бумаги, зажав
диафрагму до 22) - матрицу придется
чистить самостоятельно или в мастерской.
(Обычно достаточно продуть матрицу
специальной фотографической грушей.)
Очистка сенсора
- продувка
матрицы от мелкой пыли. Выполняется
автоматически при включении. Если на
снимках остаются посторонние пятна (проверка
- надо снять лист белой бумаги, зажав
диафрагму до 22) - матрицу придется
чистить самостоятельно или в мастерской.
(Обычно достаточно продуть матрицу
специальной фотографической грушей.)
 Закладка настроек
воспроизведения. Тут можно
редактировать фото и видео, задавать
режимы просмотра.
Закладка настроек
воспроизведения. Тут можно
редактировать фото и видео, задавать
режимы просмотра.

 А здесь можно отредактировать
список распознаваемых лиц.
А здесь можно отредактировать
список распознаваемых лиц.
 Съемки и примеры фото
К сожалению, в силу различных
причин у меня было очень немного
времени на то, чтобы поснимать этим
фотоаппаратом в различных условиях.
Кроме того, мне так и не удалось застать
полностью солнечный день с голубым
небом - зимняя Москва-с, друзья, ничего не
поделаешь. Только один денек за пару
недель тестирования выдался с хоть
относительно проглядывающим солнышком -
вот это я успел поймать.
Съемки в основном
производились китовым объективом H-PS14042 (f
= 14-42 мм или 28-84 мм в эквиваленте 35 мм
камеры), также мне были привезены на тест
еще два объектива, которыми я чуть-чуть
успел поснимать (очень жаль, что чуть-чуть,
потому что объективы очень интересные).
Это Leica
DG Macro-Elmarit 45mm/F2.8 и Panasonic Lumix G Vario 7-14mm F4 ASPH .
Съемки и примеры фото
К сожалению, в силу различных
причин у меня было очень немного
времени на то, чтобы поснимать этим
фотоаппаратом в различных условиях.
Кроме того, мне так и не удалось застать
полностью солнечный день с голубым
небом - зимняя Москва-с, друзья, ничего не
поделаешь. Только один денек за пару
недель тестирования выдался с хоть
относительно проглядывающим солнышком -
вот это я успел поймать.
Съемки в основном
производились китовым объективом H-PS14042 (f
= 14-42 мм или 28-84 мм в эквиваленте 35 мм
камеры), также мне были привезены на тест
еще два объектива, которыми я чуть-чуть
успел поснимать (очень жаль, что чуть-чуть,
потому что объективы очень интересные).
Это Leica
DG Macro-Elmarit 45mm/F2.8 и Panasonic Lumix G Vario 7-14mm F4 ASPH .

Leica DG Macro-Elmarit 45mm/F2.8

Panasonic Lumix G Vario 7-14mm F4 ASPH
Сделанные снимки перед
выкладыванием вообще никак не
обрабатывались, разве что встроенными
средствами фотоаппарата (в этом случае рядом с
изображениями сделаны соответствующие
пометки). Здесь выложены уменьшенные
снимки размером в 600 пикселов, при щелчке
по снимку открывается фото размером 1980
пикселов. Кого интересует просмотр
полноразмеров "как есть" - вот в
этом архиве
(288 Мб) выложен весь комплект. Данные EXIF (и прочие
метаданные) во всех видах изображений,
разумеется, сохранены.
Ну, поехали.
Зима (район "Щукинской"),
улица, пасмурная погода.

 Плакат в лифте. Это ISO 1600.


 Ночная съемка китовым
объективом. Свет идет только от уличных
фонарей. Полный автомат iA.
Ночная съемка китовым
объективом. Свет идет только от уличных
фонарей. Полный автомат iA.

 Это дома в условиях очень
низкой освещенности. ISO 1600. Шума почти
нет, но баланс белого, как и на
предыдущих снимках, сильно уползает в
желтизну, надо корректировать.
Это дома в условиях очень
низкой освещенности. ISO 1600. Шума почти
нет, но баланс белого, как и на
предыдущих снимках, сильно уползает в
желтизну, надо корректировать.
 Панель в лифте.
 Это уже получше погода, из дымки
временами даже проглядывало солнышко. (Район
Химки-Куркино.) Снято китовым объективом
на 14 мм.
Это уже получше погода, из дымки
временами даже проглядывало солнышко. (Район
Химки-Куркино.) Снято китовым объективом
на 14 мм.
 А это с той же точки китовым на
максимуме - 42 мм. В сравнении виден
диапазон охвата.
А это с той же точки китовым на
максимуме - 42 мм. В сравнении виден
диапазон охвата.
 Следующая серия - эксперименты
с так называемым творческим режимом, при
котором можно задавать различные
эффекты изображения.
Это обычный кадр.
Следующая серия - эксперименты
с так называемым творческим режимом, при
котором можно задавать различные
эффекты изображения.
Это обычный кадр.
 Выразительный эффект. Хорошо
подходит для съемок ярких контрастных
предметов.
Выразительный эффект. Хорошо
подходит для съемок ярких контрастных
предметов.
 Ретро. Эффект выцветшей
фотографии. В общем, похоже.
Ретро. Эффект выцветшей
фотографии. В общем, похоже.
 Сепия. Создает оттенок сепии.
Кстати, паршиво создает, у сепии заметно
более насыщенный коричневый цвет.
Сепия. Создает оттенок сепии.
Кстати, паршиво создает, у сепии заметно
более насыщенный коричневый цвет.
 Динамический монохром. С таким
эффектом снимать Нью-Йорк под старину -
самое оно.
Динамический монохром. С таким
эффектом снимать Нью-Йорк под старину -
самое оно.
 Выразительное искусство.
Интересный эффект. Наверное, прилично
работает с резко очерченными
контрастными тучами-облаками.
Выразительное искусство.
Интересный эффект. Наверное, прилично
работает с резко очерченными
контрастными тучами-облаками.
 Кросс-процесс. Подчеркнутые
зеленые и синие оттенки. Не могу
придумать, для чего это вообще можно
использовать.
Кросс-процесс. Подчеркнутые
зеленые и синие оттенки. Не могу
придумать, для чего это вообще можно
использовать.
 Эффект мыльницы. Ну, если
фотоаппарат делать из обычной мыльницы,
тогда, наверное, он так и будет снимать.
Эффект мыльницы. Ну, если
фотоаппарат делать из обычной мыльницы,
тогда, наверное, он так и будет снимать.
 Эффект миниатюры. Оставляет
резким изображение в центре и
размазывает периферию. Подходит для
макросъемки, когда нужно сделать акцент
на изображение в центре.
Эффект миниатюры. Оставляет
резким изображение в центре и
размазывает периферию. Подходит для
макросъемки, когда нужно сделать акцент
на изображение в центре.
 Впрочем, я вообще считаю, что
все эти предустановленные фильтры в
самом фотоаппарате ни к чему. Задача
фотографа (пусть даже самого что ни на
есть чайника-расчайника) - получить
приличное исходное изображение. А уж как
потом с ним извращаться - это вопрос
используемого графического редактора и
его фильтров-плагинов. Фотоаппарат с
программой все равно никогда не
сравнится, а тогда какой смысл?
С той же точки кадр сделан
широкоугольником Lumix G Vario 7-14mm.
Впрочем, я вообще считаю, что
все эти предустановленные фильтры в
самом фотоаппарате ни к чему. Задача
фотографа (пусть даже самого что ни на
есть чайника-расчайника) - получить
приличное исходное изображение. А уж как
потом с ним извращаться - это вопрос
используемого графического редактора и
его фильтров-плагинов. Фотоаппарат с
программой все равно никогда не
сравнится, а тогда какой смысл?
С той же точки кадр сделан
широкоугольником Lumix G Vario 7-14mm.
 Вот еще им же.
 Это уже китовым.
 Солнышко слегка проглянуло,
ловлю момент.
Солнышко слегка проглянуло,
ловлю момент.
 Съемка в контровом свете.
 Еще немного солнышка - китовый
на 14 мм. Хороший угол (28 мм эквивалента) -
для обычных задач будет вполне
достаточно.
Еще немного солнышка - китовый
на 14 мм. Хороший угол (28 мм эквивалента) -
для обычных задач будет вполне
достаточно.
 Теперь в помещении при очень
плохом освещении из окна проверяем
режим HDR самого фотоаппарата. Вот
обычный кадр.
Теперь в помещении при очень
плохом освещении из окна проверяем
режим HDR самого фотоаппарата. Вот
обычный кадр.
 А это со включенным HDR. Тени, на
мой взгляд, прорисовались неплохо. Хотя
если делать HDR вручную, получилось бы
заметно лучше - там диапазон экспозиции
явно надо увеличивать. Но для
автоматического режима сойдет.
А это со включенным HDR. Тени, на
мой взгляд, прорисовались неплохо. Хотя
если делать HDR вручную, получилось бы
заметно лучше - там диапазон экспозиции
явно надо увеличивать. Но для
автоматического режима сойдет.
 Демонстрация возможностей
широкоугольника. Сначала съемка китовым
объективом на 14 мм.
Демонстрация возможностей
широкоугольника. Сначала съемка китовым
объективом на 14 мм.
 А теперь широкоугольником (Lumix G
Vario) на 7 мм.
А теперь широкоугольником (Lumix G
Vario) на 7 мм.
 Фикс (Leica DG Macro-Elmarit) на 45 мм.
Портрет игрушки.
Фикс (Leica DG Macro-Elmarit) на 45 мм.
Портрет игрушки.
 Включил режим "Портрет с
шелковистой кожей". И правда, кожа у
льва сразу стала очень шелковистой.
Включил режим "Портрет с
шелковистой кожей". И правда, кожа у
льва сразу стала очень шелковистой.
 Еще фикс.
 А это уже тот же фикс в режиме
портрета - диафрагма на 2,8, снимал с
близкого расстояния.
А это уже тот же фикс в режиме
портрета - диафрагма на 2,8, снимал с
близкого расстояния.
 Тот же кадр еще ближе, чтобы
задник совсем размыть.
Тот же кадр еще ближе, чтобы
задник совсем размыть.
 Ну и китовый на 14 мм
в помещении с плохим естественным
освещением.
Ну и китовый на 14 мм
в помещении с плохим естественным
освещением.
 Еще немного солнышка на китовом
объективе.
Еще немного солнышка на китовом
объективе.
 Интерьер ресторанчика на 7 мм
ширика.
Интерьер ресторанчика на 7 мм
ширика.
 На нем же блюдо в приближении (14
мм).
На нем же блюдо в приближении (14
мм).
 Оно же на 7 мм.
 На 7 мм улица.
 И теперь съемка в сумерках
китом 14 мм.
И теперь съемка в сумерках
китом 14 мм.
 И в темноте с рук китом при свете
обычных уличных фонарей. Кстати,
очень прилично. Снималось на автомате.
И в темноте с рук китом при свете
обычных уличных фонарей. Кстати,
очень прилично. Снималось на автомате.
 Кстати, когда знающие русский
немцы видят название магазина "Кнакер"
(хороший магазин, между прочим), то
начинают плакать от счастья. Утверждают,
что в немецком "кнакер" - это "пердун"
на сленге. Хорошее название.
Видео
Видео снимает, на мой взгляд,
очень хорошо, причем фотоаппарат также
имеет немало функций для записи
видеороликов.
Прежде всего там можно
выбирать различные форматы как видео
высокого разрешения AVCHD - это файлы с
расширением MTS, так и видео формата MP4 (файлы
с расширением MP4), пригодного для
просмотра в планшетах-смартфонах и для
передачи через Интернет.
Вот поддерживаемые виды.
Кстати, когда знающие русский
немцы видят название магазина "Кнакер"
(хороший магазин, между прочим), то
начинают плакать от счастья. Утверждают,
что в немецком "кнакер" - это "пердун"
на сленге. Хорошее название.
Видео
Видео снимает, на мой взгляд,
очень хорошо, причем фотоаппарат также
имеет немало функций для записи
видеороликов.
Прежде всего там можно
выбирать различные форматы как видео
высокого разрешения AVCHD - это файлы с
расширением MTS, так и видео формата MP4 (файлы
с расширением MP4), пригодного для
просмотра в планшетах-смартфонах и для
передачи через Интернет.
Вот поддерживаемые виды.
 В процессе видеосъемки можно
использовать трансфокатор и делать
одиночные фотоснимки. (Видеосъемка
включается отдельной кнопкой,
фотоснимки делаются обычной кнопкой "Спуск".)
Доступны также различные виды
фокусировки.
В процессе видеосъемки можно
использовать трансфокатор и делать
одиночные фотоснимки. (Видеосъемка
включается отдельной кнопкой,
фотоснимки делаются обычной кнопкой "Спуск".)
Доступны также различные виды
фокусировки.
 Поснимал видео в различных
режимах. И в AVCHD, и в MP4 качество получается
на уровне, фокусируется нормально даже
после использования трансфокатора.
Съемки в условиях плохой освещенности
также порадовали. Впрочем, смотрите сами
- вот два ролика, сделанных при дневном
свете в максимальном AVCHD и MP4, еще
два ролика в тех же форматах в сумерках и
AVCHD в темноте. Плюс - фото, сделанное в
процессе съемки видео.
Видео днем в HD.
Поснимал видео в различных
режимах. И в AVCHD, и в MP4 качество получается
на уровне, фокусируется нормально даже
после использования трансфокатора.
Съемки в условиях плохой освещенности
также порадовали. Впрочем, смотрите сами
- вот два ролика, сделанных при дневном
свете в максимальном AVCHD и MP4, еще
два ролика в тех же форматах в сумерках и
AVCHD в темноте. Плюс - фото, сделанное в
процессе съемки видео.
Видео днем в HD.
Видео днем в MP4
Фото, снятое днем при съемке этого видео.

Видео в сумерках в HD
Видео в сумерках в MP4
Видео в темноте HD
Дополнения, впечатления и наблюдения Камера очень понравилась. Удобный и легкий корпус, отлично продуманные элементы управления, отлично сделанная система настроек на сенсорном дисплее, который, не в пример дисплею Sony Alpha NEX-5N , предоставляет огромное количество функций. Китовый объектив - отличный. В выключенном состоянии - просто как блинчик "пятерка". Фотоаппарат становится размером буквально в две сигаретные пачки, прижатые друг к другу. При этом общий вес тушки с объективом - меньше 500 граммов. Для сравнения, вес моего (уже бывшего) Canon 60D с китовым объективом - 1230 граммов. В 2,5 раза больше.Автофокус - очень быстрый, я вообще не заметил разницы с зеркалкой. Не знаю, может быть, там есть различия в какие-то сотые доли секунды, но я их не мог измерить без своего "стрелочного осциллографа"©. Контрастная фокусировка, которая здесь применяется, более точная, чем фазовая, но требует требует большего движения объектива и времени. Здесь, как говорят разработчики, за счет быстрого процессора и быстрого объектива скорость съемки доведена до частоты 0,09 с, что соответствует уровню профессиональных камер и превосходит зеркальные камеры начального уровня. Так вот, чисто визуально все так и есть: автофокус просто мгновенный. Хорошо работает автоматическое переключение с дисплея на видоискатель, разве что там пришлось режим с "чувствительного" перевести на "нормальный", потому что поначалу несколько раз аппарат переключал меня на видоискатель в плохих условиях освещения, когда я пользовался дисплеем. Для определенных случаев очень удобен режим "ткни пальцем в объект на дисплее - я тут же сфотографирую, наведя на него резкость". Возможность перевести аппарат на электронный затвор и полностью вырубить звук - крайне полезна для ситуации, когда нужно получать качественные снимки без звука затвора: в театре, на концерте и так далее. Скорострельность у аппарата совершенно замечательная. В режиме "истеричной съемки"™ можно вскидывать аппарат в разные стороны и непрерывно давить на кнопку: он успевает фокусировать и снимать примерно за полсекунды. Кроме того, в подобных случаях можно использовать серийную съемку, которая здесь также впечатляющая. В суперскоростном режиме он делает 20 снимков в секунду и серия - 40 кадров. В режиме высокоскоростной съемки он делает 6 кадров в секунду и серия ограничивается только свободным местом на карте памяти. Причем, начиная от режима высокоскоростной съемки, вы также можете снимать в RAW, а от режима средней скорости еще и может работать прямой просмотр (LiveView) при съемке (средняя скорость - 3,7 кадра в секунду, низкая скорость - 2 кадра в секунду). Впрочем, нужно иметь в виду, что для скоростных режимов серийной съемки доступна только AFS-фокусировка - то есть по первому кадру серии. Что, в общем, неудивительно. По поводу LiveView. Режим просмотра здесь непростой. Яркость изображения (в видеоискателе и на дисплее) соответствует выставленным параметрам экспозиции. Это очень удобно в случаях, когда вам надо выставить компенсацию, чтобы, например, осветлить слишком темный объект или затемнить слишком светлый. Вы зубчатым колесом выставляете компенсацию, а на дисплее (видоискателе) сразу видно, что в итоге получится на фотографии. Причем в ручном режиме экспозиции подгонка яркости отключается автоматически (это очень и очень правильно!), а соответствие выставленных параметров условиям съемки вам показывается на линейке выдержек-диафрагм: если параметры неправильные, там появляется красная зона. Очень порадовал дисплей как у зеркалки, который можно крутить как угодно. У той же Sony NEX дисплей откидывается только на 90 градусов для нижней съемки и на 45 для верхней, а повороты в сторону вообще не предусмотрены. Батарея у камеры живет не слишком долго (обычная проблема для беззеркалок и компактов), но терпимо. В обычном режиме без использования вспышки хватает где-то на 320-350 кадров - это чуть побольше, чем у Sony NEX-5N и NEX-6. Не понравилось только то, что эта камера не умеет заряжать аккумулятор через порт miniUSB, как это сделано у NEX-6. В этом случае можно не покупать запасной аккумулятор, а можно просто заряжать камеру в дороге от внешних смартфонных батарей, коих сейчас полно. Для данной же камеры придется все-таки купить запасную батарею, потому что в поездках без нее можно и не справиться. Ну и теперь передо мной возникает дурацкий вопрос: а на черта я вообще поторопился с покупкой Sony NEX-6? Да, у нее исправлены многие проблемы NEX-5N. Однако вот эта камера мне совершенно однозначно понравилась намного больше, чем NEX-6. Да и по габаритам она почти такая же, хотя поначалу кажется больше. Сравните.
 Ну и обращаю ваше внимание на то,
что Panasonic Lumix DMC-G5X с китовым объективом
стоит примерно 28 тысяч рублей, а Sony NEX-6
начинается где-то от 30 тысяч (я покупал
свой комплект за 46 тысяч, но там еще
телевичок SEL-55210).
Впрочем, конечно, не стоит
суетиться: мне и другие производители
предлагают потестировать их
беззеркалки. Вполне возможно, что
найдется что-то еще более интересное. Но
данным фотоаппаратом я более чем
доволен. Причем изначально был
расположен даже скептически: я Lumix
толком в руках не держал, а NEX-6 мне, в
общем, нравился. Но разница между
ними в удобстве использования и
функциональности очевидна.
Теперь ответим на вопрос, кому
может быть интересна данная модель.
Несмотря на то что аппарат отлично
снимает в полностью автоматическом
режиме и имеет немало предустановок для
ситуации "я умею нажимать только одну
кнопочку", его возможности, конечно,
рассчитаны на продвинутых любителей и
профессионалов. Некоторые профи, судя по
их отзывам в Интернете, приобретают эту
камеру для случаев, когда зеркалку с
собой брать не хочется или просто нет
такой возможности. Ну а, например, мне
такая камера совершенно спокойно может
полностью заменить зеркалку, особенно
если еще приобрести фиксик 25 мм с 1,8 и
широкоугольничек миллиметров на 9.
Объектив Panasonic Lumix G Vario 7-14mm F4 ASPH, конечно,
классный, но он стоит порядка 1000 евро ($1650
в России), что слегка не вписывается в
заданную мной ценовую категорию, но,
впрочем, надо будет просто попробовать
другие широкоугольнички и понять, что
именно мне подойдет.
В общем, поторопился я с
покупкой, эта камера мне нравится
заметно больше Sony NEX-6. Впрочем, Sony NEX-6 во
всех подробностях я намеревался
поизучить через пару недель, по итогам
напишу обзор, и вот там уже окончательно
сравним эти две камеры.
Ну и обращаю ваше внимание на то,
что Panasonic Lumix DMC-G5X с китовым объективом
стоит примерно 28 тысяч рублей, а Sony NEX-6
начинается где-то от 30 тысяч (я покупал
свой комплект за 46 тысяч, но там еще
телевичок SEL-55210).
Впрочем, конечно, не стоит
суетиться: мне и другие производители
предлагают потестировать их
беззеркалки. Вполне возможно, что
найдется что-то еще более интересное. Но
данным фотоаппаратом я более чем
доволен. Причем изначально был
расположен даже скептически: я Lumix
толком в руках не держал, а NEX-6 мне, в
общем, нравился. Но разница между
ними в удобстве использования и
функциональности очевидна.
Теперь ответим на вопрос, кому
может быть интересна данная модель.
Несмотря на то что аппарат отлично
снимает в полностью автоматическом
режиме и имеет немало предустановок для
ситуации "я умею нажимать только одну
кнопочку", его возможности, конечно,
рассчитаны на продвинутых любителей и
профессионалов. Некоторые профи, судя по
их отзывам в Интернете, приобретают эту
камеру для случаев, когда зеркалку с
собой брать не хочется или просто нет
такой возможности. Ну а, например, мне
такая камера совершенно спокойно может
полностью заменить зеркалку, особенно
если еще приобрести фиксик 25 мм с 1,8 и
широкоугольничек миллиметров на 9.
Объектив Panasonic Lumix G Vario 7-14mm F4 ASPH, конечно,
классный, но он стоит порядка 1000 евро ($1650
в России), что слегка не вписывается в
заданную мной ценовую категорию, но,
впрочем, надо будет просто попробовать
другие широкоугольнички и понять, что
именно мне подойдет.
В общем, поторопился я с
покупкой, эта камера мне нравится
заметно больше Sony NEX-6. Впрочем, Sony NEX-6 во
всех подробностях я намеревался
поизучить через пару недель, по итогам
напишу обзор, и вот там уже окончательно
сравним эти две камеры.
The Panasonic Lumix G5 is a 16 Megapixel mirrorless compact system camera based on the Micro Four Thirds standard which Panasonic co-developed with Olympus. Panasonic now refers to mirrorless system cameras as DSLMs, or Digital Single Lens Mirrorless, but we’re sticking with the term compact system cameras for now.
Announced in July 2012, the G5 is the successor to the Lumix G3, and in case you were wondering, there was no G4, Panasonic having skipped the number for tetraphobic reasons (it’s considered unlucky in some Asian countries). Like the G3 the new model features 16 Megapixels, athough this is a newly designed sensor with improved high ISO noise performance and, paired with a redesigned Venus Engine processor, delivers a maximum ISO sensitivity of 12800 ISO.
The new sensor and processor also provide improvements in video, with a new 1080p50/60 mode. High speed burst shooting also gets a boost to 6fps at full resolution. The fully-articulated touch-screen remains, but the resolution has been doubled to 920k pixels and you can now cleverly use the screen like a track pad to set the AF area while composing with the electronic viewfinder. There’s also an eye proximity sensor to switch the viewfinder on and off, along with a new rocker switch just behind the shutter which operates powered zooms, a selection of Creative Control filters and an electronic level.
With these improvements the Lumix G5 cements value for money reputation that the G series has earned and puts it in contention with cameras costing a lot more. In my review I’ve compared it with the pricier Sony NEX-6. The NEX-6 offers the same 16 Megapixel resolution as the G5, but with a larger 3:2 proportioned APS-C sensor. Other refinements include a 2.3 million dot electronic viewfinder (but not a touch-screen), full HD movies at 1080p50/60, and fast 10fps full resolution continuous shooting. Like the Lumix G5 the NEX-6 also comes with the option of a small lightweight collapsible zoom.
Possibly the most exciting thing about the NEX-6, though, is that you can extend its feature set by means of built-in Wifi and downloadable apps. But when all’s said and done the Lumix G5 provides a similar package to the NEX-6 albeit minus some of the bells and whistles. Does that make it a bargain that punches well beyond its weight? Read my full review to find out.
Panasonic Lumix G5 design and controls
With its moulded contours and hand grip, pronounced hump and centrally located viewfinder, the Lumix G5 resembles nothing more than a miniaturised DSLR. With the G3, the ‘World’s smallest and lightest system camera’, it was all about size, but with the G5 Panasonic has relaxed a little and it’s as if the G5 has let out a breath. The dimensions tell you the size of it – 120 x 83 x 71mm weighing 396g with the battery and card. The G3’s measurements of 115 x 84 x 47 and 382g exaggerate the situation a little as most of the G5’s additional depth is due to the bigger grip and the two weigh almost the same.
On the top panel a slightly larger mode dial has the same eight positions as the earlier G3 with the PASM modes joined by two custom positions, SCN for scene modes and Creative control. As on all G series models and compacts intelligent Auto mode is activated via a dedicated illuminated button. In front of that is the movie record button, relocated from the rear panel of the G3 and forward of that is a new rocker switch which controls the motorised zoom if a PZ lens is fitted and can also be assigned to exposure compensation and aperture adjustment in Manual mode.
The shutter release is positioned at the very front of the grip, a much more natural position as that’s where your index finger falls naturally and you don’t have to make an effort to extend it backwards as was the case with the G3. Generally, the G5 is a more comfortable camera to hold and operate than the G3. Round the back the thumb rest now has a more contoured ridge, providing a more stable grip and allowing more confident one-handed operation.
|

From the mode dial leftward the top of the Lumix G5 looks identical to its predecessor. An ISO standard hotshoe is mounted atop the viewfinder hump with stereo microphones located forward of it. On the left side is a switch to pop the flash and next to it the small grille for the mono speaker.
As before, there’s a small button on the rear panel just to left of the viewfinder which toggles the view between it and the LCD screen. That’s less important than it used to be thanks to the addition of a proximity sensor just below the viewfinder which automatically turns it on when you put your eye to it.
The Q.Menu button is relocated to the right side of the viewfinder and alongside it there’s a new programmable AF/AE lock button that’s also labelled Fn1.
The thumb-operated rear dial has been shifted rightward slightly to a new position on the rear right corner just outside the thumb rest. In Aperture and Shutter Priority, the dial naturally defaults to adjust the f-number and shutter speed respectively, but push it in and it’ll subsequently adjust the exposure compensation. Push it in again and it reverts to adjusting the f-number or shutter speed. Pushing the dial in full Manual switches between adjusting the shutter speed and aperture. In Program it can be used to shift the exposure, or again adjust the exposure compensation with a push.
The playback button is relocated to the panel on the right side of the screen next to the DISP button for toggling screen and viewfinder overlays. The four way controller has been redesigned and is now a single silver coloured pad rather than the individual buttons on the G3, but the functions are the same, ISO sensitivity, White Balance, Drive mode and AF mode. Finally the delete/back button doubles up as a second programmable function button labelled Fn2.
Moving onto the ports, a flap on the right side of the body opens to reveal remote control, mini HDMI and combined AV / USB jacks, but sadly no external microphone input; absent since the G2 to differentiate it from the higher-end Lumix GH series.
 |
In a compartment under the body you’ll find the battery and memory card slot. The larger grip means the G5 can accommodate the 1200mAh DMW-BLC12E battery used in the GH2 with Panasonic quoting 320 shots for a full charge. That’s an improvement on the 270 shots of the G3, but still well short of what you could have expected from the much earlier G2. Bear in mind also that these figures are quoted for the manual zoom H-FS014042 lens. While that’s useful for making comparisons with older models, with the PZ 14-42mm kit lens attached, you’ll see a significant drop in that figure. In terms of memory, the G3 is compatible with SD, SDHC and SDXC cards; Panasonic recommends using cards rated at Class 4 or higher when recording movies.
As mentioned above, the Lumix G5 features a popup flash, which you need to manually open by flicking a switch on the side of the head; with the flash closed, it won’t popup on its own accord, which prevents any nasty surprises. The popup flash has a guide number of 8 at 100 ISO which is not as powerful as the built-in flash on an entry level DSLR like the Canon EOS T4i (GN 13), but with a little more punch than the built-in flash on the NEX-6 (GN6) or the accessory flash provided with the Olympus PEN models (GN 7). It effectively gives the G5 a range of 3 metres, or about 10 feet at 160 ISO with the aperture wide open at f3.5. The built-in flash has red eye reduction and slow sync modes, the fastest sync shutter speed is 1/160th and the G5 offers both first and second curtain sync.
The G5 is also equipped with a hotshoe which can accommodate the optional FL220 / FL360 / FL500 with TTL auto metering; but note that like the NEX-6 there’s no built-in wireless flash control.
Panasonic Lumix G5 viewfinder and screen
The G5 shares the same 1.4 million dot electronic viewfinder as its predecessor. There will inevitably be some disappointment that the resolution hasn’t been increased on the new model, but, despite the fact that it trails the NEX-6, with its 2.4 million dot EVF, the G5’s viewfinder is still very good. In terms of resolution, 1.4 million dots has become more or less standard at this end of the market. You’ll find the same resolution on offer from the Olympus E-M5 and PEN VF-2 accessory EFV, the Fujifilm Finepix X100 and XS-1, and the Nikon V1 and V2.
So it looks like the NEX-7 and NEX-6, along with Fujifilm’s XE-1 will continue to lead the way on EVF resolution for the time being at least. But it’s all too easy to get tunnel vision, when it comes to EVF’s resolution isn’t the only factor, size and brightness also play a big part. I’m happy to report that the G5’s viewfinder is both big and bright and in a side by side comparison with the NEX-6 the difference wasn’t as pronounced as you might think. The Lumix G5’s viewfinder looks brighter and a little bigger than the NEX-6’s though there’s no denying the Sony’s higher resolution does provide a more detailed view with a more stable image. When panning, the lower resolution of the G5’s EVF and its field sequential display does lead to shimmering and ‘tearing’ effects. Apparently some people are more prone to this than others and though it’s slightly distracting I didn’t find it massively off-putting. If you’re using the EVF for a protracted period though it could become quite tiring on your eyes.
As I’ve mentioned, there’s an optical sensor below the viewfinder which automatically activates it and turns off the LCD when you put your eye to it. The G5 also retains the button on the left side of the viewfinder that allows you to do this manually. Clearly you don’t need both of these systems and you need to make a choice. If you decide to use the optical sensor, the button can be assigned to another function, alternatively if you stick with the button’s original function the optical sensor can be turned off. In practice, although there’s a very fractional delay when you put your eye to the viewfinder, I found it preferably to switching manually.
You can turn the LCD screen off altogether and operate the camera with the viewfinder only, but unlike the Sony NEX-6 you can’t arrange things so that shooting information is displayed on the screen while the viewfinder is used for composing.
While the EFV resolution is unchanged, the Lumix G5’s screen is updated and now has double the resolution of its predecessor with 920k dots. As before, it’s a touch screen, but Panasonic has extended its function to include something called ‘Touch Pad AF’ Essentially this allows you to position the AF area by dragging your finger on the LCD screen while using the viewfinder to compose. I’ll talk more about how that works in practice in the AF section near the end of the review.
The screen itself is hinged at the side and so can be positioned facing in any direction including downwards for overhead shots and forwards for self-shooting, though, probably the two most often-used positions for this kind of screen are folded in for protection or reversed like a conventional fixed screen. The screen is 3:2 proportioned so when shooting 4:3 stills there are narrow bars down either side. On the right side of the screen this space is used for some touch icons which appear in a docking strip. All other information is displayed overlayed on the image though you can switch the configuration for both the EVF and LCD screen so the exposure details are displayed below a reduced image area. This makes it easier to see your settings, but harder to see what you’re shooting.
The display button toggles between two overlays – with information and without, plus either of those options with a two-axis level. As I’ve mentioned, you can also turn the display off altogether. Additionally, there are two programmable screen function buttons labelled Fn4 and Fn5 which by default activate the level and a repositionable live histogram. Given that you can access the level this way, assigning two of the display overlays to it seems rather wasteful and I’m sure Panasonic could make much better use of it.
Panasonic Lumix G5 lens and stabilisation
The Lumix G5 is available as body only or in a kit with several lens choices. I tested it with the Lumix G X Vario PZ 14-42mm F3.5-5.6 ASPH. POWER O.I.S. This powered zoom, announced in August 2011, was the first zoom for a compact system camera that was itself compact, rather than a slightly smaller version of a DSLR kit zoom. While previously you needed to attach a pancake prime to a compact system camera body to make it pocketable, you now had the same degree of portability with a standard zoom.
Aside from the micro four thirds metal mount, the lens is constructed from high quality plastic. In its collapsed power-off state it’s a mere 27mm thick, but switch the camera on and it extends to 49mm. Two rocker switches on the left side of the barrel control the zoom and manual focus. Unlike the single-speed control on the Sony E PZ 16-50mm, the zoom rocker offers two speeds and there’s a good couple of millimetres travel in each direction so, although it takes a little bit of use to get the feel of it, you can zoom at the slower speed without too much risk of accidentally speeding things up by pushing that little bit too far.
coverage wide | Panasonic Lumix G5 Lumix G X Vario PZ 14-42mm F3.5-5.6
 coverage tele |
|
|
||
| 14-42mm at 14mm (28mm equiv) | 14-42mm at 42mm (84mm equiv) |

The only criticism I’d make of the two-switch setup is that, despite the slightly larger size of the zoom rocker, it isn’t easy to distinguish the two by feel alone and, to begin with at least, I found myself occasionally trying to zoom with the focus control. Though there’s is of course a second option which is to use the new zoom control on the Lumix G5’s body. Located immediately behind the shutter release this also provides dual-speed control, though it’s a little harder to control than the switch on the lens.
The 14-42mm range equates to 28-84mm in 35mm equivalent terms which takes you from a respectable wide angle to a portrait telephoto. The 14-42mm PZ lacks the 24mm equivalent super-wide angle view of the Sony E PZ 16-50mm, but as I discovered in my NEX-6 review, that camera has to do a lot of processing to deal with distortion at the extreme wide angle setting. If you compare RAW and in-camera JPEGs shot on the G5 with the 14-42mm PZ, it’s much more a case of what you see is what you get.
As with the Sony E PZ 16-50mm though, with a maximum aperture of f5.6 at the telephoto end of the range, you’ll struggle to achieve sufficiently shallow depth of field to throw the background out of focus. For that, you’ll need to switch to a fast prime like the Leica DG Macro-Elmarit 45mm / F2.8 or the more affordable Olympus M.Zuiko Digital 45mm 1:1.8. And that illustrates the advantage of Micro Four Thirds over rival mirrorless systems: as the most mature mirrorless standard and with both Panasonic and Olympus producing lenses along with third parties, it boasts the broadest choice of optics. Not only are almost all popular focal lengths available, but there’s generally at least two options of each depending on speed, quality and budget.
Like the NEX series, Panasonic doesn’t incorporate image stabilisation into its Micro Four Thirds bodies, preferring instead to provide optical stabilisation on lenses. The 14-42mm PZ features Panasonic’s Power O.I.S image stabilisation which it claims is twice as effective as its earlier Mega O.I.S stabilisation system. Although it’s lens-based, there’s no control on the lens to turn stabilisation on and off, instead, it’s controlled from the Rec tab of the main menu. There are three modes, Normal, Panning and Off. Normal compensates for vertical and horizontal camera movement, Panning for vertical movement only, but there’s no option to correct for horizontal movement only so that you can pan with the camera held in portrait orientation.
To test the Lumix G5’s stabilisation I set it to Shutter Priority exposure mode, set the lens to its maximum 42mm telephoto zoom and took a series of shots at progressively slower shutter speeds with the stabilisation off and in Normal mode. Where there’s the option of a viewfinder I always use it for this test in order to minimise camera shake and provide the best possible chance for a steady shot. Using the viewfinder and with the stabiliation on, the G5 was able to produce sharp results at shutter speeds as slow as a fifth of a second – four stops slower than conventional suggests would be advisable at this focal length. The crop is a tiny bit soft, where the 1/10th crop was pin sharp, so I think it’s fair to say the PZ 14-42mm lens provides three to four stops of stabilisation.
Panasonic Lumix G5 Lumix G X Vario PZ 14-42mm F3.5-5.6
 Power O.I.S. Off/On |
||||
|
||||
100% crop, 14-42mm at 42mm 160 ISO 1/5th O.I.S. Off. | 100% crop, 14-42mm at 42mm 160 ISO 1/5th O.I.S. On. | |||

Panasonic Lumix G5 shooting modes
In addition to the PASM modes, the Lumix G5 mode dial has two custom positions, SCN for scene modes and Creative control which provides access to an expanded range of art filters. The intelligent Auto and intelligent Auto plus modes are accessed via a dedicated button on the the top plate which remains illuminated while active. It’s easy to quickly skip over these modes on a camera aimed at enthusiasts, but they provide a foolproof mode for non-expert photographers as well being handy if you’re in another mode with obscure settings but spot a spontaneous photo opportunity.
Intelligent Auto uses Scene detection to select one of seven appropriate scene modes and also uses face detection and face recognition to set the optimum focus and exposure. Pressing the thumb dial allows you to adjust background defocus with aperture settings displayed on screen as well as the more novice-friendly scale a ‘best of both worlds’ design which works for novices and experts alike. The G5 will also make suggestions if it thinks your shot might benefit from the use of one of the Creative control filters.
Intelligent Auto also automatically activates three other image enhancement features that have been an option on the Panasonic range from compacts upwards for some time. Intelligent ISO is simply an enhancement of the Auto ISO setting which raises the ISO sensitivity when moving subjects are detected in the frame in order to set a sufficiently fast shutter speed to capture the action. I.resolution has four settings – High, Standard, Low, Extended and off – each of which applies varying degrees of sharpening to the image while suppressing the artefacts that often accompany this kind of processing.
The G5 also features I.Dynamic, or Intelligent Dynamic Range control, which automatically adjusts the contrast when there’s a big difference between light and dark areas on the image. Again it’s applied automatically in iA, but off by default in the PASM modes, where you can choose between Off, Low, Standard and High.
The Lumix G5 introduces a new HDR mode which shoots a fast sequence of three images and from them saves a single composite with a wider tonal range. It’s a no frills feature – you can’t change the number of exposures or the EV range, but HDR can be selected in any of the PASM modes, so you still have some control over exposure. Below is a comparison of the same scene shot in Program Auto mode at 160 ISO with, on the left a single exposure and, on the right, HDR mode enabled.
The HDR shot on the right shows a lot more detail in the shadows tonal range most clearly visible in the door on the right of the shot, the highlights in the windows on the left also show improved detail. This is backed up in the histograms below each image with the HDR histogram on the right well within the bounds of the x-axis at the highlight end and showing very much improved shadow detail.
Panasonic Lumix G5 Program mode HDR On / Off |
||||
|
|
|||
Program Auto 1600 ISO f4 1/8th | HDR Scene mode 1600 ISO f2.8 1/16 | |||
|
|
|||


For those who want the option to process HDR shots outside the camera, the G5 provides one of the best auto bracketing features you’ll find, bettering even that offered by many budget DSLRs. You can shoot automatically shoot up to seven frames up to a stop apart in 1/3EV increments. Exposure compensation is available in a similarly broad range of +/-5EV. It certainly outdoes the Sony NEX-6 which offers 3 frame auto bracketing in increments up to +/-3EV, or +/-5EV with the optional $4.99 Bracket Pro app.
The range of Creative Control filters has been expanded with the addition of new effects including Soft Focus, Dynamic Monochrome, Impressive Art, One point Colour, Cross Process, Low Key, and Star Filter. All of them provide a degree of customisation, whether it’s changing the effect colour, the filter strength, degree of vignette or, in the case of Dynamic Monochrome, contrast. Additionally you can use the background defocus and set exposure compensation.
If I was to make one criticism of Creative Control it would be that despite its having a position on the mode dial and touch screen controls it absurdly difficult to change filters. The icon at the top left of the screen which displays the currently selected filter isn’t touch sensitive so you have to go via the main menu.
 |
 |
 |
| Dynamic Monochrome | Cross Process | Impressive Art |
Finally, the G5 has a new Electronic Shutter option. This doesn’t enable faster continuous shooting or provide any other performance enhancements, but merely disables the mechanical shutter to enable silent shooting for those situations where the shutter noise would be distracting such as in museums, concerts and so on.
Panasonic Lumix G5 movie modes
Like the G3 before it, the G5 can capture Full HD video with continuous autofocus and stereo audio recorded from built-in mics (complete with level meters and level adjustment if you like). But where the G3 was limited to 1080i, the G5 now offers 1080p50 or 1080p60 depending on region. That puts it on a par with the GH2, though it still lacks an external microphone input and the ability to output a clean signal over the HDMI port while filming. It also lacks the GH2’s manual exposure controls and the choice of adjustable frame rates. So the G5 is in no danger of encroaching on the flagship model’s position among pro and advanced amateur movie makers, particularly as the new GH3 further widens the gap with timecode support, higher bit rates and a choice of compression options in addition to other pro features like weather sealing.
The other major change in the Lumix G5 video specifications is a move away from the older motion JPEG codec to the more recent and efficient H.264 for the lower resolution movie formats. As before full HD video is encoded using AVCHD. Choosing AVCD provides the option of four quality modes; 1080p50 at 28Mbps, 1080i50 at 17Mbps, 1080p25 at 17Mbps and 720p50 at 17Mbps. Switch to MP4 recording and three further options are available, all at 25fps; 1080p at 20Mbps at 10Mbps, 720p and 640×480 (VGA) at 4Mbps. In NTSC regions the 25 and 50fps rates become 30 and 60 fps respectively.
You can start recording video in any shooting mode by simply pressing the dedicated record button next to the right of the viewfinder, and the G5 can also capture still photos while recording without interrupting the video, albeit only at the video resolution. Alternatively You can set the camera to capture full resolution 16:9 stills while filming, but doing so will briefly interrupt the audio and the still is recorded in the video footage. There’s no manual control over exposure for movies though, nor the ability to adjust the exposure once you’ve started recording. In these respects it falls behind the Sony NEX-6 or Panasonic’s flagship GH3.
The only caveat for maximum recording times as always concerns cameras destined for the European market, which for tax regulations are limited to 29 minutes and 59 seconds.
|
|
|---|---|
|
|
|
|
|---|---|
|
|
|
|
|---|---|
|
|
|
|
|---|---|
|
|
|
|
|---|---|
|
|
Panasonic Lumix G5
handling
The extended front grip and relocated rear dial between them make the G5 a much more comfortable camera to hold and use than its predecessor. Add in the new zoom rocker and custom buttons and the overall effect is greater than the sum of its parts; there’s was nothing wrong with the G3’s handling, but the G5 greatly improves on it.
One of the big problems I find with dual-speed zooms is that during movie shooting they can be difficult to control at the slower speed; it’s all too easy to nudge the control a little too far and speed up unintentionally. The G5’s dual-speed zoom defaults to single speed operation in video mode and also allows you to set the speed to high medium or low independently for both stills and video shooting.
The set speed works for either of the two zoom controls and, as I mentioned earlier, the new zoom rocker just to the rear of the shutter release means you can operate the camera one-handed. On the other hand, if you’re happy to use the zoom control on the lens or, with a manual zoom lens fitted, the rocker can be put into service as an additional exposure control. In manual exposure more it changes the aperture with the rear dial used for shutter speed and in all other modes it’s used for exposure compensation.
Along with Canon’s Func.Set menu, Panasonic’s Quick menu is one of the the best designed Quick menu systems around. Press the Q.menu button and an overlay provides instant access to frequently used functions. The problem is that the Quick Menu has grown and its default contents, which, photo style, flash, movie settings, picture size and quality, focus mode, AF mode, metering mode, exposure compensation, sensitivity and white balance no longer fit on a single screen and can require a fair bit of button pressing (or screen tapping) to get to. The G5 provides a solution to this problem by allowing customisation of the Q.menu. In addition to the default items you can add Quick Menu items to a total of fifteen across three screens – five on each. Perhaps more importantly you can re-arrange the quick menu items, so there’s no need to scroll past photo style, flash, movie settings, picture size and quality if you rarely alter them, just to get to the Focus mode and area settings, you can put them right at the front.
Among other things you can add HDR, I.Resolution, I.Dynamic, Drive mode, auto bracket and yes, even stabilisation to the Q.menu.
 |
 |
 |
 |
 |
 |
 |
 |
 |
The Lumix G5 has three physical programmable function buttons. The AF/AE Lock button doubles as Fn1, the delete/back button doubles as Fn2 and the LVF/LCD toggle doubles as Fn3. As the delete/back button is only used in playback mode or when navigating menus, it’s readily available in shooting modes, but if you want to assign the other two you obviously sacrifice their original function. This isn’t too much of an issue with the screen toggle as the eye sensor renders it largely redundant. As with the earlier G3, the G5 provides two positions on the mode dial C1 and C2 which between them access for previously saved custom setups, one on C1 and three on C2.
Everything I’ve mentioned thus far is accessed via the G5’s physical buttons, but the touch screen adds a further dimension the the G5’s handling characteristics. Panasonic’s approach with the touch screen is to use it as an extension to the camera’s physical controls rather than to replace them, and it’s sometimes easy to forget that the screen can be used to do many things that you’re used to doing using the camera’s physical controls, including focussing and shooting, zooming the lens and navigating menus.
As I’ve already mentioned, there are two screen function buttons which, like the physical buttons, are programmable. In the default mode they toggle the new electronic level gauge and the live histogram, but can be assigned to the same range of functions as the physical function buttons. Between the fixed functions on the four-way controller, the customisable Quick menu, the physical and touch function buttons and the custom positions on the mode dial the Lumix G5 provides a huge and versatile array of custom options.
Panasonic Lumix G5 Autofocus
The Lumix G5 appears to inherit the contrast detect AF system of its predecessor. Panasonic’s contrast detect AF is widely regarded as one of the fastest systems around; one of the reasons for is swiftness is that Panasonic doubles the output of the sensor to 120fps, whatever the technical whys and wherefores, the result is a system which locks focus in barely no time at all – you press the shutter and the AF responds almost immediately. Compared with the NEX-6 it gets there a fraction earlier every time and performs better in low light too.
Like its predecessor, the G5 is also packed with a broad selection of AF modes and options: you can choose from Pinpoint mode along with Single area, 23-area, AF Tracking and Face Detection. These integrate beautifully with the touch-screen, simply tap the area you’d like the camera to focus on, or the face which should have priority, or touch the subject you’d like to track.
The pinpoint mode, introduced on the G3, is a highlight, temporarily magnifying the image by 5 times for a really close conformation, while also letting you swipe the enlarged target area around with your finger until you settle on the desired part of the subject. You can also opt for Manual focusing assistance with either a small window in the middle showing an enlarged view at 4x, or a full-screen view at 5x or 10x. The variety of AF modes, coupled with their touch-controls work really well, and give the G5 a big advantage in flexibility and ease of adjustment.
The G5 also adds one new trick to its array of touch focus tools. The Touch Pad feature allows you to use the LCD screen to locate the AF area while using the EVF to compose your shot. Counter-intuitive as it sounds, it actually works, up to a point. Moving your finger accurately around the screen while your face is pressed to the rear of the camera isn’t as awkward as it sounds, in fact it isn’t awkward at all and accurate position is no problem either as, once you see the AF area appear in the EVF is all a question of relative movement with your finger on the LCD screen. When it works, the Touch Pad features work well. The only issue I had with it was its constant determination to mistakenly interpret my nose pressing against the screen as a desire to set the AF area to the top right corner. This might be less of a problem for those who use their right eye, and with practice it’s probably something you could avoid happening, or work around. Of course you can eliminate this problem by simply flipping the screen out to the side.
While the single AF performance of the G5 is impressively quick and also accurate in low light, it’s important to note it, like all Micro Four Thirds cameras to date from Panasonic and Olympus, remains a 100% contrast-based system. Meanwhile Sony, Canon, Nikon and other mirrorless rivals have adopted a hybrid AF system for their latest models which complements contrast-based AF with phase-detect AF points on the sensor. Now in our tests these phase-detect AF points don’t necessarily make these cameras faster at focusing, but they can make them more confident with less searching or hunting back and forth. This may not be a big issue for single AF acquisition, but can help with continuous AF tracking for both stills and movies. In my tests the G5 may have focused faster than the NEX 6 for single AF acquisitions and was more accurate in low light, but the Sony generally tracked better in continuous situations and avoided visually distracting hunting in movies. It’ll be interesting to see if Panasonic or Olympus implement hybrid AF systems on future Micro Four Thirds bodies, or even if it’s technically possible on their standard.
Panasonic Lumix G5 Continuous shooting
The Panasonic Lumix G5 offers four full resolution continuous shooting speeds: Low speed shoots at 2fps, Middle speed at 3.7fps and High speed at 6fps – an improvement on the 4fps top speed of its predecessor. The Super high speed mode uses the electronic shutter to attain a speed of 20fps; but where the G3 dropped to 4 Megapixel resolution for this mode, the G5 maintains 16 Megapixel full resolution. The G5 can shoot in Super high speed mode with continuous autofocus, but the frame rate drops well below the maximum when you do this, so you might just as well be using the Middle speed.
To test the G5’s continuous shooting I fitted it with a freshly formatted 16GB Sandisk Extreme Pro UHS-1 card and set it to the 6fps Hi speed continuous shooting drive mode with image quality set to full resolution fine JPEGs. The G5 fired a burst of sixteen shots before slowing slightly and becoming a little erratic for a few frames then settling at a little over 2fps. I timed the initial sixteen frame burst at 6.6fps – slightly faster than the quoted 6fps.
Next I set the G5 to RAW mode and repeated the test. This time the G5 fired a burst of 9 frames before pausing for what seemed like forever but was in reality just under 4 seconds, then continued at slower than one frame per second. I timed the initial 9 frame burst at 6.92 frames per second, again, faster that the quoted 6fps.
The time taken to write the contents of the buffer to the card was 8.6 seconds for JPEGs and 19.5 seconds for RAW files. You can fire off another burst while the buffer is still writing. This works well with jpegs – you can get another long 6fps burst after just a few seconds wait, but RAW is less successfully with the camera only able to shoot very slow sub 1fps ‘bursts’ until the buffer is cleared. Switching the UHS-1 card for a speed class 10 Sandisk Extreme card extended the write times to 11.3 seconds for JPEGs and 24.6 seconds for RAW files, so it’s worth spending a little extra on the faster UHS-1 cards if you do a lot of fast action continuous shooting.
Panasonic Lumix G5 Sensor
The Lumix G5 features a new 16.1 Megapixel CMOS sensor with a redesigned Venus engine processor which in addition to providing 1080p HD video and 6fps continuous shooting, according to Panasonic produces better image quality and lower noise than its predecessor. The highest senstitivity setting is boosted from 6400 to 12800 ISO with the base sensitivity remaining at 160 ISO.
Files are saved as JPEGs at one of two sensitivity setting and the G5 can also save RAW files in Panasonic’s RW2 format. Best quality JPEG compressed files are typically around 6-8MB in size. The shutter speed range is 1/4000 to 60s plus bulb which has a limit of 120 seconds.
To see how the quality of the Panasonic Lumix G5 measures-up in practice, take a look at my Panasonic Lumix G5 quality and Panasonic Lumix G5 noise results pages, browse my Panasonic Lumix G5 sample images , or skip to the chase and head straight for my verdict .
- ,
- ,