Relief contour wood carving. Relief wood carving. Materials for work
All photos from the article
Wood carving was mastered by man hundreds of years ago. Moreover, a variety of types of its techniques have survived to this day. Below we will look at the most common types of wood carving, and also get acquainted with the tools that are used for it.

Carving techniques
Currently, wood carving is divided into several types:
- Openwork;
- Geometric;
- Flat-relief;
- Embossed;
- Sculptural;
- Invoice.
Below we will take a closer look at all these types.

The photo shows an example of decorating a facade with openwork carvings
Openwork
Openwork or, as I also call it, sawn carving began to be widely used in the 19th century. Moreover, it was popular both in village houses and city apartments.
It is used to decorate the following building elements:
- Entrances
- Nalychnikov,
- Gables of houses, etc.
This technique is based on sawing shaped holes. Wood carving looks very impressive and resembles wooden lace.
As for the drawing, it can contain various motifs:
- Relief carving;
- Ornamental and decorative patterns;
- Geometric images reminiscent of patterns in lace and folk embroidery.
In our time openwork carving enjoys a certain popularity when decorating country houses, gazebos, etc.

To make sawing threads, a simple tool is usually used:
- Rotary for making holes - it should be noted that for holes with a diameter of more than 10 mm, special flat drills - perks - are used.
- Saw for cutting parts along the outer contour - special circular (rotary) saws are used. The width of their canvas is in the range of 4-15 mm. Narrow blades are used to obtain sharp curves, and wide blades are used to cut smooth shapes.
A distinctive feature of a bow saw for carving is that the blade can be rotated in different directions. Thanks to this, you can make cuts in different directions without changing the position of the saw machine.
The history of wood carving goes back to the emergence in human society of techniques and methods of processing wood, as the simplest and most common material, as well as the emergence wooden architecture. Our distant ancestors knew that wood has very valuable qualities: waterproofness, thermal insulation, low density, and a rich variety of texture patterns. In addition, wood is convenient to process and harvest. In this regard, flat-relief carving was widely used in everyday life on wood - almost everywhere from the construction of defensive fortifications to kitchen utensils and agricultural implements.
Since the advent of the first tools, all people have strived to create beauty. Over time, this desire brought results in the form of the ability to create incredible works from natural material. There is hardly a people who do not decorate their homes and household items. However, the history of the development of carving in each country is special and is associated with the level of culture, skill and worldview in society. This is probably why in each country the art of wood carving has its own unique characteristics, techniques and styles.
Learn flat-relief wood carving with your own hands
Flat relief carving is one of the most popular types of wood carving. It is very widespread in house carvings, as well as in the manufacture of various souvenirs.
Flat-relief carving is a carved pattern that stands out low above the main background of the ornament with the possibility of giving relief to both the design itself and its background part.
Usually the background around the main picture is cut off completely or removed by five to seven millimeters so that the contrast between them is emphasized as much as possible.
Although the image differs quite significantly in height from the background, the drawing itself, having three-dimensional outlines, is usually made approximately in the same plane.
The selection of the ornament relative to the background plane can have several variations: they can be decorated with notches, notches, rounded edges and become concave or convex, partially or completely.

A sketch for carving using the flat-relief carving technique can be any realistic or stylized images of animals, plants, birds or even people, if the experience of wood carving allows you to work out even the smallest details in detail and with high quality.
There are several types of background: oval, cushion, inserted, matched and undercut. You can examine all these types and visually study the differences between them in the photo below:

Let’s just look at the option with an oval background (outline)
To perform this type of carving, grooves are cut along the contour of the sketch, which are then ovalized (rounded) both from the background and from the ornament side.
First, make cuts with a blunt knife along the contour. On curves, cuts are made using semicircular chisels of suitable width.
The background of the picture is also removed with a knife or a straight chisel, maintaining a 30-degree inclination of the cut to the plane of the workpiece.

On the side of the image of the ornament, the contour should be steeper, on the background side it should be sloping, this will allow the pattern to look more convex. After finishing the rounding, you can use cutters to sand the product with fine sandpaper.
With a selected background.The difference between a carving with a selected background and a flat-relief carving with an oval background is that the background around the ornament is removed with one selected angle of inclination to the workpiece plane (30-45°) and is not further processed (rounded) with a cutting tool or sanding.
With pillow background.Cushion carving is a type of carving with an oval outline. The only difference is that the background does not remain flat and may be lower than the plane of the product’s ornament. Raising the ornament above the background has its advantages, but also its disadvantages. Cutting the entire background to the same height takes quite a lot of time, especially with large volumes. In addition, this work requires skill and accuracy so as not to damage the product.

This type differs from others in that depressions are created around the main picture, which is why the image seems to rise above the background to a different height (usually within 5-7mm), turning out to be deeper and more interesting in appearance.

See and feel the difference between different types carving is very difficult. Often many types are combined in one product, because of this it is not worth giving clear definitions and starting any disputes on this basis.
Video on the topic of the article
At the end of the article, we have selected a video for you with examples of flat-relief carving, as well as with a fascinating and detailed description of the process of creating these very products.
Let's consider what flat-relief wood carving is, what types still exist and what is needed to perform them. Products made from this material have long been part of human life (from toys to houses). And when creating wooden objects, they try to show their natural beauty. Carving is one of the first decorations that was applied to fences, dishes, boxes, furniture, etc. But different techniques were used to make each item.
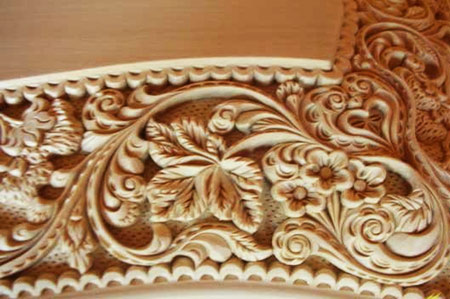
Painting made with flat-relief carving
For example, slotted or openwork carving was used to decorate a house, furniture or dishes, and when decorating a ship, souvenir or toy - .
First, let's look at what types of wood can be used for this exciting activity. For beginners, it is better to choose soft breeds. The following types of wood exist:
- hard - beech, walnut, oak, ash;
- very hard - acacia, yew, hornbeam;
- soft - aspen, linden, pine.
In order to make a triangular notch thread, you must have:

The following types of thread exist:

Flat-relief has subtypes:
- A carving with an oval kennel - with an interesting play of chiaroscuro, which results from a combination of a steeper curve (from the side of the pattern) and a hollow one (from the background).
- With a cushion or matched background - almost the same as with an outline, but with the difference that the background is not flat, but is sometimes located below the ornament itself. The pattern seems to be superimposed on a plane. And in this case the background is made by embossing.
How to prepare the base and get started
Mainly hard work, requiring certain skills and knowledge. In order to do everything correctly, you need to know how to use the tools. Processing the base begins with work on preparing wood for carving.
 Example of a varnished kitchen board
 First, it needs to be planed, and if the background is made of light wood, then this is done with a plane. And for a dark background of the composition, the workpiece is tinted. To obtain a shiny surface, the wood is varnished; in this case, black is used; after it dries, it is polished with a polish.
When using dyes such as tempera, ink, mordants, watercolors and other similar dyes, the surface remains matte or is covered with a light varnish and polished. To secure the workpiece, it is clamped in the workbench. To do this, use machine clamps or holders (plates that cover and hold the workpiece). Flat-relief carving allows you to create a floral pattern, bas-relief of an animal, bird or person. 
When wood carving is done, designs are selected from special books, magazines or albums. To perform the ornament correctly, it is transferred using tracing paper or carbon paper. It is better to first use transparent paper, which is drawn into squares. Their size depends on the size of the original pattern. If it is necessary to increase it, then use a pantograph. , perhaps increase 2 or 4 times.
In order for the wood carving, the sketches of which are transferred to the workpiece, to be done correctly, select a quarter or half of the pattern, fold the tracing paper horizontally and, if necessary, also vertically. Afterwards, sketches of the ornament are transferred to it or an outline is outlined. On one side, half of the image is obtained, it is folded, and a whole image comes out.
 Making a sketch of a pattern for flat-relief carving
 It is transferred to a wooden blank using any of existing methods. The main thing is that all parts free from slotted threads are placed in a place with a beautiful texture. And the rest contain framing elements. The contours of the pattern must coincide with the direction of the fiber.
Relief wood carving can become more than just a hobby. Having mastered the skills of using tools and becoming familiar with the technology, the master will be able to get a good and stable source of additional income. Wooden decorations are in demand both in apartments and country houses.
An example of a painting made with relief carvings
Wood carving is a traditional craft of many peoples. This type of applied art has a long history. And during this time, masters created several types of technologies, such as:
In addition, experts distinguish wood processing in the Kudrin style (Kudrin-Abramtsevo) as a separate variety. The style owes its name to the place of its birth - the village of Kudrino in the Moscow region. It is distinguished by abundant floral ornaments, garlands of flowers, in which peculiar animals and birds are placed.
The type of wood processing gets its name from the word “relief”, which in our case is understood as areas raised above the general surface. Flat-relief carving, in turn, is divided according to execution methods into:
- bas-relief;
- high relief.
The first type has a high relief, the second has a lower relief. A sign of a blind type of wood processing is a continuous carved surface of the background without smooth surfaces.
 Step-by-step execution flat-relief carving
 The background is located below the level of the picture, and it is selected with a chisel of one type or another. One of the varieties artistic treatment tree - . It differs from relief in that a pattern is applied to the surface of the material, the contours of which are selected with a special tool.
The protruding part remains flat, and only the contours emphasize the image, while the relief carving has a figured surface of the design.
Note that slotted processing implies a complete selection of the background, that is, the drawing seems to hang in the air.
What can you get by carving wood?
The main pattern, which is made using the technique of flat-relief carving or another variety of it, is. It can be a simple geometric pattern or vegetation, stylization.
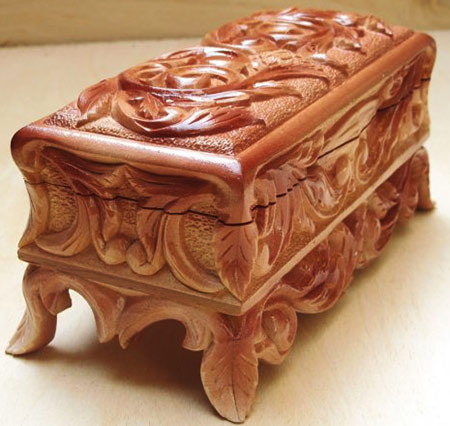 An example of a box made with relief carvings
 More experienced masters include images of animals, birds, and people in their works. There are both traditional folk stories and compositions on modern themes. It all depends on the skill of the author and his ability to transfer the image to the board.
Read also
Hand carved wood furniture
Since the starting material for this type of work is a wooden board, the following is made from it:

The range of products is very large. The surface can be treated in relief cutting board and a window sill, in general, any thing in the house that has a flat surface. The most popular are souvenirs made in the style of relief or contour thread.
A handmade item in the traditional folk spirit will be a wonderful gift for family and friends. And, having mastered the job, the master will be able to sell souvenirs via the Internet. Such products are in great demand, especially abroad.
How to select and prepare wood for carving
You can start practicing making carved relief surfaces on ready-made boards. Shelves from old racks will do, parts that can be bought for next to nothing at any carpentry shop or at the sawmill. Linden wood is considered the most suitable for carving. Among the advantages of this breed, craftsmen note its uniform density, slight shrinkage during drying and rapid drying, in addition, the ability to cut in relief both along the fibers and across them.
Before work, the material must be dried. The tree is harvested from November to February, when there is little juice in it. If the master buys a ready-made workpiece, then you need to clarify whether it has been dried. If you do it yourself, the process looks like this. First, the trunk is cleared of branches and bark, then cut into pieces. 
Then the wood for carving is boiled in a container with salt added for 4 hours. This will remove juices and speed up the drying process. Then the blanks are lowered into the basement, where they are placed upright on the concrete floor. This will draw out excess moisture, after which the wood is laid in a ventilated area under a canopy for drying. A moisture content of 12-10% is considered normal. Without special equipment, the content can be found out like this. A piece 3 cm long and 15 cm wide is cut from the end (the excess is removed).
The fragment is weighed and then dried for 5 hours at a temperature of +100°C in the oven. Then they weigh it again and make calculations. To do this, the resulting difference is divided by 150 and multiplied by 100. The result will show the existing humidity.
Flat relief carving
Flat-relief carving is widely used in house carvings and in the manufacture of various souvenirs. It is characterized by selecting or deepening the background around the ornament to a depth of 5-7 mm.
In flat-relief carving, the image takes on three-dimensional forms, maintaining the same height of most of the protruding planes with the same depth of the background.
Flat-relief carving allows the carver to create various compositions with floral patterns, images of animals, birds and humans.
The planes of the ornament can be (Fig. 1):
1-concave;
2-straight;
3-convex
Rice. 1. Ornament planes in flat-relief carving
The background in flat-relief carving can be (Fig. 2):
- Ovalized(A). A carving with an oval outline or background is the most simple view flat-relief carving. It resembles a contour carving, since the outline of the pattern consists of dihedral recesses, slightly oval.
- Pillow(b). Carving with a cushion background differs from previous types in that the background does not remain flat anywhere. The design is steeply rounded on the side of the contour and more sloping on the side of the background, which is shaped like pads.
- Selected(V). A carving with a selected background is performed in the same way as a carving with an oval contour, but the background is selected to a certain depth. The background can be made smooth, caulked or filled with profile slots.
- Handpicked(G). They are performed similarly to carvings with an oval background, but the background around the ornament is chosen at a certain angle of inclination to the plane.
- Undercut(d). A carving with an undercut background is similar to a carving with a selected background, the only difference being that the background goes under the ornament.

Rice. 2. Types of background in flat-relief carving
There are types of flat-relief carvings such as:
Openwork (slotted) carving. The background of the pattern is selected completely through sawing or drilling (Fig. 3). The openwork carving technique is used to make platbands, cornices, shutters, piers, anemones, fenders in Russian and Belarusian huts.

Overlay thread. This is an openwork carving attached to a wooden plane.
Technique for performing flat-relief carving
Making flat-relief carving with an oval contour.
Carving begins with a cut with a jamb knife along the contour of the design (Fig. 4), followed by trimming from the background side.

Rice. 4. Carving with an oval contour
(arrows indicate the direction of tool movement):
a - incision; b - trimming; c - ovalization of the contour.
After trimming, they begin to round the edge on the side of the ornamental element in such a way that the edge is rounded steeper than the trim on the border with the background. The result is a relief image with smooth, soft oval lines without sharp shadows.
IN execution of flat-relief carving with a selected background.
An incision is made along the contour of the design with a slight inclination from the line of the design towards the background (Fig. 5).

Rice. 5. Carving with selected background
This tilt makes it possible to protect the edge of the ornament from accidental cuts when choosing a background. At the end of the work, you need to cut it vertically, exactly along the line of the design, and then process the edge of the outline of the ornament. After cutting along the contour, trimming is done. Trimming is performed to a given depth, which is the same throughout the entire plane of the ornament. After trimming, they begin to sample the background with straight, semicircular, sloping chisels.
When stripping the background, it is important to take into account the direction of the wood layers to avoid scoring. Carving on hard rocks is done using a mallet.
The main tool for performing flat-relief carving: a jamb knife, semicircular chisels of various widths.
Flat-relief carving was and is widely used to decorate furniture, various souvenirs, and in house and interior carvings.
Products and panels made using flat-relief carving are presented in the photographs:

Cabinet with elements of flat-relief and openwork carvings

Panel with a plot composition

Decorative panel
Literature:
1. Burikov V.G., Vlasov V.N. House carving - M.: Niva Rossi together with the Eurasian Region Company, 1993-352 p.
2. Logacheva L.A. Basics of wood carving skills. - M.: Publishing house "Narodnoe tvorchestva", 2002. - 136 p.: ill.