DIY soap multi-colored layers. Handmade soap. How to make soap with your own hands? Homemade soap recipes. Templates and molds for handmade soap
We discussed the types of base, necessary tools and methods of flavoring, and today I will talk about how to choose the right dye, what additives are available and, finally, I will share a few tricks that will help you create your first masterpiece!
How to choose a dye:
There are many dyes for soap: food dyes, pigments, mother of pearls, glitters... And all of them are suitable for soap base. The only difficulty we have to face is color migration. All dyes can be divided into migrating and non-migrating. What does it mean? For example, you want to make two-color soap, fill one layer with white and the second with orange. If you use a non-migrating dye, then over time your soap will not change, but if you use a migrating dye, then in about a week the boundaries between the layers will blur and the orange will smoothly flow into white. In our case, this may even work to our advantage and give an interesting gradient effect, but imagine if flowers on the lawn or a bag of gifts in the hands of Santa Claus behaved in a similar way? Therefore, we draw the following conclusion for ourselves:
- Any dyes, including migrating ones, are suitable for single-color soap.
- For multi-color soaps, if you want to maintain clear, contrasting boundaries between colors, use only non-migratory ones.
- Migrating food dyes include all types of food dyes: liquid, gel and powder. Most often, natural dyes are also subject to migration.
- Pigments and pigment pastes, mother-of-pearls and dyes from the Zenicolor set.
What else do you need to know about dyes?
Some dyes have their own application characteristics, so be sure to read the instructions for the dye before use and try the new dye on a small amount of base first. For example, some pigment pastes must first be diluted with water and only then added to soap, and sometimes it is better to grind dry pigments together with oil.
We already talked about this in the last article, but I want to emphasize once again that bright colors are obtained only in a transparent base, while white turns any color into a pastel one.
It is also worth considering that almost all dyes cloud the transparent base, so they should be added drop by drop in the literal sense of the word. Add one drop, mix and evaluate the color, then, if necessary, add the next one.
There are no established restrictions on the amount of dyes, but their excess can lead to coloration of the foam. Most often 100 gr. A quarter or a third of a teaspoon is enough for the base.
What are the additives in soap base:
| Additive | Features and Properties | Percentage or input method |
| Base oils and oil extracts | “Soap” “softens”; soap with the addition of base oils does not dry out the skin. | ½ teaspoon of oil per 100 g. basics. The exception is water-soluble oils; they can be added 3-4 teaspoons per 100 grams. |
| Water soluble paper | Allows you to make soap with a picture or photograph. | Take a round or rectangular shape, fill the first layer with about 1cm of transparent base without additives. As soon as it hardens, place the cut out picture on top, sprinkle with alcohol and fill with a white base with flavoring. |
| Scrubbing particles | Both natural and artificial additives can be used as the basis for scrub soap. The first includes coffee, ground nut shells, pumice powder, etc., the second includes polyethylene powders and scrubs, which have one undeniable advantage: they are perfectly round and do not injure the skin, so they are suitable even for daily use. | Add two to three teaspoons per 100 g. soap base. Add the scrub to the already slightly cooled base, otherwise it will settle. To get the perfect scrub soap, in which the particles are evenly distributed, try using a swirl base instead of a regular base. |
| Clays | Soap with clays has drying properties, it is perfect for teenagers or people with oily skin. | 1-3 teaspoons per 100 g. basics. |
| Dried flowers, dried herbs, cinnamon sticks, orange slices, star anise | They look beautiful only as a decoration on the top of the soap; the inside loses color and turns black. | Optional |
| Cocoa liquor | With its help you can make truly chocolate soap. It will give the soap a rich chocolate color and aroma. | 5-10 g per 100 g. soap base |
| Menthol | Gives soap cooling properties. Indispensable for hot summer days. | 2-3 crystals per 100 g. basics |
| Tar | Tar soap perfectly cleanses, dries and heals the skin. | 5-7 gr. per 100 gr. soap base. |
| Loofah | Loofah is a natural scrub that can be used either whole or ground. | Pre-soak the dry loofah in hot water, squeeze it thoroughly and fill it with soap base. It is very convenient to make loofah soap in a Pringles tube. |
| wax | Used for decoration, although it can also act as a natural scrub. | Pour the soap base into the mold, wait just a minute, and carefully place a piece of foundation on top. |
What should not be added to soap base:
- Fresh vegetables and fruits
- Milk and cream
- Fruit powders
- Water, tea, coffee, juices
All these additives reduce the shelf life of soap to one or two days, after which the soap may acquire an unpleasant odor or become moldy. You should also not add honey to soap base; at high temperatures it loses all its beneficial properties.
By the way, we have a whole article on this topic - “Unwanted additives in soap base.”
10 secrets that will improve your soap:
- Make a recipe and prepare everything in advance. The soap base hardens quickly and often, in a hurry, you can forget to add fragrance or some other additive.
- Until you get the hang of it, melt the base and add all the necessary ingredients directly in a water bath, then you won’t have to rush so that the base doesn’t harden. In addition, the risk of overheating the base is significantly reduced.
- After pouring the soap, sprinkle it with ethyl or formic alcohol on top - this will help get rid of bubbles.
- Immediately after taking the soap out of the mold, pack it in cling film or shrink film, this will not only help preserve the original aroma, but also protect it from “fogging” (moisture droplets on the surface of the soap).
- If you are making multi-layer soap, try to catch the moment when the base has already set, but is still warm - this way the layers will adhere better. You can also scratch the previous layer with a fork or toothpick, but keep in mind that in clear soap these scratches will be visible.
- If you are making a large bar of soap “for cutting”, then cut it with a knife with a thick blade and carefully wipe the knife after each piece - this way you can get perfectly smooth cuts.
- Dip a dry brush just a little bit into mother-of-pearl and apply it in a thin layer to the finished soap - this will highlight all the relief parts and make even the most ordinary one-color soap a masterpiece. Golden mother-of-pearl looks most impressive.
- If the soap didn’t turn out the way you expected, don’t be upset - you can always melt it again and try to “save” it by pouring it again.
- Always keep small molds on hand to pour excess base into. Then small figures can be melted into another soap, decorate the top with them, or make confetti soap by cutting them into pieces.
- Remove the soap from the molds only after it has completely hardened, otherwise you risk damaging it.
That's all for today, and next time we'll compose together detailed instructions for making soap from base.
Good luck in soap making and see you again!
Do self made simple enough. This technique is suitable even for a novice soap maker. With its help you can do a large number of handmade soap options.


DIY multi-layer soap
Using this method, you can make multi-layer soap from both the base and. Let's take a closer look at the two-layer dinosaur soap. So how to make multi-layer soap at home? To make it you will need the following ingredients:
- - 100g
- N to (you can use natural dyes, such as green cosmetic clay)
- (optional) - 1 teaspoon per total volume
- (optional)
First of all, melt 15-20 grams of soap base in microwave oven or in a water bath, after cutting it into small pieces. Do not overheat the base, do not let it boil.

— Add a few drops of cosmetic oil, one drop of non-migrating dye and one or two drops of fragrance to the melted base. Mix the soap mixture thoroughly. 
Pour the resulting mass into the mold. Spray with alcohol. Try not to go beyond the raised pattern on the bottom of the pan. But if you do go beyond them, it’s easy to remove the excess base before it has completely hardened.

We heat the rest of the base according to the first sample, add a contrast dye (in this case we did not use it), flavoring and cosmetic oil. The second layer of this soap is egg, so it's best not to color it. Artificial colors do not add any health benefits to your soap, they are only used for the sake of adding design intent to the soap. But in some recipes they can easily be replaced with.

— We use , so we scratch the hardening layer with a sharp object (fork, toothpick, etc.) for better adhesion of the layers. Spray with alcohol.

If you want to learn how to make soap yourself, then read the article. Here you will find detailed description process and what ingredients are needed for this.
Nowadays you can find a wide variety of soaps on supermarket shelves. There is baby soap, cream soap, and antibacterial soap. However, making a product with your own hands is much more enjoyable. Moreover, buying raw materials for it is not a problem. Also, soap making is a kind of hobby, because the product obtained after preparation pleases not only with its pleasant aroma, but also with its beauty. appearance, original form.
DIY soap making kit. Ingredients for handmade soap
You can make your own soap three options:
- from the usual children's, just grate it, melt it, then add dye, oils and other ingredients, pour it into molds
- from soap base- the principle of preparation is the same as from baby soap
- preparing a product from alkalis And fatty acids- a labor-intensive process that requires compliance with safety precautions
Ingredients for making soap
- the basis(soap) or baby soap - the base is found as a white solid and clear, allowing you to make beautiful soaps in a variety of tones
- base oil- can be used as regular vegetable oil, olive oil, etc.
- essential aromatic oils— choose what you like, the range of such products is varied
- dye special or food
- supplements- you can use various ingredients that improve skin conditions (honey, glycerin, clay)
- alcohol in a spray bottle
- herbal decoction, water
- molds for pouring, dishes for kindling the base, grater, knife for cutting the finished product

 Ingredients for making soap at home
 Templates and molds for handmade soap
If you decide to take up soap making seriously and make a profit from sales, then you will need templates that will indicate the composition of the products, name, etc. Such templates can be downloaded from special portals. In addition to labels, you will also find various forms useful. Such containers are made of plastic, rubber or silicone. You cannot use molds made of glass or metal, because it is problematic to get the product out of solid containers; metal is susceptible to corrosion.

 Handmade soap molds
 Heat Resistant Plastic Molds They are made taking into account the fact that the soap base will be poured into them hot, and the molds, in turn, will not be deformed. Their great advantage is that there are a lot of such products - both small and large figures are available - for preparing several bars of homemade soap at the same time.
 Plastic soap molds
 Silicone forms are also convenient to use. They do not require special care and are also soft, which makes it much easier to “release” the soap when it is ready. The service life of such containers is longer than that of plastic ones.

 Silicone molds for making soap
 IMPORTANT: Before pouring the base, grease the molds with oil, this will make it easier for the soap to come out of the molds. If this does not help, then put the container of soap in the freezer, and after a while, pull it out by pressing on the mold.
DIY soap flowers
If you are a creative person and like to make crafts with your own hands, then you can make flowers from soap yourself. Some doubt creeps in - is this possible, since the soap base is not plastic? To make the material softer, you need to use a little trick when preparing the base.
To prepare it you will need:
- base (soap) or baby soap - 230 grams
- regular gelatin, which is sold in supermarkets - one large spoon
- water or herbal decoction - 8-9 large spoons
- dyes, aromatic oils - optional
- regular knife, potato peeling knife

 Roses from soap base
 Procedure
- Pour gelatin with water (cold), leave for 43-56 minutes to swell
- Prepare the base - grate it, melt it, add a teaspoon of water.
- Then pour aromatic oils, dye, etc. into the base, mix the resulting mass with the prepared gelatin
- Pour the mixture into round molds
- When it hardens, pull out the resulting cylinders
- Now all that remains is to use a vegetable knife to cut the petals for the rose and mold the flower, as if from plasticine
 DIY soap rose
 You can also make flowers simply in special molds. It is enough to fill the container and, a few minutes after hardening, take the finished flower out of it. Any flight of fancy is welcome. You can come up with different shades for the flower and leaves.
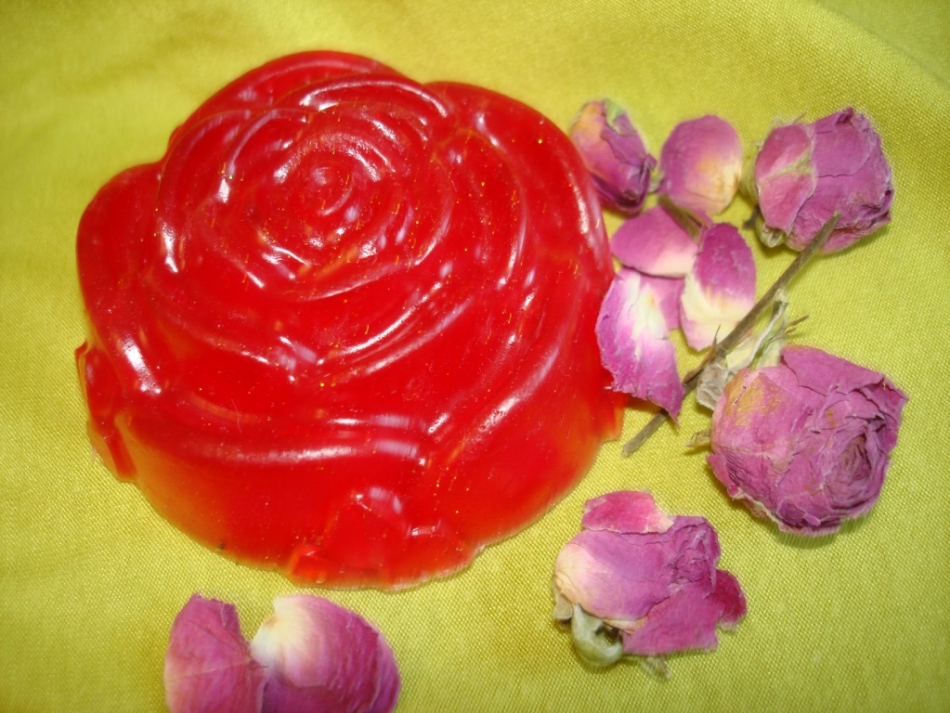
 Soap “Rose”, made in a special silicone mold
 If you have artistic talents and have the skills of a sculptor, then carving (cutting out figures) will be easy for you. Below you can watch a video tutorial for beginner soap makers.

 Carving - carved flower
 Video. Soap rose
Handmade soap. How to make soap? Recipes
There are many recipes for handmade soap. Above we talked about the fact that you can cook a product from the base and baby soap. Now let's take a closer look at their manufacturing intricacies.

 Puff soap - made from a transparent, white base
 Soap base recipe
Ingredients:
- one hundred grams of transparent base
- half a teaspoon of honey
- some yellow dye
- two drops of lemon essential oil
Melt the base, do not boil it under any circumstances, pour liquid honey into it, add a drop of dye and essential oil. Pour the finished composition into the mold. When it hardens, pull out the soap.

Recipe for making baby soap
Ingredients:
- 100 grams of baby soap
- half a cup of milk or herbal infusion
- half a spoon (large) olive oil
- a little aroma oil, dye
- teaspoon of vitamin A, E oil solution
Dissolve the soap in a water bath and add milk. When removed from oven, add remaining ingredients. Stir and pour into molds.

 Original performance handmade soaps
 DIY coffee soap
Most often, soap with black, ground coffee is used as a natural scrub for the skin. Ground black coffee is suitable for adding to the base, and coffee beans as a decoration. Spent coffee grounds should not be used for soap making, because there are no useful components left for the structure of the skin.

 Coffee soap-scrub
 - RECIPE: Melt the white base (100 grams) in the microwave. Add two large spoons of ground coffee. Then pour in a small spoon of cocoa butter. Add some brown dye there. Pour into molds
- RECIPE: Rub two pieces of baby soap. Pour water (150 grams) into a bowl and melt the mixture. Add three teaspoons of olive oil and the same amount of sugar. At the end, add a teaspoon of cream and coloring. Pour into molds, let harden
 Homemade soap from baby soap and coffee
To get honey, healthy soap, you need to take eighty grams of white base. Cut it into small cubes and melt in the microwave. Do not overheat the mixture above 64 degrees, otherwise the soap will not foam. Add 45 grams of uncandied honey.
Stir the mixture thoroughly with a wooden stick. Then add 4 (citrus) drops to the aroma oil mixture. Pour in two tablespoons of carrier oil (olive or rosehip oil). Stir again, sprinkle the soap with alcohol and pour into the prepared form. Sprinkle a little alcohol on top too, so that there are no bubbles. The cream soap will be ready in about one hour.

DIY clay soap
RECIPE: Take one hundred grams of white base, chop and melt in the microwave. For this soap, it is advisable to take a mold with a pattern at the top. Fill the drawing with the prepared mixture. Add clay (pink) to the rest of the mixture - two small spoons, grape seed oil, wheat germ oil, one teaspoon each, D-panthenol (12 drops), aroma oil (3 drops). Mix the mass well. We wait until it begins to harden slightly, only then pour it into the mold. This will prevent the clay from settling.
 Soap with added clay
 IMPORTANT: Remember to spray the soap with alcohol before pouring it into the container. This helps the layers bond together and eliminates bubbles.
Handmade glycerin soap
Ingredients:
- pure water - 706 grams
- base oil (palm) - 1131 grams
- oil (coconut) – 451 grams
- castor oil - 708 grams
- 96 percent alcohol - 792 grams
- glycerin - 226 grams
- solution of chilled water, sugar - respectively: 423 grams, 566 grams

 Glycerin soap
Preparation
- Heat oils in a bathhouse
- Take 33 percent (of the amount of oils) of chilled water and dissolve the alkali. We begin to gradually heat it in a bath (water)
- Then mix both heated mixtures. Their temperature should be 40-42 degrees
- It is advisable to pour alkaline water into oils through a strainer, in case not all the alkali has dissolved yet
- Place the pan with water on low gas so that the mixture does not overheat, keep the temperature at 60-62 degrees (minutes: 35-42)
- The mass first thickens, and then a beautiful translucent gel is obtained. When this happens, add superfat (olive oil) so that the soap does not dry out the skin tissue in the future.
- Then you can slowly pour in warm alcohol, just don’t rush (the soap may foam)
- Leave the mixture to simmer further, and in the meantime prepare the sweet syrup
- Then pour it into the soap, stir again, you get a transparent mass
- After five minutes, add glycerin. After two hours of total simmering time for the glycerin soap, remove the mixture from the heat
- All that remains is to drop a drop of dye, sprinkle with alcohol and pour the mixture into the molds
- You need to take out the finished soap after a day, and use it after a week.

 Handmade soap with glycerin
 IMPORTANT: The dishes that you used for lye must be treated with vinegar and then washed.
DIY liquid soap from soap remnants
The crisis forces us to save on everything. But this process sometimes turns into a very pleasant, useful activity. After all, you can make healthy liquid soap from leftover soap.

Preparation
- Finely grate the remaining soap
- Boil the water
- Mix soap, boiling water in a glass jar
- Then add citrus juice (for flavor), glycerin - one spoon
- Mix the solution again and pour into a container with a dispenser.
- Leave to infuse for two to three days (do not forget to shake the gel periodically), after which you can use it


Handmade soap oils. What oils are added to handmade soap?
To make soap at home, carrier oils or so-called base oils and aromatic oils are used. Their choice must be approached more than responsibly. After all, quality products will not be cheap. The manufacturer most often reduces prices if chemical components are available. What oil to add is up to you. The main thing to consider is whether you or your family members are allergic to one or another type of product. And we talked about proportions in the paragraph - Handmade glycerin soap.

 Oil selection table by skin type
 It is best for novice soap makers to start making a product from baby soap, a soap base. Making soap from scratch is more difficult. Experienced soap makers use their own technologies. They advise adding chamomile and calendula herbal decoctions to the product instead of water. Then the finished soap has a beneficial effect on the skin.

 Homemade soap
 Video: How to make soap at home yourself?
Soap with loofah is a wonderful remedy for the prevention of cellulite. This fibrous sponge cleanses the skin well of the layer of dead cells, stimulates blood circulation in problem areas and accelerates the process of cell regeneration. After using a loofah, the skin becomes softer and more elastic.
Required
- 100 g white and 220 g clear English base, without sodium lauryl sulfate;
- essential oils: lavender and litsea cubeba;
- Sesame oil;
- glycerol;
- a piece of loofah with a diameter of 6-7 cm and a length of 3.5-4 cm;
- dry pigment dyes: lilac and neon pink;
- alcohol in a spray bottle;
- 3 round shapes, differing in diameter from each other by about 1-1.5 cm (I used 2 jars of cotton swabs and a trimmed plastic bottle from kefir);
- scales, heat-resistant dishes, small glasses for diluting dyes, a knife, sticks for mixing the base, a toothpick.
How to make multi-layer loofah soap
1. Loofah - component homemade soap, requiring preliminary preparation: when dry, it is too hard and can scratch the skin. Therefore, before you start making soap, pour boiling water over it and leave for 5-6 minutes. During this time, the fibers will be saturated with water and soften.

2. While the loofah is “steaming”, prepare for the first pour of soap. To begin, cut 50 g of white and 80 g of transparent base.

3. Then dilute the dyes in glycerin. I usually pour 1-2 teaspoons of glycerin into a glass, and then little by little - using a stick - add dye. If after mixing the color turns out to be too pale, add more powder.

4. Now squeeze the loofah well to remove all the water and place it in the smallest size mold (slightly larger than the diameter of the washcloth).

5. Melt the base one by one – first the transparent one (it cools more slowly), and then the white one. I used a microwave oven - set the power to 320 kW, time - 1 minute, and kept an eye on it so that the base did not boil. Tint the transparent base with lilac pigment, and then add 15 drops of sesame oil, 8 drops of lavender and 10 drops of litsea cubeba.

6. Simultaneously pour the white and lilac base into the loofah mold on both sides. To ensure that the soap completely fills the air space between the loofah fibers, tap the jar on the table several times.

7. To remove air bubbles that rise to the surface, do not forget to treat the soap with alcohol. Place the mold in the refrigerator for 20-30 minutes to speed up hardening.

8. While the loofah soap is cooling, make the base for the next layer. Weigh 25g white and 70g clear base and cut into cubes.

9. Remove the frozen round from the mold and scratch it on all sides.

10. Spray the soap with alcohol to strengthen the adhesion of the layers.

11. Place the bar in a jar of a slightly larger diameter, but not in the center, but a little closer to the edge - so that the finished soap in cross-section resembles a “peacock's eye”.

12. Now melt the transparent base in the microwave, tint it with neon pink pigment, and pour in 20 drops of sesame and 10 drops of lavender oil.

13. Flavor the melted white base with 12 drops of Litsea cubeba essential oil.

14. Simultaneously pour the slightly cooled base into the mold on both sides, changing the filling points of the transparent and white layers.

15. Spray the surface with rubbing alcohol and use a toothpick to make a couple of circular motions to slightly blend the pink and white soap.

16. Cool the soap in the refrigerator for 10-15 minutes and remove the bar from the mold. Trim off excess soap with a wide-bladed knife.

17. Scratch the surface of the block with a stick and treat with alcohol.

18. To line the bottom of the largest jar, I melted the soap scraps and poured them into the mold, then let the soap harden. If the jar you choose has a flat bottom, you skip this step.

19. Place the soap with loofah in the jar, moving it to the edge - the same as with the previous pouring (due to the lack of base, the bottom was not quite level, so I put a stick so that the soap would not tilt).

20. Cut the remaining clear and white base into cubes and melt in the microwave.

21. Add lilac dye and 8 drops of lavender oil to the melted transparent base.

22. Add 3 drops of Litsea cubeba essential oil to a white base.

23. First, pour the colored soap into the mold.

24. Spray the surface of the soap with alcohol.

25. After this, add a white base.

26. Make a circular motion with the stick.

27. After treating the soap with alcohol, place the mold in the refrigerator.

28. Remove the frozen block from the mold.

29. Use a knife to cut off the beads along the edges and divide the loofah soap into two equal parts.

You should end up with a wonderful multi-layer round soap.

This is one of the simplest and most enjoyable soap making methods. Even children can easily handle the base, not to mention adult beginner soap makers. To begin with, you can try transparent and white soap bases, without all kinds of additives and specializations.
You can find out more about soap bases (types, features, composition, manufacturers). As already mentioned, the most popular at the moment are the basics made in England; the Russian manufacturer also has a fairly large selection of basics.
The main thing is to remember and follow the rules for adding all components and dosage.
Advantages of the method:
- the soap base is easy to work with;
- It’s enough to simply realize any idea - multi-colored multi-layer soap or small colored details, everything is possible;
- can you make clear soap
- melts quickly, easy to cut;
- large selection of different types;
- can be used immediately after preparation.
- sold only in specialized stores or online stores;
- on average, a kilogram of base will cost 200-240 rubles, you will also need dyes, flavors, oils or other useful additives (you can get by with natural dyes and flavors, more about this in the following articles);
- The capacity of oils and additives is quite limited (about 3% oils), all excess will come out as dew on the finished soap.
The additives are the same as in soap prepared. I will duplicate the list of fillers. Remember that the base only accepts a certain amount of ingredients, anything more, reduces soap quality and foam.
- Scrubbing substances (poppy seeds, coffee, sesame seeds, sugar and cane sugar, loofah, oatmeal, coconut flakes, ground apricot seeds, grape seeds, strawberry and kiwi seeds,).
- Softening additives, caring (honey, milk, cream, herbal decoctions, cocoa, chocolate (gives a brown color), glycerin (softens the skin, 1 tsp), vitamins, turmeric (gives an orange color), parsley juice, chlorophyllipt (gives green color), sandalwood powder (gives red color), cosmetic clay, bath pearls).
- For beauty (dried flowers, zest, petals, beads, toys, wax, sea salt (cannot be added to a hot base, as unnecessary chemical reactions occur)).
Instructions for making your own soap from soap base:

This is the basic thing you need to know about the process of creating soap from a solid soap base. Everything else depends on your imagination, what you decide to put in the soap, what colors to paint it, what shape to choose.
Here are some examples of DIY soaps made from soap base.
Soap-scrub “Coconut Paradise”

Nourishes the skin, tones, softens. The soap will be clear rectangular with coconut flakes. Let's take the simplest and most inexpensive option. A rectangular mold (a plastic box of processed cheese, for example, will do.)
Recipe: transparent soap base (100 g), coconut oil (1.5 ml, half a teaspoon), essential oil mint (4 drops), if you have a coconut scent, add 5 drops instead of essential oil, coconut flakes (2 teaspoons). If desired, you can add dye, if available.
Preparation:
- Melt the soap base.
- Add base oils, mix well, stir the soap until it becomes thicker.
- Add coconut flakes and stir.
- Add fragrance (or essential oil).
Whipped soap "Chocolate"

Has a delicious chocolate smell. Nourishes the skin, gently cares. We take the same rectangular shape, if desired, you can choose any other. We don't need dye, thanks to cocoa the soap will be a rich brown color. Flavoring is also optional. You will only need a mixer to beat the soap, you can do this with a blender, the main thing is to wash it thoroughly afterwards.
Recipe: soap base (100 g), cocoa powder (2 tsp), coconut oil (1.5 ml half teaspoon), milk chocolate cube, milk (1 tsp), cinnamon essential oil 1 a drop.
Preparation:
- Melt the soap base.
- Add base oils, milk, cocoa, crushed chocolate, mix well so that there are no lumps. Beat with a mixer until foamy.
- Add cinnamon essential oil.
- Sprinkle the mold with alcohol, pour soap into it and sprinkle with alcohol again.
- Let the soap harden for 20 minutes. Remove and wrap in cling film.
Now you know how to make soap with your own hands from a soap base. Happy soap making!