Stands in kindergarten made of ceiling tiles. Wall decoration with ceiling tiles. Composition of tiles suitable for crafts
Master Class. How to make a “Nature Calendar” stand with your own hands.
Master class objectives:
Show your version of creating a “Nature Calendar” stand;
Be able to select materials for the stand;
Decorate the group to your liking;
Develop creative activity teacher
Show how you can make a “Nature Calendar” stand with your own hands.
Develop a desire to make things and design a stand as you wish.
Cultivate aesthetic taste and neatness.
Invoke the joy of creativity, satisfaction from the work performed.
Material: plastic panels, building profile, metal strip, ceiling tiles, transparent thick film, colored paper, pictures of the seasons, poster "Seasons".
For the base of the stand I used plastic panels, which were glued together at the joints for strength with ceiling glue.
As a frame I used a building profile, which I also glued to the base with ceiling glue.

Seasons – designed on the ceiling tiles. The arrow is cut from food trays. It is held on with Velcro. By moving it, you can indicate each month and season at the same time.

Weather – I pasted pictures of natural phenomena from the “Nature Calendar” poster on the ceiling tiles. On top there are transparent pockets. Children find the pictures they need and put them in their pockets. And in the red squares, children use a felt-tip pen to water based can mark weather changes throughout the day (this marker can be easily erased). All arrows are held on with Velcro.


Temperature – in the middle of the picture there is a thermometer, along the entire length of which Velcro for clothes is glued. The red Velcro mark can be moved throughout the thermometer to indicate the temperature. You can also mark the weather in degrees in the boxes.


Days of the week – names of the days of the week are printed on sheets of paper different color. Children move the arrow around the circle, identifying the days of the week by color, and those who know the letters can read it.

The numbers of the month are pasted onto a metal strip (perforated aluminum sill), along which a red window with a transparent film moves freely. In the red frame, children mark the desired day of the month.

There are also two windows with transparent pockets. In one you can place a picture depicting the season. In the other, there is a child’s drawing reflecting the time of year. In order to place the sheet horizontally next to the window, plastic clips are glued to hold the design. Very comfortably. The sheet can be placed both horizontally and vertically.


To help children navigate time, there is a clock on the nature calendar. Children can easily identify minute and hour hands, minutes and hours by numbers and counting, and can set the right time.

Having such a nature calendar, you can maximize the activity of children in a corner of nature.
Take heart, colleagues! Imagine! I wish you creative success!
Read 35778 once
Valentina Semenova
Subject-spatial development environment in group kindergarten constantly requires updates. Decor walls is one of the options for interior decoration. Children spend most of the day in kindergarten, so I really want the children to enjoy going to kindergarten. Everyone knows how expensive stands are, so I found an easier option. In my work I have been using for a long time ceiling tiles. WITH using tiles I make various corners, stands, interior decorations. Working with her is easy and simple. Except tiles in my works I also use titanium glue, colored self-adhesive paper, acrylic paints, gouache, stationery knife. I present to your attention my works.
Design of the central group wall rooms in 1st junior group.

decorating the duty officers' corner


design of a corner of nature

decor design corner

reception decoration
Menu corner


Corner "Our Vernissage"

Thank you for your attention!
Publications on the topic:
Master class on making a sun from foam plastic ceiling tiles. I present to you a master class on making a sun from foam plastic.
"Kite" from ceiling tiles. Master Class. Good day, dear colleagues! It's winter now and it's minus twenty-eight outside.
IN Lately I became very interested in making group design elements from ceiling tiles, covering them with a mixture of gouache and PVA glue.
Leaf fall, leaf fall, Yellow leaves are flying. Yellow maple, yellow beech, Yellow circle of the sun in the sky. Yellow yard, yellow house. The whole earth is yellow all around.
Ceiling tiles are an excellent material for creativity. It is easy to cut, can be painted and adheres well. Having assessed the qualities and capabilities.
In a kindergarten group, the spatial developing environment needs to be constantly updated. I have been using ceiling tiles in my work for a long time.
Children are flowers of life. And in our work, children need to be constantly surprised and interested. Before the opening of the mini-center after the holidays, children.
Placing information corners is one of the important requirements in kindergarten. There should be information for parents about the daily routine, thematic and educational materials. Buying ready-made boards is not cheap. All that remains is to use your creativity.
What material should I use to quickly and inexpensively decorate a room? Ceiling tiles – the best option. The most necessary thing is a little effort, creative thought, and time. The result will not be long in coming.
Three in one: inexpensive, fast and effective
A do-it-yourself tile stand is the optimal solution for preschool educational institutions and schools, as it is characterized by many advantages:
- low cost;
- ease;
- ease of processing;
- speed of production;
- availability of necessary materials;
- different design options.
Foam products can be processed in any way, so the originality of the stand is the main feature of the information corner. To do it yourself, you need to stock up necessary tools, materials, imagination, and the resulting result will surprise you with its brightness, colorfulness, highlighting the group in kindergarten.
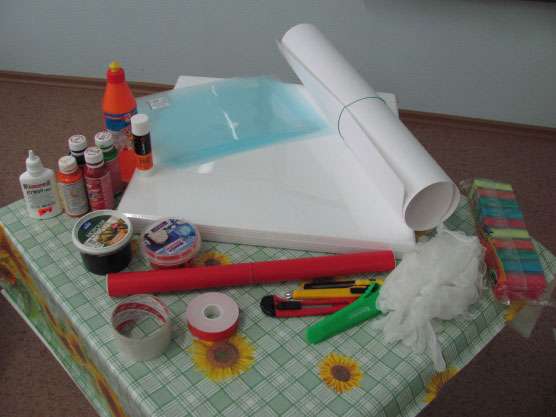
Necessary materials
To make your own kindergarten stands from ceiling tiles, you need to visit hardware store. To create you will need a few tools and some materials:
- stationery knife;
- scissors;
- two types of tape: masking tape and stationery tape;
- double-sided adhesive tape;
- PVA glue;
- colors;
- acrylic paint;
- brushes, sponges, gloves;
- decorative means.
The design of the layout is limited by imagination, and with a few efforts the information corner will be ready.
How to make stands from ceiling tiles
Easiest to do. The first step is to develop a layout and design. To make the task easier, you can use computer graphics editors. After this, the required number of tiles are fastened together, and the surface is given the desired shape.
When the background is dry, additional parts are made. Windows are created using folders or files, double-sided tape, adhesive tape or ceiling plinth. Subtitles can be cut out of tiles according to a template or paper letters can be attached, previously covered with tape to increase their service life. Pictures, figures and other objects serve as decorative elements. Everything should be placed in the designated places and glued.
To make a themed stand, you need to create a base from polystyrene foam and give it the desired shape. The main thing: do not forget to fasten the parts of the tile on the back side. Using paint and color, a background is created. The header can be made from polystyrene foam, paper, cardboard, painted with the desired colors and glued. The surface is decorated with decorative elements: pictures, butterflies, letters, patterns. If necessary, windows are made.
Expanded polystyrene tile stand:
- an easy way to save money
- decorate the interior of a kindergarten group
- create an effective didactic tool
For production you will need:
- some time
- efforts
- fantasy
- children's help
- parents
- educators
Thanks to the available materials, creating an information corner will not be difficult, and the simplicity of the methods and minimum costs will save parents' resources and budget.
An example of making a stand in pictures step by step


Anna Svetlichnaya
Dear colleagues!
In connection with the implementation of the Federal State Educational Standard, the task teacher organize work with parents, one of the forms of which is information corners. I would like to present to your attention master- manufacturing class stand"No one is forgotten, nothing is forgotten!"
First, we need to develop a layout. I did this in PowerPoint
For work we need...

The width of our stand 1 meter, i.e. 2 tiles.

Since the layout consists of 4 wavy stripes, 1 template will suit both the concave and convex parts, only upside down.

We attach the template to tiles, trace with a pencil.

Upper part cut the tiles

and apply it to the bottom of the part, combine it so that the cut matches, and when assembling it, stand I didn't have to adjust the parts.

We turn the part over, trace it and cut it out from another tiles, then the details will match.


It is better to number the parts immediately on the reverse side. Thus, 4 strips are cut out, each of which consists of 2 parts.

To paint, mix the color with PVA glue to achieve the desired shade. We paint the parts according to the numbering, not forgetting to paint the edges.


Name stand we type on the computer, make templates, trace and cut out tiles.

We also need flowers. We make a template.

We will have flowers volumetric. To do this we will have to cut the template several times.

First, cut off the calyx from the flower. Circle on tiles received details.

Then cut the cup into 2 parts, outline the smaller one, and cut it out.

Cut off the upper part from the flower template, trace the resulting part onto tiles.

We cut off another part of the template and trace the very bottom of the flower on tiles.
It turns out volumetric flower.

Now let's paint all the details with the desired color. When the paint dries, glue it together with glue. "The Dragon". The flower parts are glued together on the reverse side using scraps tiles.


More to make stand we will need the Eternal Flame. In our case, a picture is cut out, glued with pencil glue and laminated with tape. We cut it out with a stationery knife, retreating a couple of mm from the edge of the picture.


Now we will deal with the pockets that are needed to place information. You can make them from: files, corners, folders, or you can buy ready-made ones. We will make pockets from folders. The folder needs to be cut.


Using self-adhesive paper, we make a frame. We put double-sided tape on the back side.


Now let's assemble our stand. The parts are fastened together on the reverse side with scraps tiles and glue"The Dragon".Then we place our details: pockets, flowers, letters and the Eternal Flame. Let's fill the pockets with information.