Carve patterns on wood. Drawings, templates and stencils for wood carving. Main shapes of different patterns
Wood carving is an ancient art form. Its high popularity to this day is explained by the availability of the material and the beauty of the result. The primitive designs that can be found in the works of our ancestors over time turned into elegant patterns and ornaments. Thanks to the power of the Internet, finding sketches for wood carving is not particularly difficult.


What is an ornament
Since ancient times, various ornaments have been used to decorate wood products. The ornament is a special rhythmically arranged pattern made of various visual elements.

There are several basic, basic varieties of ornament. Let's look at some types in more detail.
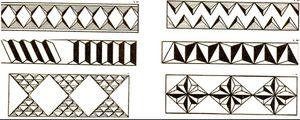
Geometric ornament
A geometric pattern, as a rule, consists of many simple figures, the combination of which creates an amazing fantasy image.
Individual elements of geometric patterns can be used independently:
- dot (together acquires a decorative effect);
- lines (used as delimiters of individual scenes on the product);
- broken lines (carry a sacred meaning, for example, a zigzag is a symbol of water);
- squares and diamonds (act as frames for plots);
- polygons (traditional patterns of oriental motifs);
- crosses (in ancient times - symbols of various structures);
- spirals, screws;
- circles.

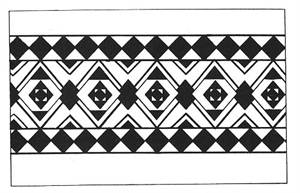
The geometric ornament will be most widespread in geometric and contour carvings.

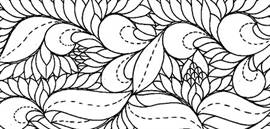
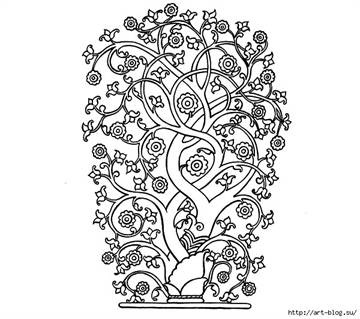
Trees and flowers
They border the main ornament of the composition, or are independent ornaments. Trees, flowers, and fruit-bearing plants are depicted. It is one of the most favorite ornaments of different nations.
The most common forms are lotus, ivy, grapes, oak.


Wild animals
As the name suggests, zoomorphic ornament is based on the repetition of images of different animals. Most often, their appearance is greatly simplified. Animals are often associated with mythology.

Used in combination with floral and geometric patterns.


It is found in any type of carving (from flat-relief to sculptural).
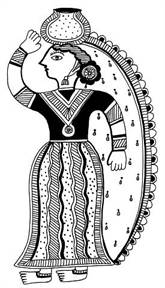
Image of a person
As a rule, a person in wood carving is depicted schematically, along with plant and animal ornaments.
Complex ornaments
A wide variety of elements that have a decorative function (inscriptions, hieroglyphs, Arabic script, heraldry, symbols).

Depending on the location and shape of the ornament, The following varieties are distinguished:
- border;
- garland (wavy ornament);
- rosette (a separate ornamental figure);
- palmette (fan-shaped ornament);
- arabesque (complex, ornate ornament);
- wreath;
- panel

Stages in preparation
Before cutting out the design you like, you need to find a sketch of it. Then you will need to cut out the templates.
Next, transfer it to the workpiece using carbon paper (tracing paper) and a simple pencil. And only then will it be time to cut out the ornament (with a knife, jigsaw, milling cutter or other suitable tools).
Beginners should not attempt complex, ornate designs. Good for beginners contour thread, artistic motives.

The template must be suitable for the specific type of thread. There are some templates for flat-relief and geometric carvings, and others for slotted carvings.
Here are some easy-to-follow sketches (photos and drawings):


Wood carving is an amazingly beautiful and very popular type of hand-made wood processing these days. The carved interior details captivate with their magnificent appearance and reflect rich national traditions.

Creative people who are simply itching to do something very interesting and useful should pay attention to wood carving. Girls and women may think that this is only a man's activity. And they will be wrong, because there are no fewer women woodcarvers than men.

About wood carving for beginners
Can be used to decorate indoor and outdoor spaces different kinds carvings and techniques for implementing the plan. If you are interested in this type of needlework, then you must understand that you need to master the methods and techniques of wood processing, acquire necessary tools and improve your carving skills.
In the modern world of smartphones and tablets, a wooden stand decorated with wood carvings looks very original.


Skillfully executed carvings in the form of simple and ornate patterns and ornaments seem to enliven the world and endow it with sophistication, charm, emphasizing the taste of the owner of luxury items and the talent of the craftsman.


The works of the best carvers decorate the temples. Pay attention to the photo of the iconostasis of the upper Church of the Holy Image of the Savior, which is located in Moscow, in the Church of the Intercession of the Blessed Virgin Mary in Fili.

Modern masters with delicate taste create real masterpieces.

And thanks to finishing and protection technologies finished product from the destructive effects of mold and insects, these wood carvings have served people for hundreds of years.
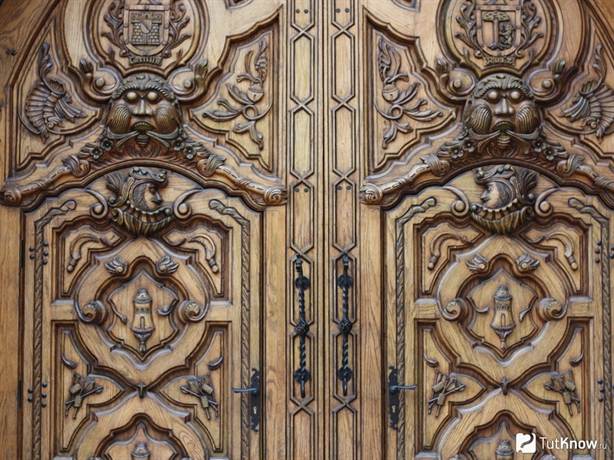
Pay attention to the magnificent carved pieces of furniture:


Stylish doors:

Delightful handmade figurines:


Very often, connoisseurs collect handmade carved items. Wonderful chess that is worthy of any collection.

Perhaps, over time, your wood carving masterpieces will be carefully preserved by collectors or decorate temples.
Types of wood carving
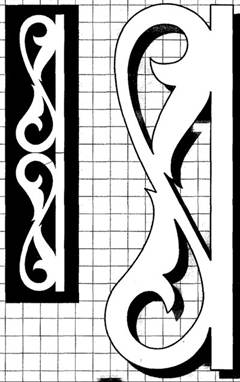
Of all types of wood carving, it is very interesting openwork or through thread on wood, which is characterized by some transparency, in which only the image remains, without a background. An example is an applied carving - this is an ornament that is attached to a finished background after production by a craftsman.

Geometric carving woodworking – This is a type of carving in which the pattern is formed using many simple geometric shapes (a rhombus is often used).

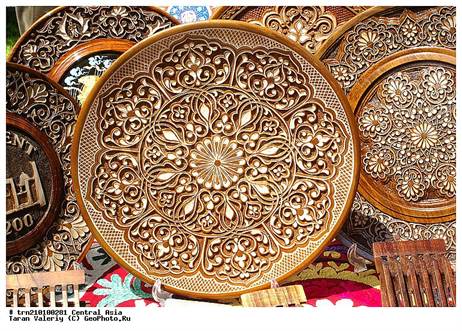
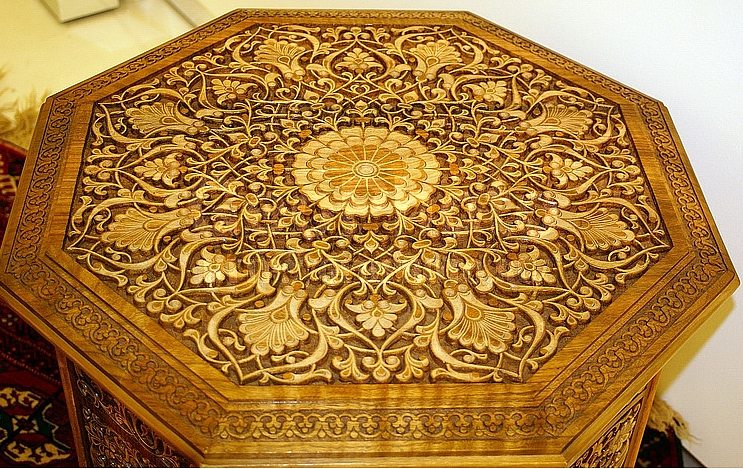
Oriental carving on wood it is distinguished by its whimsical shapes. Egypt is the cradle of the oriental type of wood carving.

Relief carving on wood. In this technique, the image is located above the background or at the same level with it. These are carved panels of various shapes with three-dimensional images.

- This is a flat-relief carving, but distinguished by an abundance of carved and stucco decorations, various colors, curls, leaves, figures of people in unnatural poses, fabulous fantastic animals.

Originated in the village of Kudrino. Well-known products in this type of carving are boxes, vases, dishes, ladles, and home decor items. The main element is a floral ornament: rosettes, curls and twigs.

Volumetric (sculptural) carving Great for making sculptures, animal and human figures, toys. - a subtype of volumetric thread. This is the main industry of the village of Bogorodskoye in the Moscow region. The famous Bogorodsk toys are figurines of animals and people made of linden and alder.

Most often used to decorate wooden Scandinavian churches. Wood carvers decorated the inside and outside of church buildings with images of Gods and various animals.

- the simplest and most unique type of carving. On a flat background, the master cuts out grooves - grooves, forming a pattern. Carved landscapes - images of landscapes on wood.


All these types of carvings are quite conventional. Each master chooses the most suitable one, taking into account work experience, quality of wood and creative inspiration.
What can be decorated with carvings?
The simplest staircase is transformed, decorated with carved balusters. Balusters- these are figured columns in the form of columns, a stylish and noble decoration of the staircase. Wooden balusters look organically with a spiral wooden staircase.

Bas-relief. Another name is "low relief". This is a sculptural image on a plane. Most often these are figures of people and animals .

Choosing tools for wood carving
As in every business, wood carving has its own secrets and nuances, which allow one to reveal the beauty of wood in a wonderful ornament. It is necessary to select special tools for wood carving and stock up on the necessary blanks and sketches for wood carving, which will be embodied in the form of drawings, borders, lace or genre scenes.
Basic tools
Very high demands are placed on the quality of carving tools. Of course, skill plays an important role, but well-selected and sharpened tools will help bring your idea to life. Experienced carvers will tell about its quality at first glance at a tool, but beginners get lost in the store because of the huge selection.
The basic set for wood carving includes:
- several knives and chisels;
- needle files;
- hacksaws for metal;
- vice;
- sandpaper;
- drill with several types of drills;
- bars.

Knives should be made only from high quality steel. It is better to purchase them in specialized stores for creativity. Although at the initial stage, just sharply sharpened knives will do. An excellent start would be knives from Tatyanka, Narex, Kogatana, etc.
It is not necessary to choose an expensive foreign-made instrument, because domestic instruments can be the same good quality but much cheaper
As your skill grows, you may need a set of tools, a milling machine, a drill, etc.

Chisels for carving
Sometimes, instead of a chisel, a sharpened screwdriver or file is used for wood carving.

Flat chisel- This is a long rod, at the end of which there is a flat cutting edge. Very often it is used for primary processing wood
Semicircular chisel- This is one of the most important tools for work. They differ somewhat in the degree of roundness, that is, they are medium, round and sloping.
It still happens V-shaped version of chisels. It can be useful for geometric wood carving, which we will introduce you to below.
Beginners need only a small wood carving set of good quality to immediately get used to the correct movements and pressure.
In this video there is a wonderful master A. Yuriev shared with us which tools to choose for carving.
How to protect yourself from injury when carving wood
Any tool of a master carver can be compared to a straight razor, therefore, when working with it, you must strictly follow safety precautions. The material must be positioned so that you can work freely with a knife or chisel, eliminating the possibility of the sharp edge hitting your hands.
The work place should be comfortable and clean. All unnecessary tools at the moment should be carefully folded, because they are very sharp and can cause injury.

Materials for work
Each type of wood for carving has its pros and cons. Soft wood is easy to work with, but there can also be a lot of defects. These are aspen, linden, birch. This wood is best for beginners.

Oak, boxwood, mahogany are more expensive and complex wood. It is hard and durable, so it is difficult to carve from such wood. Very often there are troubles when working with such types of wood. Either the instrument or the craftsman may be harmed.
An experienced carver can easily work with a variety of woods, including juniper. Well, for beginners it is better to use inexpensive materials - spruce, pine, pear or birch.
Whatever tools are chosen for wood carving, safety precautions must be strictly observed!
Geometric carving technology
Geometric wood carving is considered the simplest and is perfect for beginners. To create the intended design, you need to have a small set of wood carving tools and clearly follow the design. For geometric carving In wood, symmetry and repetition are of great importance. This achieves a wonderful play of light and shadow.


Cutting boards using this technique and wooden panels look wonderful in the kitchen.

Geometric carving consists of sequential cutting out of simple geometric shapes: rectangles, triangles, squares, rhombuses. But the result is a wonderful ornament that looks different in different lighting.
Execution Sequence any wood carving is like this:
- First, a wooden blank is made (board, deck, blank).
- Next is rough leveling of the surface of the workpiece, during which all defects and roughness are removed.
- Then a decorative relief is formed using special cutters.
- After the main carving is completed, the finishing process is grinding, impregnation, painting, varnishing.
You cannot work with a workpiece on your knees! The master must have a table to work on.
Master class “Geometric wood carving on a cutting board”

Tools. You will need 2 knives for wood carving: a triangular jamb knife and a feather knife, a ruler, a compass, a pencil.

A triangle jamb knife is necessary for cutting triangular shapes of various configurations, as well as for cutting long straight lines. A pen knife is used to cut long lines such as a petal or groove. Carving knives should be sharp and comfortable.
First stage. We make a sketch of the pattern on the board. It can be applied using a compass and ruler. Or you can print out carving patterns taken from the Internet and use carbon paper to transfer them to a prepared cutting board.

Second phase. Cut out the petals. We use a pen knife.

While working, the thumb is pressed firmly against the board, and the index finger lightly touches the wood. This will help regulate the depth of the knife into the surface and the angle of inclination. And your thumb will help you move the blade smoothly. First, we cut in one direction at an angle, then we turn the board over and cut on the other side.

If the shavings curl like a rope, the knife is good and sharp. It must be periodically sharpened with a piece of leather with GOI paste.

Third stage. We cut out the triangles with a blunt knife. Using the heel, at an angle of 45 degrees, we cut the knife into the wood, not reaching the edges of the pattern on three sides. The slots should meet on all sides in the shape of a pyramid. The sliver falls out and forms a beautiful triangle.


Fourth stage. What we couldn’t cut, carefully clean it so that the edges are frequent and even. Using the same principle, we cut out grooves and triangles around the perimeter of the board.
Fifth stage. We sand everything with sandpaper and treat it with natural impregnation. All! The work is done. We decorate the kitchen with a useful and beautiful cutting board with wood carvings.
Wood carving designs
To perform wood carving, photographs, drawings and sketches are simply necessary. A large pattern for wood carving is used for large-scale products: for the facades of houses, interior decoration with carvings of churches, windows.
For interior items and furniture, carvers use small patterns that are carefully worked out by the craftsman.
YOU WILL NEED IT
We offer you an archive from . Choose, print, create.
Video master classes on wood carving for beginners
Of course, the wood carving looks especially impressive in the video. Channel "HAND WOOD CARVING" shows the features of geometric carving for beginners.
A woman's view of wood carving. Channel tatianacarving shows us how to make flower petals and leaves.
Konstantin Belyaev on his channel he talks in detail about wood carving cutters.
And in this video Ivan the Builder shows how to make relief-planar carving:
We will be very glad if this article inspired you to take up wood carving!
The ancient art of carving wood and plywood has always been considered a fascinating activity, with the help carved jewelry erected towers and huts of unique beauty, most of which are still considered architectural monuments today. Woodcarving, or wood carving, is becoming a popular skill; it is used to make large and small masterpieces. Beginners are helped to create masterpieces ready-made stencils for wood carving - special templates according to which three-dimensional ornaments and patterns are created.
The ancient art of wood carving has always been considered a fascinating activity.
Stencils for woodworking are used to transfer ready-made identical patterns onto a three-dimensional plane. Most often, such work is done to decorate walls and window frames, which is why sketches for working with wooden surfaces are considered the most common.
Carved patterns made using a stencil are divided into several types by craftsmen:
- ribbon carved ornament;
- carved platbands;
- carved balusters;
- pilaster;
- towels;
- brackets.
According to these ready-made templates even a novice master can compose and independently create a unique design and a real masterpiece of carved art. Using a ready-made stencil you can easily decorate any wooden product. Artistic cutting and openwork designs are usually useful when decorating:
- pieces of furniture;
- dishes;
- picture or photograph frames;
- boxes.
If a master wants to convey certain national motifs or features of an object in his work, he should first study the subtleties and nuances of ornaments and patterns.
How to learn wood carving (video)
Sketches for patterns: instructions
For those craftsmen who have recently picked up tools, experienced craftsmen recommend taking into account the following nuances when preparing for work:
- the engraving template should be as simple and understandable as possible, without complex or ornate elements;
- each type of thread has its own templates for work;
- lines from the existing template to the material for work are transferred as accurately as possible, since this is the only way to achieve accuracy in the work.
When choosing a design for subsequent transfer to the material, it is worth considering a number of subtleties that will help you make the product professionally and skillfully.
- For a large product, you should not choose an openwork pattern or a pattern with small details. Such a design will be lost on the finished item and will not make it unique.
- Small items are not decorated with patterns with large elements and ornamental details, so as not to hide the shape and uniqueness of the product.
- Proportions when transferring details to fragments of the product should be observed to the finest detail so as not to disrupt the integrity of the finished ornament.
You should not start working without first creating a sketch, which you can make yourself or download ready-made photographs from the Internet.
Carved frames for mirrors: an interesting idea
Lovers of Art Nouveau style interiors will appreciate carved frames that frame paintings or mirrors.
Such interior items not only look rich and unique, but also add a special “zest” to the interior of the room. When cutting out mirror frames, experts recommend using a few basic styles to work with.
- The double baroque style contains two contours inside and outside, represented by openwork curls. The craftsmen included a feather profile in this style; it reflects some of the lightness and grace of the rectangular-shaped product.
- For mirrors, the feather profile with a back is ideal, providing a dense back part where the mirror is attached.
- The refined profile also has a dumbbell style, despite the somewhat massive frame. It is these frames that hold a heavy and massive mirror well.

Lovers of Art Nouveau style interiors will appreciate carved frames that frame paintings or mirrors.
Special decorating methods are also used to make mirror frames:
- gilding with pre-polishing;
- varnishing with a transparent material;
- patina, or artificial aging of wood;
- antique decoration with cracks called craquelure.
In order to transfer the pattern from the stencil to the product, use soft pencils, transferring the pattern as accurately and accurately as possible.
Picture stencils for jigsaw and wood carving in pencil: how to make
Those craftsmen who are just starting to try themselves as a wood carver should understand that high-quality cutting can be done only after the template for cutting has been correctly prepared.
- Initially, you should decide on a blank for carving. For beginning craftsmen, geometric carvings on a plane or a simple wooden figurine are better suited.
- A sketch is made on paper with a pencil, and the main zones and places where the carving is planned are clearly defined on it.
- Using special drawing devices, the image is transferred to graph paper.
- Repeating parts are made of thick paper or thick cardboard.
- The finished paper pattern is attached to a wooden base and copied.

When making stencils for carvings made using the slotting technique, craftsmen recommend initially using thick paper for patterns.
Geometric and flat-relief carving: what is it?
Name geometric carving on wood comes from the main details and elements at the base of the pattern: geometric shapes, figures and their elements. Such ornaments are used to decorate furniture and household utensils.
To create this engraving you will need a simple set of tools:
- a piece of soft wood board;
- special knife-jamb;
- simple soft pencil;
- ruler.
When making the product, you will not need an applied paper blank, since the elements of the geometric pattern can be applied directly to the wooden blank.
Flat relief carving It is done in a similar way, but the design elements are not geometric shapes, but images of animals, elements of nature, and people. This type of carving is also used for making backgammon.

The finished product can be treated with colorless varnish
For such a wooden engraving you will need the following materials:
- set of wood cutters;
- soft wooden blank;
- sandpaper, pencils.
The product is manufactured following a certain sequence of actions.
- The wood is cleaned and prepared for work in advance. The design is applied to carbon paper and transferred to the workpiece.
- Contour carving is made according to the drawing; the relief and frame of the product are pre-selected.
- Upon completion, the work is treated with stain, dye or simply watercolors. Cleaned with sandpaper.
The finished product can be treated with colorless varnish.
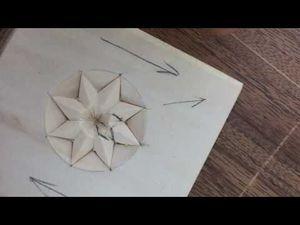
Flowers: wood carving for beginners
Flowers are one of the main elements of many wood carving patterns. It is not difficult to cut out this element; it is important to follow the sequence of actions and the principle of operation.
- A pattern in the form of circles is applied to the wooden surface and the details of the future flower are marked.
- The central circles are cut in a circle, after which they are cut from the outer circle to the center.
- After marking the petals, they are cut along the contour, cutting off the triangles between the petals, after which the outer contour of each petal is cut.
- An incision is made inside the flower, rounding the center of the design element.
You can decorate the drawing with any additional motifs; the geriola base of the product provides ample opportunities for toning.
Geometric wood carving is difficult process, the implementation of which requires certain knowledge from the master. This type over a long period of its development, decorative and applied art managed to influence the formation of several basic techniques that made it possible to create truly attractive and unusual sculptural compositions. In order to improve the skills of making geometric patterns on wood, first of all you need to study the methodology of this work and pay attention to the sketches available on the Internet.
Basics of Geometric Wood Carving
Geometric woodcarving lessons involve learning the basics of this decorative and applied art. Thanks to this, you can acquire knowledge about the tools needed for work, the features of choosing wood, the preparatory stage, the cutting techniques used and the safety measures used.
Tools
Wood carving, the geometry of whose patterns often amazes with its beauty and attractiveness, requires the selection of appropriate tools, such as:
- Knife-jamb. It is characterized by a beveled blade that allows you to create geometric patterns - triangles, squares, lines, etc.
- Flat chisel. A small product that is no more than 2 centimeters wide is best suited.
- Hacksaw. It is necessary for cutting out small parts of a workpiece or cutting off unnecessary wood elements.
- Round, square and half-round files. With their help, you can make recesses and holes of certain shapes.
- Rulers. These tools are usually not used for wood carving. At the same time, geometric patterns often need to be symmetrical. Therefore, in this case it is impossible to do without a ruler.
- Pencil. It is necessary for marking the previously selected workpiece. This way you can improve the quality of work and significantly reduce time.
- Compass. This simple tool allows you to correctly mark the workpiece if a round ornament is created on it.
- Eraser. It is used primarily for correcting pencil lines. In addition, such a tool is required after completion of the work if there are some marks left on the wood.
Thus, geometric wood carving does not require a large number of different devices. Often it can be done with a minimal set of tools.
Wood (how to choose wood?)
There are several types of wood that can be used to make geometric carvings:
- Solid. Most often, this type of wood is chosen by professionals. This is due to the fact that they have the relevant knowledge and experience. That is why, despite the complexity of working with hard rocks, they cope well with the task.
- Very hard. Most often this option is chosen due to the aesthetic properties of such trees. Working with hard wood is difficult, even for professionals.
- Soft. It is easier to process. That is why, if the master has no experience in creating sculptural compositions, it is best for him to choose this option. Soft blanks are made from linden, pine or aspen.
As a rule, it is quite difficult to get blanks from linden trees. This is due to the fact that it is often used, including by professionals. The main disadvantage of pine is that it is very prickly when cutting. In turn, aspen - best option, allowing you to end up with really beautiful work.
Preparing for work
When starting the first lesson, you need to prepare for yourself the appropriate board with the following overall dimensions:
- length: 170 millimeters;
- width: 110 millimeters;
- thickness: 20 millimeters.
Reference. Additionally, you will also need sketches of various geometric patterns that can be made on the workpiece.
A beginner needs to start working with the process of polishing a previously prepared board. To do this, using a ruler and pencil, you need to draw many horizontal and vertical lines over the entire surface of the workpiece, so that you end up with even squares.


Next you need to start drawing figures on the board in accordance with the previously selected sketch. It is best to start with the image of pegs, diamonds, crowns, pyramids, stars, squares and rosettes. Using this ornament, you will be able to create your own unique patterns in the future.
Cutting technique
There are two main cutting techniques that allow you to create basic geometric patterns on wood:
- triangle cutting;
- cutting into strips.
Interesting! Julienne cutting is used to create squares. In all other cases, the triangle method is used. Geometric patterns for wood carving can be created by a combination of these two techniques.
Security measures
Geometric wood carving for beginners is a very exciting, but also quite dangerous activity. This is due to the fact that in the process of work the master needs to use a large number of a variety of piercing and cutting instruments. That is why he needs to follow the following safety rules:
- All movements must be carried out from the hand. This greatly simplifies the work and reduces the load on the shoulder girdle.
- The hand holding the cutter should be pressed tightly against the work surface. This will help free up the movement of the brush.
- When the cutting process is in progress, the fingers of the free hand should not be on the workpiece. Otherwise, they may be injured.
Thus, wood carving can be very safe if you adhere to the above recommendations from experts.
Watch a video tutorial on geometric wood carving:
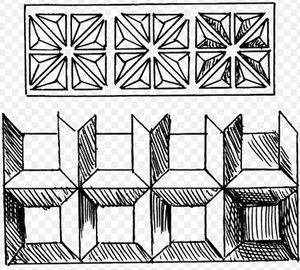
Basic patterns
There are several main types of geometric patterns that are used in wood carving. These include pegs, diamonds, roundels, pyramids, stars, squares and rosettes. Having studied the features of creating each of these ornaments, the master can independently connect them together, making original and unique work.
Skolishki
 In order to carry out wood carving, you must first learn how to perform such simple actions as pricking and trimming. To do this, you need to take the knife in your working hand. Her thumb should be located on the beveled handle.
Initially, you need to press the cutter so that it goes deeper into the wood by a few millimeters. After this, you should lower the blade at an angle so that it intersects the line of the side knife in accordance with the previously made markings. In a similar way, you need to prick on the other side.
Trimming occurs as follows:
- The cutting part of the knife should be applied to the left side of the triangle. With its bevel it should be connected to the top of the figure.
- The knife handle must be pulled back. In this case, it is necessary to maintain a parallel between the right side of the ornament and the blade.
- Finally, press down on the knife, returning the brush to its original position.. At the end, the tip of the knife should be on top. In turn, the cutting part will be on the right side of the triangle.
Since the trimmed triangle should eventually break off on its own, the pattern obtained as a result of these actions is called a chip.
Diamond
The rhombus, which is often used in wood carving, is a fairly simple figure. It consists of two triangles. They are connected to each other by their bases.
Reference. The technology for creating diamonds on a workpiece is the same as for making a peg. First you need to cut out the top row, then turn the board and start on the bottom of the figure.
Viteika
Another type of chips is viteyka. It is obtained due to the displacement of two triangles to the sides of each other.
Thus, having made many turns, you can end up with a winding path on your workpiece. To do this, you first need to cut out the bottom triangles, split them off, rotate the board and start creating the top row. After this, a so-called snake will remain in the middle.
Pyramid
The pyramid is the first complex design that can be made with a wood cutter. It consists of several triangles, which must be located in a certain order in relation to each other.
In the center between the three triangles is the point of contact of the corners. That is why, when cutting, you need to ensure that the cutting surface of the knife is always with one end strictly in the middle. Trimming should be done in the direction of the wood layer.
Star
 A distinctive feature of an asterisk is that it consists of more triangles than a pyramid. Despite this, the process of creating this pattern is similar.
To cut out an asterisk, you need to make four consecutive triangles on the workpiece in the same way as described above.
Squares
Unlike all previous ornaments, creating squares requires the use of a different technique called straws. The pattern can be either the border of the entire work or part of a larger element of the design.
The creation of a square occurs as follows:
At the end, a piece in the form of a straw should fall off from the wood. If you process all the lines of the square in the same way, you can get an interesting pattern.
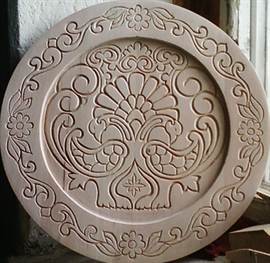
Socket
The rosette is the most complex ornament in geometric wood carving. To create it you will need a compass. With its help you need to draw a circle of large diameter. After this, you need to make another one - 5 millimeters smaller than the previous one. Next, you should divide the circles into 16 even parts.
Once the above steps are completed, you need to mark the points in the middle of each segment on the small circle. From these places you should draw a line to the points of the large circle closest on each side.
At the end, having the markings, all that remains is to cut and split off the triangles in accordance with the technique described above.
Practical lesson in geometric carving, making a box
Geometric wood carving of a box requires certain steps, such as:
- thinking through the ornament;
- drawing a picture on the workpiece;
- performing markings;
- cutting out the simplest shapes;
- creating more complex ornaments;
- removing roughness with sandpaper.
A geometric tree pattern can be created quite easily. In order to complicate it, it is necessary to connect a large number of simple elements together. Additionally, you can watch a lesson on the Internet that will help you understand how to decorate a box with geometric patterns.
Video material on carving a wooden box:
Conclusion
Almost anyone can learn wood carving. In order to do this, it is imperative that you first read the relevant theory. After this, based on the recommendations of specialists, you need to approach the process of acquiring practical skills. Once they are received, you can begin independent work to create beautiful wooden objects decorated with original geometric carvings.
In contact with
One of the most luxurious, valued for its originality and handmade, products made in the form of wood carvings are rightfully considered. Since ancient times, with the help of this type of art, unsurpassedly decorated towers and huts have been created.
Some of them are currently considered architectural monuments. This art is beginning to revive in the modern world. Wood carving stencils are excellent helpers in this matter.
In contact with
What is a stencil for?
First, let's try to figure out what stencils for woodworking are. These are special ones that are used to apply pattern elements to the surface of wood.
They are much make it easier to repeat identical characters and allow you to speed up your work. For example, the most popular stencils for are samples for platbands.
With their help, quite a lot of work is done complex work for interior and facade design.
Stencils are divided according to their purpose for creating interior elements:
- ribbon carved ornament;
- carved platbands;
- pilasters;
- towels;
- carved balusters and more.
All varieties are considered professional templates. You can use them create several ornaments for wood carving of a voluminous nature and significantly facilitate the task assigned to the master. There is no need to create them yourself. On the Internet you can find and download the option you like.
Prices for wood carving kits
wood carving kits
How to choose a stencil
Wood carving designs are so varied that they can be used by both beginners and high professionals. With their help, both simple ornaments and high-level works of art are created.

The main thing is to make the right choice. To do this, you must adhere to certain rules:
- if you started using incisors quite recently, then Don’t choose intricate patterns, since it is quite difficult to work with them, and the workpiece can be damaged;
- for each type of wood carving they choose their own stencil;
- Before starting work, you must apply a stencil design to the workpiece; the lines must be neat and clear.
 Finding stencils today is easy. This can be done using electronic libraries.
Every decorator will appreciate the convenience and wide selection of this source. Here you can choose drawings from a bygone era as well as modern masterpieces.
When making a choice, be sure to compare the dimensions of the workpiece and the image itself.
You also need to choose a sample that will look appropriate on an element of the interior. We pay attention to the nuances:
- for a large product, you do not need to choose a stencil with small elements or openwork patterns;
- for small items, stencils with large designs are inappropriate;
- proportions must always be observed.
All these tips apply to any drawings.
Types of wood carving
Wood carving does not have a narrow direction; on the contrary, it has several varieties:
- slotted;
- flat-relief;
- embossed.
Slotted carving on plywood
 The key to success when performing slotted carvings is right choice ornament. Thanks to it, plywood carving sets the overall concept and adds aesthetics to the product.
Drawings and ornaments on floral or animal themes are standard representatives of the classical style and are suitable for any interior design.
Very often used slotted inscriptions. In this case, ready-made stencils are difficult to find, since they are created individually for each case. This is due to the fact that it is necessary to maintain the size, style of the font, and the set of words is always different.
Important! The situation is completely different with patterns of plant, animal and fantasy styles. Many options for this topic can be found on the Internet. Some options are shown in the photo below.
House wood carving
Brownie is the main focus of the design of huts, which is very common in the Nizhny Novgorod region. It is she who can boast of various lace patterns. To perform it yourself, you should select the appropriate sketches.
The main condition for house carving is to avoid small parts. They will get lost on the facade of the house, and will not last long.
Options for house carvings can be selected on websites dedicated to wood carvings. But there are craftsmen who can make a template to order. In this case, you can realize exactly your idea and get an original pattern.
Attention! Patterns for house carvings are applied using tape stencils.
Through wood carving
A distinctive feature of through thread is complete wood removal from the inside of the picture.

Through threads come in different styles:
- simple, in which elements are cut out along the contour of the design;
- openwork, when the pattern is created with a volumetric effect due to multi-level cutting.
Through carvings are used to make frames, various overlays, door panels, and decoration elements.
Through carving in oriental style is done using a jigsaw.
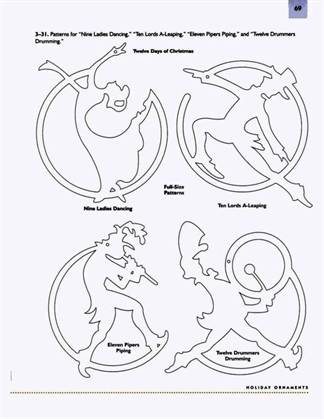
Sawing with a jigsaw
Sawing with a jigsaw is mainly carried out on plywood. To perform quality work you must have at least the slightest experience with the tool. Also an important factor is the presence of an original stencil depicting animals.

Commonly used stencils:
- a pair of swans;
- head of a deer, wolf;
- cockerels on a knitting needle;
- a horse standing on its hind legs;
- butterflies.
It all depends on the style of the interior, which needs to be supplemented with decorative elements. You can easily find examples of templates on the Internet.
 The most suitable material for sawing is birch plywood 3–10 mm thick. In addition, for work you need to prepare:
- copy paper for interleaving the pattern;
- special paper for sanding parts;
- wood glue for joining parts;
- clear varnish to give a decent appearance.
Before starting work, the workpiece is carefully polished with glass paper, only then do they begin to transfer the design.
Floral ornament
Often, floral or foliage patterns are made in the form of stripes or borders consisting of repeating patterns. Can be made in an individual composition that contains an image trees, fruiting plants, various floral elements And so on.

The work is done in various ways:
- display in a naturalistic form;
- simplified plant elements.
Floral patterns for carving wood are in second place in popularity after geometric patterns. Favorite thematic elements at all times are lilies, grape leaves and berries, oak, hops, ivy, etc.
Sketches for patterns
Stencils for wood carving are quite diverse in their subject matter. Some of their variants are used in a narrow direction, and some can be found on any interior elements.

Here are several sketch options that can be used for a specific purpose:
- Wooden patterning is used to decorate the facade of houses. It looks perfect on both doors and walls.
- Art style cutting is used to decorate tableware and furniture.
- Products made using intricate openwork cutting are especially held in high esteem. Most often it is used for household items.
Important! A correctly selected sketch will help you complete wood carving quickly and accurately.
Useful video: templates for wood carving
Each type of cutting has its own processing technology, and detailed elements are maintained. In some cases, several techniques are used simultaneously, which are subsequently transformed into a three-dimensional canvas with the presence of smallest fragments. This characterizes a true master.