What is shutter speed in a camera. What is shutter speed in a camera and why is it one of the most important parameters? What is a camera aperture
by Thomas Larsen
Many photographers, especially beginners, neglect the possibilities offered by exposure control. Most often, the aperture is set, and the shutter speed is used only for compensation in order to obtain a normal exposure. In this little photography tutorial, we'll look at how you can use shutter speed to be creative and some of the mistakes photographers make when choosing shutter speeds.
You should always know what you are shooting, why you are doing it and what result you can expect.
Five classic camera shutter speeds

1. Freeze motion, or shoot 1/250s or faster
Using a fast shutter speed helps to get a fairly balanced shot, but makes the picture too static. Any movement in the frame will be frozen. You can fix this by trying to slightly tilt the camera to get a more dynamic photo composition. But the best option- use the technique of shooting with wiring, which we will write about later.

The faster the subject is moving, the faster the shutter speed should be. For example:
- fast moving cars or animals: 1/1000 s;
- mountain bikes or running people: 1/500s;
- waves: 1/250 s.
It should be remembered that individual parts of the object can move very quickly. A striking example of this is a helicopter. The fuselage itself can be frozen at shutter speeds and 1/250, but even 1/2000 may not be enough for the blades. Or, for example, when photographing a girl waving her hair to freeze the ends of her hair, it is also necessary to use shutter speeds of the order of 1/1000 or even less, while the model itself is moving relatively slowly.
How to solve the problem of "lubrication"?
You can take a lot of shots, but knowing the laws of physics and the features of recording frames on a memory card, they do it differently. First, about physics: if you throw the ball up, then when will it have the highest speed, and at what point is it the smallest? That's right - the largest when the ball just comes off the hand, and the smallest at the point where it stops to fly down, i.e. at the peak of its movement along an up-down flight path.
When shooting competitions, where, say, motorcyclists take off on a springboard, the most interesting point is the peak, which is also the "slowest" in terms of movement. Shooting as many frames as possible is not best approach to solve the problem. At some point, the camera will simply stop to record everything on a USB flash drive, and in sports competitions, such a delay is fraught with the loss of the best frame.
Instead, use a series of 2-3 frames, but while the main subject is at the peak of his movement. This approach gives the photographer the best chance of getting the best images by allowing the camera enough time to record the frame onto the memory card without being blocked.
2. Shooting with wiring
When shooting with panning, when using the camera to track the movement of an object, shutter speed plays a very important role. It must be in the range from 1/15 to 1/250 s.

If you have a lot of time, then you can do calculations - what shutter speed is needed to shoot cars moving in a certain area, but in reality everything is a little simpler. If everything in the frame is too blurry, then you need to make the shutter speed shorter.

If the frame has frozen the movement of the car, then an increase in exposure time is required. And do not forget that 1/125 is a longer period of time than 1/250

For example, some of the quantities most commonly used by photographers are:
- fast moving cars, motorcycles or birds: 1/125 s;
- mountain bikes close to camera: 1/60s;
- mountain bikes, moving animals or human work: 1/30 s.

by Jamey Price 1/60
3. How to use long exposure
It is also called creative blur - 1/15 s to 1 s.

Here it is necessary to make a small technical digression and recall what a camera is. This is an image capture tool that allows you to imitate the human eye, the human gaze, to some extent. But having created this tool, a person began to receive unusual effects that are hard to see in real life. Our vision conditionally "does 25 frames" per second in normal lighting, and we are used to seeing the world as we see it. But the camera, due to the fact that it is different, can show us the world differently.
In particular, make a frame overlay () or with a little more long exposure show the blur of moving objects by turning them into a line.

A similar effect can be observed with the eyes, if in complete darkness you quickly turn a flashlight. A dark-adapted eye will perceive a moving spotlight as a line.
A slow shutter speed is used to take pictures of a waterfall, for example. Specialists in this case, of course, use manual settings and , but you can simply set the shutter priority mode (Tv) on the camera.
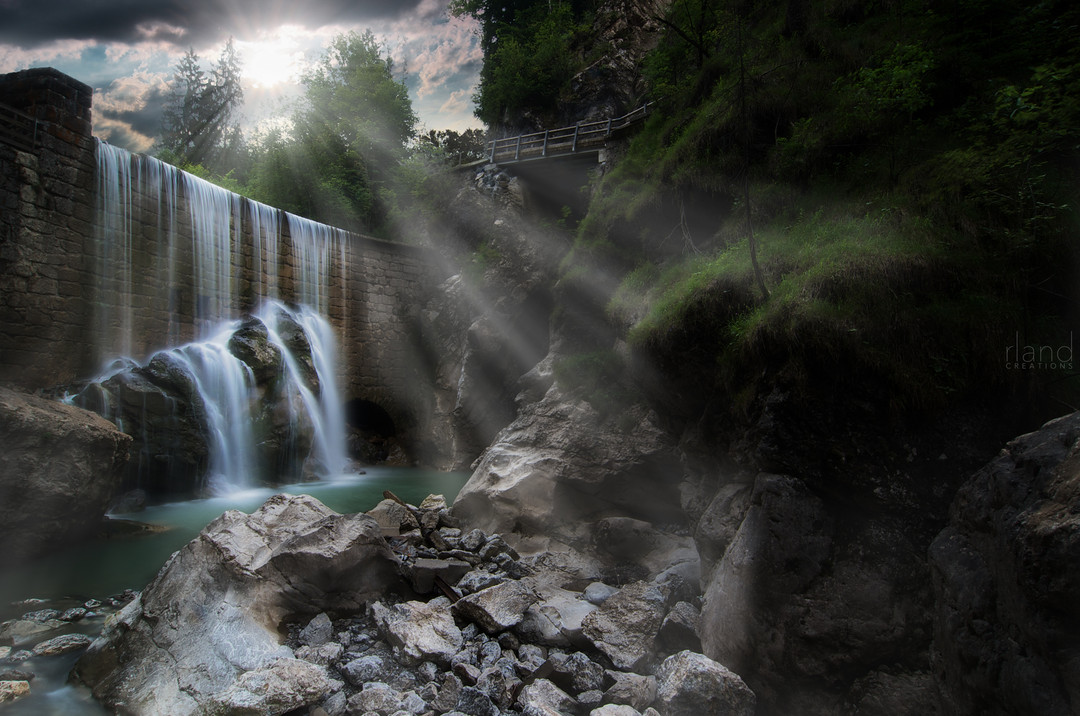
by Roland Maria, 3"
We offer some shutter speeds for motion blur:
- rapid flow of the waterfall: 1/8 s;
- people walking near the shooting point; waves; slow water movement: 1/4 s.
In bright conditions (on a sunny day), it may be difficult to obtain the required shutter speed (below 1/8 sec.), even by changing the aperture or at low ISO values. To reduce the amount of light, a Neutral Density (ND) filter is used, which is exactly what it is designed for. In ours, you can find variable density ND filters that can reduce the amount of light passing through the lens to almost zero and can even turn a sunny day into night. Well, of course, when using slow shutter speeds, the use of or becomes mandatory.
4. Photo with shutter speed from 1 s to 30 s
There are processes that take a long time, and shutter speeds up to 1 second are no longer enough. These processes differ not only in time, they differ in perception. At shutter speeds from 1 to 30 seconds, all processes that proceed quickly are erased in the frame, only static remains ... soft static. It feels like the world is frozen. Movement disappears again. Only if at shutter speeds of 1/1000 the movement disappears, but a person sees an object that could move, then at a 30 second shutter speed they do not remain.

This effect can only be obtained when using a tripod. At the same time, it can no longer be light, marching, but a stable and heavy model is needed, since even a small wind will affect the image acquisition. Photographers often use a simple trick - they hang an additional load on a tripod, and most often this load in field conditions is a working photographic backpack. On most tripods, you can see a hook on the bottom for hanging the load and, accordingly, giving it more stability. Additionally, we recommend that you familiarize yourself with some other working techniques -.
Excerpts that photographers use to create these photos:
- wind stirring in the foliage of trees: 30 s;
- smooth movement of the sea surface: 15 s;
- fast moving clouds: 8 s;
- waves with some details preserved: 1 s.
If you're planning to shoot before sunrise or after sunset, be prepared for the light to change very quickly, so you'll need to change your aperture (or use a faster or slower shutter speed).
5. Shooting at night - shutter speed over 30 s
Shooting at night assumes that there is very little light. Accordingly, many photographers will want to increase the value, which most often leads to an increase in noise, when individual pixels begin to appear much brighter than the rest.

If you leave the ISO as low as possible and just set a slow shutter speed, this will lead to some reduction in image noise.
Most often, astrophotographers face similar problems - that is, people photographing the starry sky. In addition, with long exposures, due to the rotation of the Earth, an effect arises when the stars line up in a round dance.

In order to avoid this, special equatorial mounts (tripods for telescopes) are used, which allow compensating for the movement of the Earth.
For example, to shoot the night sky, you might need the following exposure times:
- individual stars or full moon landscapes: 2 minutes;
- star tracks: 10 min.
Global debugging
Hand shake
In addition to the fact that the selected shutter speed should depend on the speed of the object and the amount of light, we remind you that shutter speed is also affected by such a phenomenon as blurring from natural hand trembling. The longer the focal length of the lens, the faster the shutter speed should be. You can roughly calculate as follows - the focal length in mm corresponds to the shutter speed in fractions of a second. That is, with a 50 mm lens you can shoot handheld at a shutter speed of at least 1/50 sec without fear of blurring (unless, of course, you are dancing at this time or riding a sightseeing bus), and for 200 mm it will already take 1/200 second.

Even a simple monopod allows you to increase shutter speed by 1-2 times. The photographer has the opportunity to shoot with longer shutter speeds. A good tripod allows you to take pictures at any shutter speed.
The exposure time is a quality indicator even at. According to the observations of professional portrait painters, at a shutter speed of 1/50, the portraits are "live". Longer shutter speeds show blur, while shorter shutter speeds make portraits look too frozen.
The inability to properly use the shutter speed of the camera will lead the novice photographer to stagnation in creative development. No need to be afraid to master the initially difficult to perceive. Ask questions, together we will look for answers from advanced and professional photographers.
Updated 08.08.2019 Views 4317 Comments 45
If you bought a camera more serious than an ordinary soap dish, then most likely you will want to master the manual settings (although they also exist on soap dishes). And I would even advise you to do it as soon as possible, so that even if you shoot in automatic mode, you understand what is happening.
There are few basic parameters on the camera that you will control, but they are all closely interconnected: shutter speed, aperture, ISO, white balance. There is also such a parameter as DOF (depth of field), which in itself is not set in any way, but it turns out due to other parameters. I'm afraid for the first reading all this will seem too complicated and scary, but here I can only advise you to try as much as possible at first. Shoot the same frame with different settings and then see what happens, look for relationships, analyze. And do not forget about the instructions for the camera, this is practically a reference book at first.
All parts of my FAQ for beginner photographers
basic settings digital camera- this is shutter speed and aperture, their relationship is called exposure. Therefore, when they say you need to choose an exposure, they mean you need to set these two values.
From the article, you learned what the exposed camera exposure time. Now it's time to move on to the practical part and learn how to properly set the shutter speed on your camera.
 First, let's see in which shooting modes the camera will allow us to manually control the shutter speed. To do this, turn the shooting mode switch wheel and pay attention when the field with the shutter speed value is active (highlighted). remember, that holding time denoted as follows: 1/200, 1/8, 1 'etc. IN Canon cameras the shutter speed is indicated in the field located in the upper left corner of the display.
Thus, we have experimentally established that it is possible to manually control the shutter speed of the camera in only two modes - shutter priority Tv and in full manual mode M. In both cases, the shutter speed value in the camera is set by the same set of actions.
 To set camera shutter speed, switch to shutter priority mode or manual shooting mode. The field with the exposure value will be highlighted. This means that when scrolling the wheel for changing shooting parameters, the set shutter speed will change. If you turn the wheel to the left, the exposure time will be lengthened, to the right, it will be shortened.
Keep in mind that in shutter priority mode, you only control camera shutter speed, and the aperture value is selected automatically, depending on the illumination of the scene in the frame. In manual mode, you will have to install it yourself, i.e. control both shutter speed and aperture at the same time. Therefore, when changing one of these parameters, do not forget to take care of the other! For more information on how to properly manage the shooting parameters in manual mode, I will tell in the article "Shooting in manual mode", as well as in the basic photography course.
Now it's time to really practice! After you have learned how to set the shutter speed on the camera, you need to learn how to see how it affects your result. To do this, I suggest doing a few simple exercises.
For starters, shoot only in Tv mode. This is very important in order not to get confused and learn to perceive the result.
 Normal exposure. Ask a friend, girlfriend or grandmother to finally help you practice shooting. First, set the exposure time from 1/40 to 1/80 and ask the model not to move. Take a few shots and ask your grandmother (girlfriend, friend) to wave. Now look what came of it? A smeared palm spoils the whole frame.
 Short exposure. Go outside when the sun is shining brightly. If it is possible to find a river, a lake, or at least a fountain with water - great! If not, bring a bottle of water with you. The meaning of the exercise is to try to freeze water drops in flight. Ask your model to splash water and take shots at shutter speeds of 1/80, 1/100, 1/160, 1/200, etc. Get to 1/640. At home on the computer, carefully consider how the drops of water turned out at different camera shutter speeds. For yourself, note at what shutter speed they no longer look blurry.
 Another short exposure exercise. Also, on a sunny day, set the value from 1/200 to 1/640. Now ask the model to move away and run to meet you (grandmother is best left at home). At short shutter speeds, funny shots of a running person are obtained. Do the same with the model, making her jump a little.
Long exposure. For shooting at slow shutter speeds (1/30 and longer), you will need additional accessories. Therefore, we will talk more about this technique in the following articles. I will share all the tricks and techniques for working with long exposures in my basic photography course. Follow the updates on the site site
I am still waiting for questions on the topic of the article in the comments below.
Good luck with your pictures!
Hello friends! Andrey Sheremetyev is with you, and in this article we will talk about camera shutter speed. You will learn how to set it up, how to use it, and how to significantly reduce the number of defective frames.
- What is exposure
- What is measured and how is exposure indicated?
- Short and long exposures, why photos are "blurred"
- "Shake" The dependence of shutter speed on the focal length of the lens
- How to adjust shutter speed
So, pick up the camera, and in parallel with the study of the article, practice. Let's start.
Exposure is one of the main parameters that affect how a photo will turn out. Together with " " and it determines whether the photo will be light or dark, whether the object in the picture will be sharp or smeared. But first things first.
What is exposure?
Exposure is the time for which the camera shutter opens to let the beam of light passing through the lens onto the photosensitive element - the matrix. In SLR and some mirrorless cameras, a mechanical shutter is installed, which is a sliding curtain that opens for a given exposure time. In simpler digital compacts, this mechanism is not present. Exposure in digital compacts or soapboxes is the time the camera matrix is turned on in order to capture the image from the lens.
Shutter and aperture of a SLR camera. SLR camera device
What is measured and how is it indicated excerpt?
Since shutter speed is time, it is measured in seconds and fractions of a second, for example, if the shutter speed is less than a second, then it is indicated as follows: 1/60, 1/100, 1/250, 1/1000. This is nothing but a mathematical fraction, and it is very important to remember - the larger the denominator, the shorter the shutter speed, which means the shutter will let in less light. For example, a shutter speed of 1/250 second is faster than 1/60 second. Exposures longer than one second are indicated as follows: 2”, 5”, 10” (2 sec, 5 sec, 10 sec, respectively). On SLR cameras, we can find both a fractional exposure image (1 / x), and the designation of only the denominator (x), this is the same value.
 Shutter speed fractional (shutter speed 1/30 second)
 Denominator only (shutter speed 1/4000 second)
To understand what shutter speed we have set, it is very important to pay attention to 2 dashes next to the number (“), I repeat, if they are, then the shutter speed is more than one second, if not, it means less and we have a shutter speed of the format 1 / your number.
Another example: if you changed the shutter speed from 1/100 to 1/125 - you reduced the shutter speed, if you changed it from 1/250 to 1/200 - you increased the shutter speed.
About what shutter speeds what to shoot will be discussed further.
Too dark and too light photos, what are the reasons?
Now let's talk about why the photos are too dark or too light. This is a topic for a separate article, because. most beginners in the first stages of mastering the camera have problems with underlight or overexposure (underexposed or overexposed photographs). In short, the illumination in photography is affected by 3 parameters - shutter speed, aperture, and sensor sensitivity (ISO, ISO). Now we will talk about shutter speed, that is, how the illumination changes when it changes, if the other 2 parameters (aperture and ISO) are not changed.
Everything is simple here: If the photo is too dark, it means that not enough light enters the matrix, which means that we have set the shutter speed too fast.
If the photo is too bright, then on the contrary, the shutter speed is too slow, and you need to reduce it.
How does this happen? Such photographs may be obtained when you shoot in automatic or program shooting modes, when the camera automation selects all the settings for you, and makes a mistake, after all, the automation is not a person. It can also happen when the exposure (light) metering sensor did not correctly determine the overall illumination of the frame, this happens if, for example, there is a bright light source in the frame.
Short and long exposures, why are photos "blurred"?
In addition to lighting, shutter speed also affects the image itself, and the objects in it. These properties are often used as an artistic element. A very revealing example, when fast-moving objects are blurred. Using shutter speed, you can also “freeze” fast-moving objects, for example, a drop of water in the air, a bird in flight.
Here are some examples:
 "Frozen" movement of the wings, filmed at a fast shutter speed.
By the way, when I was writing this article, the news came that I won the photo contest SAILING PHOTO AWARDS 2014, in the nomination "Landscape of the season"! The photo was taken just at a slow shutter speed (about 2 seconds), due to which the moving background was blurred (because the yacht was moving at a certain speed), and stationary objects (the yacht itself) remained sharp.
 SAILING PHOTO AWARDS 2014 - Landscape of the Season
So let's remember:
Fast shutter speeds are needed to "freeze" fast moving objects (race cars, birds, drops, children, etc.)
Long exposures are needed to blur moving objects, such as water in a river, passing cars.
If you get blurry frames, then you need to reduce the shutter speed. Its value must be selected based on the specific situation and lighting,
"Shake" and the dependence of shutter speed on the focal length of the lens
Due to the fact that we are not robots, the so-called “shake” often occurs - a slight blurring of the photo due to the shaking of the hand, the surface on which you are standing, or the wind. To avoid this, you need to choose the right shutter speed.
There is such a recommendation that for a camera with a full-frame matrix, the minimum allowable shutter speed for handheld shooting should be at least the focal length at which you are shooting. For example, if you have a 70-300mm lens, then when shooting with a maximum zoom (i.e. at 300mm), the minimum shutter speed should be at least 1/300s, when shooting at 70mm - 1/70s.
On crop mantrices (these are all amateur Kenon and Nikon cameras), the formula is as follows:
your focal length (FR) multiplied by the crop factor (1.5 for Nikon, 1.6 for Kenon)
For Kenon: FR x 1.6
But here it’s important to say that everything is very individual, someone’s hands can shake in anticipation of a masterpiece photo, someone vice versa, like a rock, therefore, the above is advisory in nature, it’s just important that you know what a stir is, where She is taken, and what to do with her. Take your camera, shoot different scenes with different settings, analyze the result, and you will understand everything.
How to set exposure?
Finally, we come to the main thing, to practice. Shutter speed can only be adjusted in shutter priority semi-automatic mode (denoted as "S" on Nikon and "Tv" on Canon) and in manual mode "M". In other modes, it is selected automatically. What are these modes? The shooting mode "M" is a mode with full manual settings, i.e. shutter speed, aperture and ISO you set yourself. Shutter priority mode “S” or “Tv” is a mode where you set only shutter speed and ISO, the camera automatically selects the aperture based on the characteristics of your lens. I will tell you more about shooting modes in a separate article.
Now I propose to consolidate the studied material, and do the following exercise:
- Set the shooting mode on the camera to “M” (to do this, turn the mode change wheel until the white mark is combined with the mode we need)
- Take a test shot
- Use the wheel to change the shutter speed (ISO and aperture remain unchanged) and take a picture, change and take a picture, and look at the result, experiment.
If the camera is not at hand, or too lazy to get it, it will help!
The essence of this exercise is to understand how shutter speed works, to find out what stir and blur are. Later, when you get similar shots, you will already know what's going on.
So, we figured out one of the 3 most important parameters in photography. In order to receive nice photos you need to clearly know what all 3 affect, and be able to use them, for this, be sure to read the following articles. Andrey Sheremetiev was with you, good shots!
There are fundamentals in photography, without knowing which, it is impossible to learn how to take high-quality and beautiful pictures. One of those things is understanding the exposure of a frame. In our article we will talk about shutter speed, aperture and sensitivity. It is these things that form the exposure and understanding of their work is necessary to obtain good shots. We will explain what shutter speed, aperture and sensitivity are and how to work with them effectively.
Introduction.
Before writing what shutter speed and aperture are, a small digression. Each frame requires a certain amount of light (exposure). The camera has three options to dose the light output: aperture, shutter speed and sensitivity. Sensitivity is used only when the situation does not allow changing the shutter speed and aperture. In addition to controlling the amount of light entering the sensor, shutter speed and aperture are effective artistic tools. First you need to understand them, and with time and experience, ease of use will come. An experienced photographer uses these tools on a subconscious level.
Diaphragm.

(diaphragma - partition, Greek), in English "aperture" (aperture, English)
Diaphragm- a structural element of the lens, which is responsible for the diameter of the hole that transmits light to a light-sensitive surface (film or matrix).
For a simple understanding of the aperture, I will give an analogy with a window. The wider the window shutters are open, the more light comes through the window.
Aperture is designated as f / 2.8 or f: 2.8, defined as the ratio of the diameter of the lens inlet to the focal length. Very often, the concepts of an open, large aperture (f / 2.8) and a large f / 16 aperture are confused. The smaller the number in the designation of the aperture, the more it is open.
By changing F by one value, the amount of light entering the camera changes by 2 times. This is called the exposure stage. Any changes (according to the scales of the camera) exposure occur in 1 step increments. For accuracy, the step is divided into thirds, if necessary.
Aperture is a very powerful visual tool. The maximum open aperture gives a very small depth of field (depth of field of the imaged space). Small depth of field visually highlights the object against a blurred background.

To obtain a large depth of field, the most closed aperture is used. To get a greater depth of field in your frame, use f-number 8 or larger. However, when playing with the aperture value, remember that there are the following dangers when approaching extreme aperture values. When open - the worst sharpness readings, and when closed, all the dust on the matrix will be visible on the frame (for digital cameras).
Greater depth of field is more suitable for landscape photography when the viewer will be interested in seeing all the details of the photo.

Excerpt.
Excerpt- the time interval for which the shutter opens to transmit light to the photosensitive element.

Again, the open window analogy will help. The longer the shutters are open, the more light will pass through.
Shutter speed is always measured in seconds and milliseconds. Indicated as: 1/200, only the denominator is displayed in the camera: 200. If the shutter speed is a second or longer, it is indicated as 2″ i.e. 2 seconds.
The minimum shutter speed when shooting handheld (to get a sharp shot) is not constant and depends on the focal length. The dependence is inverse, i.e. for 300 mm it is better to use shutter speeds shorter than 1/300.
Long exposure emphasizes the movement of objects. For example, panning - at slow shutter speeds, 1/60 and longer, the camera follows the subject, so the background is blurred and the subject remains sharp.

The flowing water at a slow shutter speed turns into frozen figures.
Very fast shutter speeds, I use to stop a moment, such as a spray of a fallen drop or a car flying by.

ISO sensitivity.
Sensitivity- this is a purely technical concept, denoting the sensitivity of the matrix (or film) to light. Imagine sunbathing people on the beach. Those with more sensitive skin will tan faster; he needs less light for that. The other, on the contrary, needs more light to tan, because he has low sensitivity.
Sensitivity is directly related to the amount of noise. The higher the ISO, the more noise, and the grain size of the film. Why? Purely technically, in general, this is the topic of an extended article.
At ISO 100, the signal is taken from the matrix without amplification, at 200 it is amplified by 2 times, and so on. With any gain, interference and distortion appear, and the greater the gain, the more side effects. They are called noise.
The intensity of noise is different on different cameras. At minimum ISO, noise is not visible and is also less apparent when processing a photo. Starting with ISO 600, almost all cameras are quite noisy, and to get a high-quality frame, you need to use noise reduction programs.

Outcome
Together, the shutter speed and aperture values form an exposure pair (the optimal combination of shutter speed and aperture for the given lighting conditions). Expopara determines the exposure of the frame. Previously, exposure meters were used to determine the exposure, which determined the shutter speed based on the amount of light and aperture. Previously, the exposure meter was used as a separate device, today it is built into almost every camera.
In every reflex camera There are shutter and aperture priority modes. In aperture priority mode, the aperture is selected, and the camera, analyzing the level of light, selects the shutter speed. The opposite is true in shutter priority mode. Almost always I use aperture priority, it gives the opportunity to work with depth of field. If there is a need to shoot movement, I use the shutter priority mode.
In our next articles, we will continue to talk about the basics of photography. After all, it is in these things that the understanding of the art of photography lies. Knowing them, you will be able to create the shots that you want.