A simple bayonet with two hoses. Bayonet knot, its variants and methods of knitting. Ix. fishing tackle knots
Any fisherman cannot do his favorite job without knots. An experienced fisherman will always be able to reliably combine several types of fishing line in a fishing rod, tightly tie a hook, spoon or other tackle, and fix everything necessary on the fishing line.
It is wise to tie the fish tank under the catch so that it does not come loose. Knowledge of knots is especially useful for those who go fishing in the sea. It is always necessary to have information on how to tie a knot correctly so that it does not come undone at the wrong time.
The article is devoted to the types of knots that will find their application not only in these situations. Each of the nodes can be considered unique, as it can be used anywhere.
We will tell you what a knot is, what type of knot is more appropriate to use in a given situation, as well as how to knit them correctly.
A knot is an old way of joining one or more ropes. It occurs by tying and intertwining the “running” and “root” ends of a rope, cord, or fishing line.
The running end is the loose part of the cable with which we form a knot. The root end is the second part of the cable, fixed in a stationary state.
All existing nodes are divided into groups according to their purpose. In our story we will talk about non-tightening knots, widely used in maritime and even fishing.
To be specific, we will consider the following nodes:
- A simple bayonet.
- A simple bayonet with a hose.
- A simple bayonet with two hooks.
- Bayonet with carryover.
- Fisherman's bayonet.
- A simple half bayonet.
When we have decided on the nodes, we can begin to analyze them in detail: what kind of node, how it is done, where it is used, step-by-step instructions for executing the node.
To create a strong, high-quality knot, you first need to familiarize yourself with the main principles and techniques of knitting knots.
"A simple bayonet"
A “simple bayonet” is a knot formed by two simple half-bayonets. It allows us to form a loop that doesn't tighten.

It is pointless to knit more than three half-bayonets on it; an additional half-bayonet will not make the resulting knot stronger.
The “simple bayonet” knot is one of the simplest non-tightening knots.
Fishermen can use it to attach the boat painter to the eye on the wall or, if necessary, easily tie the hook to the fishing line.
Make sure that the knot is tied correctly. You can determine the correctness of the knot by moving the loops.
The knot will be tied correctly if the running end, both in the first half-bayonet and in the second, comes out on the same side.
If you move the loops and their appearance reminds you of a cow knot instead of a bleached knot, it means that you did it incorrectly and if the tension is excessive, the half pins will converge and the knot will tighten.
How to knit “Simple bayonet” correctly?
The technology of knitting a simple bayonet is practically no different from the “half bayonet”. You just need to add one more half bayonet.
- We wrap the running end around the object, starting from the back;
- We knit two half-bayonets in succession;
- We tighten both ends of the rope with twine;
- Tighten the knot.
Note: use a similar knot to tie a hook to a synthetic fishing line bad idea. If there is too much pull, your knot will start to slip.
"A simple bayonet with a slug"
A “simple bayonet with a hose” differs from a simple bayonet only in the additional hose. A rope is a turn of a rope around a fixed object.
Simple bayonets with slings are used when it is necessary to firmly tie a rope to a stationary object, for example, a boat to a pier.
This knot can be remembered by those fishermen who go out to fish on a vessel and do not want it to leave the pier without its owner at some point. A correctly tied simple bayonet with a hose does not tighten even with prolonged tension.
Like other types of knots, a bayonet with a hose has the advantage that it can be untied without any extra effort. Despite the fact that this knot can hardly be called reliable, it is still in demand among sailors and fishermen.
In order to avoid unpleasant situations, we give advice: to increase the level of reliability of the knot, before securing the ends, tighten the knot.
How to knit “Simple bayonet with hose” correctly:
- Wrap the running end around the object from back to front;
- Make two more turns in the same direction;
- Form a half-bayonet around the main end with the running end;
- Make another half-bayonet at the root end;
- Tie both ends tightly with thin twine;
- Tighten the knot.
- Congratulations, the node is ready!
"A simple bayonet with two shlags"
“A simple bayonet with two hoses” differs from the previous knot by an additional hose. The additional hose creates additional reliability for the knot, due to which the rope is rubbed at a lower speed.
The knot will never be tightened tightly, no matter what load is placed on it, but it can unravel if the corresponding load is not applied to the running end.
Tip: fasten the ends of the rope with thin twine, and for reliability you can pre-tighten the knot.
In cases where the rope may be subject to frequent friction or prolonged traction, it is best to think of a simple bayonet with two hoses.
This will prevent rapid wear of the rope under high tension. It can be used when there is a need for long-term fastening of the ship's rope at the pier.
How to knit “Simple bayonet with two strands” correctly:
- Wrap the running end around the object and bring it from behind;
- Make two more turns with the running end;
- Pull the running end, wrap it around the root end and, through the resulting loop, pull the running end. Thus, a half bayonet is obtained.
- Make another half bayonet;
- Tie both ends together with thin twine and tighten the knot.
"Bayonet with a carryover"
“A bayonet with a bow” is a knot that is several times stronger compared to a regular bayonet with two hoses. Its difference is that the cable does not slide over the object to which the knot is attached, and therefore fastening the ends to this knot is not necessary.

The absence of slipping gives advantages when suddenly changing the direction of traction.
It’s a good idea for securely tying a fish tank to a stationary object, and even if there is a current in the water, the fish tank won’t come undone and the water won’t take your catch.
How to knit “Bayonet with run-out” correctly:
- Turn the running end around the object, direction: back to front;
- Pull the running end behind the main one and turn the object now from front to back;
- Next, bring the running end over the root end, then take it behind the root end and pull it into the resulting loop - you will have one half-bayonet;
- Repeat to make another half bayonet;
- Secure the ends together with twine and tighten the knot.
"Fisherman's Bayonet"
The “fisherman’s bayonet” is one of the examples of non-tightening knots, as well as one of the oldest and most reliable methods, which is still in demand among sailors.
In its weaving it is similar to a simple bayonet with a hose, however, there is still a difference. In a fishing bayonet, before knitting two half-bayonets, the rope is pulled through an additional hose.
Its second name is “Anchor Knot,” which indicates its direct purpose. Basically, this knot is used to firmly and securely fasten a cable with an anchor.
It is used not only by sailors, but also by fishermen who like to go fishing on a boat or motorboat. This knot can be used in all cases where a huge pull will be placed on the cable - it will not tighten, but will not untie either.
How to knit “Fisherman’s Bayonet” correctly:
- Thread the running end into the anchor ring from behind;
- Pass through the ring in the same direction one more time;
- Pass the end behind the molar and pull through the resulting loops;
- Pass the running end first “behind” and then “in front” of the main one, then direct it into the loop - a half-bayonet is formed;
- Tighten the knot.
- Pull the two ends of the rope together and secure them with twine.
"Simple half bayonet"
“Simple half-bayonet” is the most common and oldest type of knot. It has a wide range of applications, since it is one of the elementary non-tightening knots.

By itself, this unit does not represent any reliability, however, with a fixed running end, it effectively copes with any thrust.
It doesn’t matter how much tension is applied to the knot, it will never tighten; at most it will tighten the loop and thereby move towards the object.
Its main task is to secure other types of knots.
However, it can also be useful for fishermen: for example, to quickly tie your vessel to the pier if the stop is short, or, if necessary, temporarily connect parts of the fishing line.
How to knit “Simple half bayonet” correctly:
- You should wrap the running end around the object, bringing it from behind;
- Next, stretch it, wrap it around the root end and thread the running end into the resulting loop;
- Secure both ends with thin twine;
- Tighten the knot.
- After these movements, a simple half-bayonet is ready!
As stated at the beginning of the article, we told you about the concept of a “knot”, provided you with a description of several non-tightening sea knots that can be used in fishing, we reported step by step instructions for knitting each of the knots.
All nodes are good in their own way and will show their abilities in a given situation. If your knot doesn’t hold and comes undone, review the step-by-step instructions for tying a particular knot and repeat again.
A properly tied knot will never fail. On the positive side All of these knots are that they do not untie themselves under the influence of tension and, if necessary, if the knot was tied correctly, it can be quickly untied.
The range of uses of non-tightening knots is quite wide: from tying a hook to a fishing line, ending with securing a vessel at the pier.
How long has it been since you had a really BIG CATCH?
When was the last time you caught dozens of HUGE pike/carp/bream?

We always want to get results from fishing - to catch not three perch, but ten kilogram pikes - what a catch! Each of us dreams of this, but not everyone can do it.
A good catch can be achieved (and we know this) thanks to good bait.
It can be prepared at home or bought in fishing stores. But stores are expensive, and to prepare bait at home, you need to spend a lot of time, and, to be fair, homemade bait does not always work well.
You know that disappointment when you buy bait or prepare it at home and only catch three or four bass?
So maybe it’s time to use a truly working product, the effectiveness of which has been proven both scientifically and in practice on the rivers and ponds of Russia?
It gives the same result that we cannot achieve on our own, especially since it is cheap, which distinguishes it from other means and there is no need to spend time on production - you order it, it’s delivered and you’re good to go!

Of course, it is better to try once than to hear a thousand times. Moreover, now is the season! This is a great bonus when ordering!
Find out more about the bait!
How to tie a bayonet knot: simple, double, sliding
Knots are an integral part of maritime, fishing and tourism, with their centuries-old history. It is important to know how to make a reliable tie so that it does not come undone at the wrong moment. To tie a strong knot, it is important to first become familiar with the main principles and knitting techniques. Today we will look at “bayonets” and their application.
Brief information:
According to their purpose, bayonet ligaments are non-tightening, and are most often used by fishermen, sailors, and climbers.
Despite the elementary design, such fastenings are quite strong, can withstand heavy loads, and are easy to untie.
Let's look at the most popular variations:
- Simple bayonet;
- Simple half bayonet;
- With hose;
- Double and triple;
- With run-out;
- Fishing or anchor;
- Wet half bayonet;
- Sliding.
Simple half bayonet
It is the basis of this “family”, but can also be used independently. The simple half-bayonet began its history in Europe about 100 years ago. This knot is the simplest of the non-tightening ones, and therefore easy to untie (when you need it, of course). Often it serves as the final element of many knots in maritime affairs, that is, to insure the main knot.
How to knit a simple half bayonet correctly
 Figure 2. Knitting pattern for a simple half-bayonet knot
 This type can also be used to connect two ropes.
Simple bayonet
A reliable option that is easy to remember and easy to knit, making it one of the most popular in fishing. It is often used by climbers when constructing overhead crossings, since it is simply tied and untied when the rope is under load. Also used for attaching a cable to a support, fixing a safety net, when towing cars, and loading work on ships.
A simple bayonet is formed by tying two half-bayonets. It is important to perform the second one correctly, otherwise the ligament will tighten.
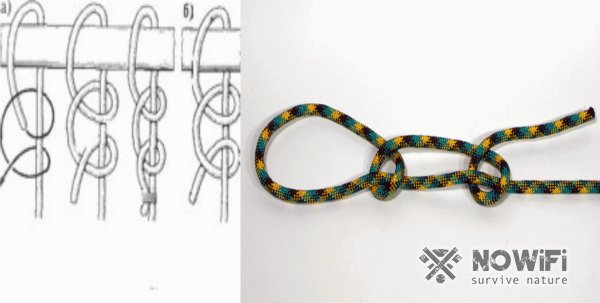 Figure 3. Diagram of the “simple bayonet” assembly
 Figure 3 a) shows the correct location of the loops that form a bleached knot when brought together.
Figure 3 b) - when the loops were brought together, a cow knot was obtained, which tightens the loop, which is an incorrect execution of a simple bayonet.
To increase strength, you can add another half bayonet. There is no point in knitting more. This will not improve reliability, but will increase the binding and untying time.
To be secure, be sure to secure the knotted ends together with twine.
Performance
- Place a loop around the fulcrum.
- We pass the rope through the formed loop. It doesn't matter whether you pass the free end under or over the rope. All subsequent ones must be tied in the same way as the first.
- Make a loop around the rope.
- We pass the free end through the formed loop, similar to the first time.
- We secure it with a control knot or twine.
Bayonet with hose
This option differs from the simple one in that an additional (double) turn is made around the support, which increases the reliability of the ligament and avoids chafing. Most often used when attaching mooring lines, but only if the ship sits for a long time.
 Figure 4. Knitting pattern for the “bayonet with hose” knot (1); photo of the “bayonet with hose” or double knot (2); photo of a triple knot (3)
 A bayonet with a hose can also be called a double one, respectively, a triple one is a knot with two hoses (Figure 4). It is clear that to knit a triple one, you need to make an additional double turn of the rope around the support circle, as shown in the picture.
Bayonet with drift
Such a bundle is several times stronger than a bayonet with two hooks. The advantage is that the cable does not slip at the point of fastening, thanks to the loops that wrap around the support on both sides of the root end (Figure 5). Also, thanks to this, there is an advantage when there is a sharp change in tension and direction of thrust.
 Figure 5. Scheme for knitting the “bayonet with runaway” knot
 How to properly tie a bayonet knot with a carryover
- We turn the rope around the support from back to front.
- Then we throw the tail over the main, again making a revolution around the support, but from front to back.
- We knit two half-bayonets and secure the ends with twine.
Fisherman's bayonet
This option is also called anchor; accordingly, it is used to attach the rope to the anchor bracket.
It is similar to a bayonet with a slag, but there is a slight difference. It lies in the fact that the first half-bayonet must pass inside the hose covering the object (Figure 6).
 Figure 6. Knitting pattern for the “fishing bayonet” knot
 How to knit a fishing bayonet correctly
- Thread the chassis into the anchor ring from behind;
- Pass it through the ring again in the same direction;
- Pass the chassis behind the main one, pull it through the formed loops;
- Pass the chassis first “behind” and then “in front” of the main one, then direct it into the loop - a half-bayonet is formed;
- Tighten the knot, pull the two rope ends together, and secure them with twine.
Wet half bayonet
It often happens that untying a wet rope becomes an impossible task, so you have to literally cut them down. To avoid this, sailors came up with a wet half-bayonet (Figure 7). The advantage of this option is that it can withstand the strongest traction and jerking, but at the same time it can easily come undone even when wet.
 Figure 7. Diagram of the “wet half-bayonet” knot
 How to knit
- Make a half bayonet with the running end around the support circle.
- Place the chassis on the other side of the support and make another half-bayonet in the direction opposite to the first.
- Using the chassis, form a small “eye” and, circling it from below around the root, place it between the ropes of the first and second hose.
- Tighten the knot.
Retractable bayonet
The retractable is used to attach a cable to a rod or other rope to reduce pressure (Figure 8). When using a retractable, the rope must be parallel to the rope being attached.
Simple bayonet
Two identical half-bayonets make up a knot, which sailors call a simple bayonet. The expression “throw half a bayonet” means adding to the knot already made one more carry and crossing the running end around the root end of the cable. The diagram shows a non-tightening knot widely used in maritime affairs - one of the simplest and most reliable knots for attaching moorings to mooring bollards, bits, guns and bollards. To distinguish a correctly tied bayonet from an incorrect bayonet, the two loops of the knot must be brought closer together. If this results in a bleached knot (see bleached knot), then it means that the simple bayonet was tied correctly. For such a bayonet, its running end, both after the first and after the second pegs, should extend equally above or below its end. For an inverted, i.e., incorrectly tied simple bayonet (Fig. 10, b), the running end after the second pebble goes in the opposite direction, not the same as after the first. When two loops of an inverted knotted bayonet are brought together, a cow knot is obtained instead of a bleached one (see Cow knot). If the half-bayonets of a simple bayonet are made in different directions, then when the cable is tensioned they will come together and the knot will be tightened. The main use of a simple bayonet in the navy is to secure mooring ends to mooring fixtures, to secure the guys of cargo booms to the butts and eyes, and to secure the cargo pendant to the load being lifted.
The maximum number of half-bayonets in such a knot under any circumstances should not exceed three, since this is quite sufficient and the strength of the knot as a whole will not increase with a larger number of half-bayonets. The reliability of this mooring unit is eloquently demonstrated by the old English nautical proverbs: “Two half-bayonets saved the queen’s ship” and “Three half-bayonets are more than enough for the royal yacht.”
Sailors often use two simple bayonets to temporarily connect two mooring lines, cable and pearl lines.
On shore, this simple but reliable unit can be used in all cases when the cable needs to be temporarily attached to some object for strong traction, for example, to a hook when towing a car.
Sea knots. - M.: Transport. L. M. Skryagin. 1984.
See what a “Simple bayonet” is in other dictionaries:
Canonical name Simple bayonet Synonyms Bayonet Category Non-tightening knots Application Securing the mooring ends to the rope ... Wikipedia
A simple bayonet with a hose... Wikipedia
This knot differs from a simple bayonet by one additional hose around the object to which the cable is attached. It also serves mainly for fastening cables and railings when mooring with bollards, bits and poles, but is used, in contrast to simple... Nautical knots
In fact, this is also a type of simple bayonet. The difference from the previous node is an additional, third hose. It increases the strength of the knot if the cable experiences constant friction against the bollard or biting. Attaching the cable to the hook using this knot... ... Nautical knots
- (Bend clinch) a knot used when attaching the end of a mooring line to shore bollards (bollards) or for temporarily connecting two pearl lines. To properly tie a bayonet, wrap its running end around the stick (or thread it into the loop of another bayonet) and... ... Naval Dictionary
Bayonet Bayonet (from Polish sztych) is a cold piercing weapon. Bayonet shovel. Bayonet or Simple bayonet is a type of naval knot; A distinction is made between a simple bayonet and a fishing bayonet. Memorial complex "Bayonets" ... Wikipedia
bayonet for Mosin rifle mod. 1891- bayonet for Mosin rifle mod. 1891 1891 For the first time in the Russian army, a tetrahedral bayonet was adopted for the Berdan infantry rifle mod. 1870, it was on its basis that a new one was developed and entered service together with the Mosin rifle in 1891... ... Military encyclopedia
Bayonet- a small casting of cast iron or copper of simple shape for further processing... Encyclopedic Dictionary of Metallurgy
- (anchor knot). One of the most important cases of using a knot in maritime affairs is tying an anchor rope to an anchor. For five thousand years of the existence of shipping, people for this purpose could not come up with a more reliable knot than a fishing knot... ... Sea knots
Here the original combination of two good knots produces a reliable and simple knot. First, a bleached knot is tied around the object to which the cable is attached (see bleached knot) and an ordinary bayonet is made at the root end of the cable, which, like... ... Nautical knots
Marine or fishing simply cannot do without knots. An experienced fisherman will always be able to reliably combine different types fishing lines or other gear.
Knowledge of various knots is very useful for those who go fishing in the sea. You need to know how to tie a knot so that it doesn't come undone at the wrong time. Bayonet knots allow you to create a non-tightening loop; they are very simple to make, but strong and quite reliable.
Useful information about nodes
A knot is an ancient way of connecting one or more ropes. This occurs due to the weaving and tying of the “root” and “running” ends of the rope, fishing line or rope.
The root end is that part of the cable that is fixed in a stationary state. It is a loose part of the rope, with the help of which we obtain a certain knot.
All nodes are usually divided into certain groups according to their purpose. Bayonet knots are non-tightening. Most often they are used in fishing and maritime affairs.
Varieties
Simple half bayonet
Of the knots that do not tighten, namely half bayonet is the easiest to implement. They do it this way: the running end is wrapped around the support, then it is braided around the root end of the rope, as a result, the running end must be passed into the loop that has just been formed. They complete the work with a safety knot, which is knitted with the running end.
This simple assembly can withstand strong traction. It may move towards the support, but it will never tighten.
Simple bayonet
This knot is obtained by combining two half-bayonets. In this option, the number of half-bayonets should not exceed 3 - this will be enough, and moreover, the strength of the knot will not increase with more of them.
In this case, the use of a safety knot is mandatory. Bayonet knots are considered very reliable. They are used when the rope needs to be secured to a support for strong traction (towing a car or guiding a suspended crossing).
Bayonet with hose
The main difference between this unit and the previous one is the presence of a second hose around the support. The presence of a second hose will make the knot more reliable. This option also requires the use of a safety knot.

Anchor knot (fishing bayonet)
It is this knot that sailors call the most reliable when attaching an anchor to a rope. This option is similar to the “bayonet with hose” knot, but there is one significant difference. The rope in the “fishing bayonet” is also pulled through the second additional hose, which wraps around the support. Even with strong cravings knot The “fishing bayonet” does not tighten and holds very tightly.
Tourist bayonet
This name was given to the incorrect (inverted) “bayonet”. Often it is used by tourists.
Bayonet knot: how to knit
“Simple bayonet” is one of the simplest knots that do not tighten. To perform it correctly, it is necessary, starting from the back, to wrap the running end of the rope around the object. Next, you need to wrap it around the root end once and thread it through the resulting loop. The working end must be passed over the main end again, wrapped around it and brought out through the second loop formed.

Even if the root end of the rope is loaded, the bayonet knots will still not be tightened. They can always be untied without removing the load from the root end.
How to tie a "double bayonet"
(this is what is also called a “double bayonet”) - this is a striking example of non-tightening knots, which has been popular among sailors for a long time, and all thanks to its reliability.
It can be done correctly this way:

- It is not recommended to use a “simple bayonet” when tying a hook to a synthetic fishing line. If the thrust is very large, the knot will slide.
- A knot called a “bayonet with a hose” has a great advantage - it is quite simple to untie. Although it is not considered reliable, sailors and fishermen use it quite often.
- A double bayonet is a knot that is most often used for strong and reliable fastening of a cable with an anchor.
- It must be remembered that a correctly tied knot will never fail. The advantage of all types of bayonet knots is that they will never untie on their own when pulled. Moreover, if they were tied correctly, they are very easy to untie.
The bayonet knot and all its varieties are reliable and strong enough when the rope is very tense. If the loads on the rope are variable, the knot may come undone. Therefore, when using one of the varieties of the “bayonet” knot, it is necessary to knit an additional safety knot or fix the running end of the rope with twine or a thin cord.
A simple bayonet is a loop made from two or three half-bayonets. Thanks to its special properties, the bayonet knot can be tied and untied, even if the rope is under load. After heavy loads, it also comes undone easily.
A typical bayonet of three half-bayonets.
They prefer to knit it mainly for attaching a rope to a support, although other options are possible.
A simple bayonet is a very reliable unit. It is easy to remember and knits quickly. It is these qualities that have made it one of the most used fishing knots in maritime affairs.
Extreme sports enthusiasts have also paid attention to it: this knot is often used as a tourist knot and in mountaineering - to fasten a rope to a support when tensioning a suspended crossing, since the rope has to be untied at the moment when it is very tense. Many other knots are not suitable for this, since they can only be untied when the rope is loosened.
The video below shows how easy and quick this knot is to knit:
How to knit a simple bayonet
Let's consider a situation where it is necessary to tie a simple bayonet on a vertical support.
This tying method will look like this:
- The running end of the rope is wound behind the support from left to right.
- The running end is thrown over the main end and inserted from below into the resulting loop - a so-called half-bayonet is obtained.
- The running end is moved to the right, its middle is taken in the right hand, and the end is again drawn to the left, thrown over the root and pushed from below into a new loop, forming a second half-bayonet, and at the same time forming a straight “simple bayonet” knot.
- For reliability, you can form a third half-bayonet, but usually two half-bayonets are enough.
- The running end is tied to the main control node. Now we can safely say that the rope is correctly and securely attached to the support.
Instead of a control knot, sometimes the running end of the rope is tied to the root end with a rope of smaller diameter. In this case, the half-bayonets that form a simple bayonet are not tightened at all - and the fasteners come undone without any problems even after heavy loads. An example of such fasteners is shown in the photo below:

This is often used by sailors when they attach a cable to a support, but I have not seen such an option in tourism: usually tying a knot ends with the formation of a control knot with the running end of the rope.
Sometimes, when the supply of rope is large and therefore it is inconvenient to knit the bayonet with the entire bay, this knot is knitted with a double end. That is, the free end of the rope is folded in half in a convenient place and a simple bayonet is knitted as if there was a single end instead of a double end.
Basic mistakes
When knitting this knot, mistakes may be made. Let's look at the main ones.
Mistake #1. When knitting two half-bayonets at the root end of the rope, you get a cow knot instead of a bleached one (another name is “stirrup”).
This is a mistake: with a significant tension in the rope, the knot may become too tight, which means additional difficulties will arise when untying it.
Mistake #2. When knitting, instead of the maximum recommended three half pieces, four or more are knitted. The photo shows this error:

This is a mistake, since knitting more than three half-pins does not increase the reliability of the fastener, but only increases the time for tying and untying it.
Mistake #3. A control knot is not tied at the end of a simple bayonet, and the running end of the rope is not fixed to the main one in the previously recommended manner.
This is a mistake, because without “control” or fixing the running end of the rope, the fastener can still come undone under variable loads.
Other bayonet options
In addition to a simple bayonet, there are other varieties of it that have certain differences and properties that allow them to be used in specific situations with maximum efficiency.
These include, for example:
- double and triple bayonet knot;
- fishing;
- bayonet with rim;
- wet half bayonet;
- back;
- bed;
- mast.
Let's look briefly at each of these options.
Double and triple bayonets
Also called a bayonet with a slag and a bayonet with two slags, respectively.
They differ from simple fastenings in that instead of one turn of the rope around the support, two or three are made. The photo below shows a bayonet with two hooks:

And here - with three:

Thanks to the additional turns, these two options are more reliable, since the impact on the half-bayonets in the knot will be minimal due to the friction force of the rope at the points of contact with the support, and in this case the rope frays more slowly.
Fisherman's bayonet
Also known as the “anchor knot”, because it has long been used to attach an anchor. It is a double bayonet, in which the first half-bayonet is knitted by threading the running end into two loops draped over a support.
The fisherman's knot has the same advantages over a simple knot as the previous version. However, if instead of the control knot the running end of the rope is tied to the main one with a thinner rope, it has an additional advantage - it does not tighten at all, even under very heavy loads.
Bayonet with drift
Its knitting pattern is as follows: at the beginning, the running end is turned around the support, then it is thrown over the root and again circled around the support, but in the opposite direction, after which the half-bayonets are knitted, as in the case of a simple knot.
The advantages of this knot over a simple one are the same as those of a bayonet with a hose, with the only difference being that the bayonet with a hose slides a little less when the load changes direction, including due to the fact that the loops of the rope wrap around the support on both sides of the root end to which the load is applied.
Wet half bayonet
This option is an untied bayonet with a carryover, where instead of two half-bayonets, one is tied, with a double running end. Instead of a control knot in this case, you can insert the running end of the rope into the loop emerging from the half-bayonet, formed by the double end.

The beauty of this knot is how easy it is to untie.
This fastener, in comparison with a simple and a bayonet with a bayonet, can be easily and quickly untied even with a very high rope tension. To do this, simply remove the running end from the loop and pull it.
Reverse bayonet
This is nothing more than an “inverted” bayonet with a run-out.
The reverse bayonet is used mainly in maritime affairs, when difficulties arise when carrying the main end of the cable around the support to which it must be attached. Due to the peculiarities of knitting this knot, the support needs to be walked around only once, while when knitting a bayonet with a run-out, it would have to be walked around the support twice.
It has the same advantages over a simple knot as a bayonet with a carryover, but compared to the second, as was said earlier, with certain conditions the reverse option is more convenient for knitting.
Bed bayonet
This option was preferred to be tied for hanging bunks on ships, which is how it got its name.

The difference in knitting this knot from the simple version comes down to the fact that instead of the initial simple node a figure eight is knitted around the support.
Perhaps this option has some advantages over a simple bayonet, since it was very popular among sailors for a long time, but personally, when using this fastener in practice, I did not find any. The only drawbacks I found were primarily related to the more complex and lengthy knitting of the bed bayonet.
Mast bayonet
The mast bayonet consists of two “stirrup” knots: one is knitted on the support, the second - on the root end of the rope. Actually, as was noted earlier, the stirrup at the root end of the rope is knitted with two half-bayonets, both in a simple bayonet and in some of its other variants.
The advantage of a mast bayonet over a simple one again lies in the additional lags (turns) of the rope around the support, due to which the rope frays more slowly. In addition, thanks to the stirrup thrown over the support, the impact on the half-bayonets tied at the root end of the rope will be less than in other knot options discussed earlier.
If you tie a control knot at the end, the mast bayonet will tighten and tightly clamp the support, preventing the rope from sliding in any direction. But in this case, it will be more difficult to untie the knot.
If, after forming the mast bayonet, the running end of the rope is tied to the main one, then the knot will not tighten even with very large loads on the rope, and after loosening the rope it can be easily untied.

A mast bayonet is a certain combination double bayonet and stirrups.
There are other units, the name of which contains the word “bayonet”, but which in themselves are not “relatives” of a simple bayonet. Such units include, for example, a sliding bayonet and a flat bayonet. We will not consider them within the framework of today's topic.
As you can see, there are many known bayonets, each of which has its own advantages and disadvantages. However, there is no point in memorizing all the options: for a tourist or a person interested in survival in the wild, it will be enough to remember two or three nodes from this category.
Personally, I would recommend only one option for memorization - a bayonet with a carryover. On the basis of this knot, if necessary, it is easy to tie a simple bayonet, and the fastening pattern on the support itself is the basis for the UIAA knot and the Prusik knot, which are used for descending and ascending a rope. If you know and are able to knit a bayonet with a bow, it will be easier to remember these knots.