Molds made from polymer clay by hand. How to make silicone molds with your own hands? Easily! Do-it-yourself silicone molds: a master class using improvised materials
Molds, which were originally used for ceramic floristry, have captivated foamiran masters, significantly expanding their capabilities. So, thanks to these simple, relief forms, you can quickly and easily obtain a clear, natural relief of flower petals and flowers. What molds are there and how to make these useful forms with your own hands - read below.
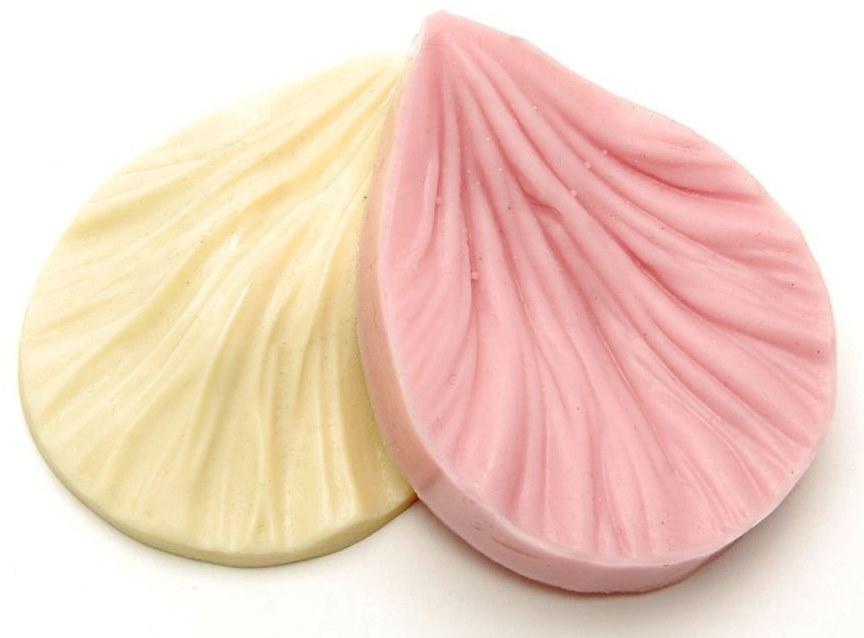
So, a mold is a cast, flat mold for making relief elements on the front surface of a foamiran workpiece. Weiner is a three-dimensional silicone mold that makes it possible to obtain not only convex veins, but also to make the edges of foamiran blanks curly. These forms are great for creating floral elements of plants with figured petals and leaves (rose, dahlia, lily, etc.).

There are a huge number of Moldavians and Weiners, and choosing the right one from such a variety can sometimes be incredibly difficult. Which molds are better? Experienced craftsmen say that the best forms that give clear impressions and do not tear the foils are Thai. But the price for such products is quite high.
If it is not possible to purchase a ready-made mold, then you can, for the first time, replace it with improvised means (for example, plates with a floral texture, cutting board, ceiling tiles). Some craftsmen got used to working with needles and toothpicks, applying relief by hand. But, it’s better to make the element yourself: the cost of such a mold will be much lower than the cost of purchased ones, and the result is much better than using improvised means.
Mold for flowers made of foamiran
The simplest, most universal way to make molds with your own hands - using viscous and plastic polymer clay. For work we will need: fresh polymer clay of any color, a living leaf with well-protruding veins (it is better to choose blackberry, raspberry, begonia leaves), a stationery knife or a thin blade, ceramic tiles or unnecessary earthenware, a metal baking tray for baking clay, a needle.

Making molds:
- Roll out the clay into a fairly thick layer.
- We apply a sheet of paper to the clay and press it tightly with our fingers, so that the veins are better imprinted, we go over the top of the sheet with a rolling pin.
- We pry the leaf with a needle and carefully remove it from the workpiece.
- Using a utility knife or blade, cut off the excess clay, giving the workpiece the shape of a leaf.
- We send the negative mold to the oven and bake it according to the instructions for the polymer clay used in the work.
- Roll out another layer of clay.
- We moisten the cooled negative with water (from the side of the veins) and place it on the rolled out layer.
- Press it with your fingers and roll it out with a rolling pin.
- We separate the negative and cut off the excess from the workpiece.
- Place the relief mold in the oven for baking.
After the double forms have cooled, you can safely use them in your work. In this way you can make leaves of different shapes and sizes.
If the clay is not viscous enough, you can knead it with your hands using Vaseline or a rich cosmetic cream.
How to make molds for foamiran with your own hands from silicone sealant
Another way to create molds for making flowers from foamiran is using silicone sealant, which allows you to transfer the relief from any voluminous leaf. Making a silicone mold is quite simple: for this we need a sealant, a small spatula, a transparent sheet from a stationery folder, a sheet for taking impressions, scissors, a sheet of A4 paper.
Let's get started:
- We attach the sheet of paper for taking the imprint to the A4 sheet and trace it.
- Remove the leaf and place a transparent sheet on the pattern.
- Squeeze the silicone into a container and, using a spatula, transfer it to a transparent sheet so that its size corresponds to the size of the sheet for taking the impression.
- Lubricate the leaf with oil and apply it to the silicone.
- We leave the silicone to dry for several days (from two to four depending on the sealant).
- After drying, use a needle to remove the leaf from the silicone.
- Use scissors to give the silicone molds a leaf shape.
The work is ready: as a result, we have convenient, high-quality, double-sided forms for quickly creating attractive, natural leaves from foamiran.
What else can you use to make molds for foamiran?
You can quickly and easily make molds from corn or potato starch and ordinary silicone sealant (available at any hardware store). In order to directly begin creating stencils, we will need to prepare a mixture for taking impressions: in an unnecessary container, mix the materials in a one-to-one ratio, first with a wooden stick, and then knead the mass manually until completely homogeneous (we wear disposable gloves to protect our hands).
Let's get started:
- Separate a small part from the total mass and form it into two balls of different sizes (one larger than the other).
- Roll out one ball with a rolling pin so that you get a flat surface 5 mm thick.
- Place a dried leaf of the desired plant on top or an artificial specimen purchased at a craft store with good texture.
- Roll out the second ball on top of the sheet.
- Set the workpiece aside: let the mass set well.
- After some time, separate the top layer from the workpiece and remove the sheet.
- Leave the molds to dry. If necessary, you can adjust the edges of the molds to the size and shape of the sheets using scissors.
Even a novice master can easily repeat this master class, and the resulting molds will not only be inexpensive, but will also give high-quality impressions due to their elasticity and flexibility. These forms can be used repeatedly.
Making molds for foamiran with your own hands: master class (video)
Molds and weiners are incredibly useful stencils for working with foamiran, allowing you to easily and quickly transfer the relief onto the workpiece. Such forms can be purchased in stores, or you can make them yourself, saving a little money. Make molds and weiners with your own hands, and get original, attractive, expressive textures to create high-quality works!
I suggest you step-by-step master class how to make silicone molds at home with photos and detailed description. Believe me, making a silicone mold at home yourself is as easy as shelling pears! And it is suitable for sculpting flowers from polymer clay, flowers from mastic, homemade soap or making plaster figurines at home.

I did it! From mastic!
When I took a course on mastic cakes, I immediately wanted to try making flowers from mastic at home. But I didn’t have any molds, and it’s quite expensive to buy everything I wanted, especially since I’m going to make cakes for myself. And then I decided to try to make a silicone mold for mastic with my own hands from sealant. Of course, it’s better not to eat such flowers (and it’s a pity to eat them), so for food it’s better to use forms made of food sealant. I went to the hardware store in search of silicone rubber for molds.
The silicone paste for making molds was replaced with the cheapest sealant, on which “Silicone” was written in large letters. The sealant cost about 100 rubles, it seems 120-130 for the whole jar, you can make a bunch of molds, and in addition there will be left over to make a dozen silicone molds for soap. I immediately bought a so-called gun for the bottle for 35 rubles. (I bought it in Obi-dybenko). In general, to cast silicone molds with my own hands, I didn’t need anything else, except for large leaves found on the street (probably chestnut), a drop of the simplest sunflower oil, an old credit card for leveling the mass and a substrate - transparent folder. It’s convenient to make molds in all kinds of disposable ones. plastic containers, in which salads and the like are placed by weight, then the mold will be beautifully shaped from the bottom and sides.

So, How to make a mold from silicone sealant with your own hands!
I squeezed out the paste and leveled it approximately to the size of the leaf. An old credit card came in handy.

I greased the leaf with sunflower oil. I think that it needs to be washed after going outside, everyone already guessed it 😉
I applied it to the sealant and stroked it well with my finger so that the leaf pattern was imprinted. Excess sealant is easily collected with the same card.

I squeezed out more silicone on top. Leveled it on the sheet. The stick also came in handy to hold the leaf that was “stretching” after the credit card.

Just a couple of minutes later I carefully removed the sheet from the bottom of the mold.

And she laid it with the silicone down to make the bottom part flat. You can also carefully press the sheet onto the silicone to print the design more clearly.

After a few more minutes, I removed the sheet. However, you don't have to take it off. It won't stick with oil.

Here is our mold self-made and ready!

The main thing now is not to touch it for several days! The silicone dries out on top, but a mold made of silicone sealant will be ready for use only when completely dry. It took me 3-4 days.
After drying, the resulting mold needs to be cut along the edge with scissors, giving it a more attractive shape and you can use it! I also tried silicone on the first thing that came to hand - I found a plastic photo frame, smeared it on the edge, and it turned out to be a silicone mold. In terms of cost, such silicone molds are cheap! And you can use them for soap, cakes (for decoration only), polymer clay, etc.

How to use silicone molds:
Working with silicone mold is also easy. If the mold for making homemade soap is filled, turn it over after the soap has been completely expelled.
If for a leaf or petal made of mastic or polymer clay - cut out the leaf, attach it, cover it with the second part of the mold, open it - ready! True, the mastic I used was not floral (especially for sculpting flowers from mastic, it holds its shape), but Creativity and master classes!
And for those who have already thought about how to decorate the New Year’s table in an original way and what can be prepared for the New Year, the Master Class section “About Tasty!” with detailed step-by-step recipes with photos of cupcakes, pastries and much more!
Not everyone gets wonderful realistic flowers from foamiran. In order for leaves, buds, and various small elements to be approximately the same shape and have a clear texture, special forms are used. They are called molds and have a flat surface with a noticeable relief. There are also weiners - this is another type of mold, most often made of silicone and having volume.
If you look at the photos of beautiful molds, it will become clear that with their help you can sculpt any detailed copy of a plant. Such blanks are not cheap, and the work will require molds with different textures. That is why many craftswomen strive to spend very little time and money to independently make the necessary molds with a suitable relief.


Available materials for creativity
The most obvious option for making molds at home is polymer clay. It is viscous and plastic enough to accept an imprint in the smallest detail, and hardens well. The blanks made from it are used many times without losing their properties.

As an alternative material for weiners, some needlewomen take silicone sealant. Its advantages:
- hardens quickly;
- is able to fill the slightest cracks, which means it gives a clear impression;
- available at any hardware store,
- Suitable for continuous use.

Sometimes the sealant is used not in its pure form, but in a mixed form. To do this, it is combined in a 1:1 ratio with potato and corn starch. And after thorough mixing, you can start making molds with your own hands.

Making molds from sealant
The silicone mold for volumetric impressions is made simply and with a minimum set of tools. We will need:
- the sealant itself,
- small capacity,
- small spatula,
- the sheet from which the impression will be taken,
- scissors,
- transparent film (can be taken from a stationery folder),
- paper A 4 (1 sheet).

Instructions on how to make molds correctly are simple. First, the outline of the leaf from which the print will be made is drawn on a sheet of paper. Cover the drawing with transparent film.

Squeeze the silicone compound in a small amount into the prepared container. We take the silicone with a spatula and carefully apply it to the film so as to close the contour, following all its bends.

Lubricate the leaf from which the mold will be made over the entire surface with a layer of oil and place it on the silicone mass. Now all that remains is to wait until the workpiece dries. This will take at least two days. The maximum drying time is 4 days, it all depends on the composition of the selected sealant.

After drying, the leaf is easily threaded with a needle and removed. And you will be left with a wonderful mold, which should be slightly trimmed with scissors to correct the shape. With it you will definitely be able to create naturalistic leaves from foamiran.

Making molds from polymer clay
Working with polymer clay is a pleasure. It has the ideal consistency to absorb all the smallest veins and leaf relief. If the mass you have is not flexible enough, you should knead it thoroughly in your palms with a small amount rich cream or Vaseline. Then it will acquire the desired viscosity.


It is better to take a living leaf from a plant that has a clear relief with many veins. Experts recommend begonia, blackberries or raspberries.

You also need to prepare:
- unnecessary ceramic flat plate (or tiles left over after renovation),
- a sharp knife with a thin blade (a stationery knife will do),
- rolling pin,
- baking tray,
- igloo

The manufacturing process is not complicated, and soon you will be able to give a master class on how to make molds with your own hands.

First, roll out the well-kneaded clay onto a tile into a thick layer. Then press the selected leaf tightly to it. It should be carefully straightened, pressing firmly with your fingers in order to transfer the design as much as possible. Finally, roll the rolling pin over it several times.

Using a needle, carefully pry up the edge of the sheet and remove it. We use a utility knife to trim off the excess mass so that the workpiece acquires a shape close to the original. We received a negative mold, which should now be baked as written in the instructions on the clay package.

Note! 
When the negatives are “baked” and cooled, we moisten them with water on the side where the veins are imprinted. Place them on the second rolled out piece of clay. We repeat the operation with pressing with fingers and a rolling pin.

We remove the negatives, and cut the resulting molds with a knife and send them to the oven. That's all. After cooling, you can start sculpting.

Another way to create molds
Every housewife has potato starch in her kitchen. If you add corn and silicone sealant to it, then a composition will appear so that another idea can be realized on how to make molds. The mixture must be combined in a small cup, first stirring with a stick. Then you should put on medical gloves and knead the mixture completely by hand.


We separate one part from the resulting mass and form 2 balls of a larger and smaller size from it.

We roll out the first piece so as to obtain a plate 0.5 cm thick. Place a dry leaf or an artificial leaf with a clear relief on top.

Roll out the second piece on top and leave the kind of layer cake to dry a little. Now you can separate the two parts of the mold and remove the leaf.
Note! 

We leave everything until final drying, after which you can adjust the edges of the molds. They will be elastic, bend well, and give a clear impression.

Simplifying the process of sculpting petals
You always need a lot of flower petals. You can also make a mold for them and speed up the molding process.

You need to sculpt a complex figure from polymer clay: its upper part resembles an elongated leg, and its bottom resembles a thickened drop. Press the workpiece onto the table, making the base flat.

Now, using a thick needle or toothpick, we begin to draw longitudinal stripes on a flat drop. They should be of different lengths, interrupted and curved. After this, we put the stamp in the oven and start using it immediately after cooling.

The notches made with a needle well imitate the natural pattern on flower petals. Add to this the leaves made using wonderful homemade molds, and you can collect gorgeous bouquets.
Note! 

DIY photo of molds


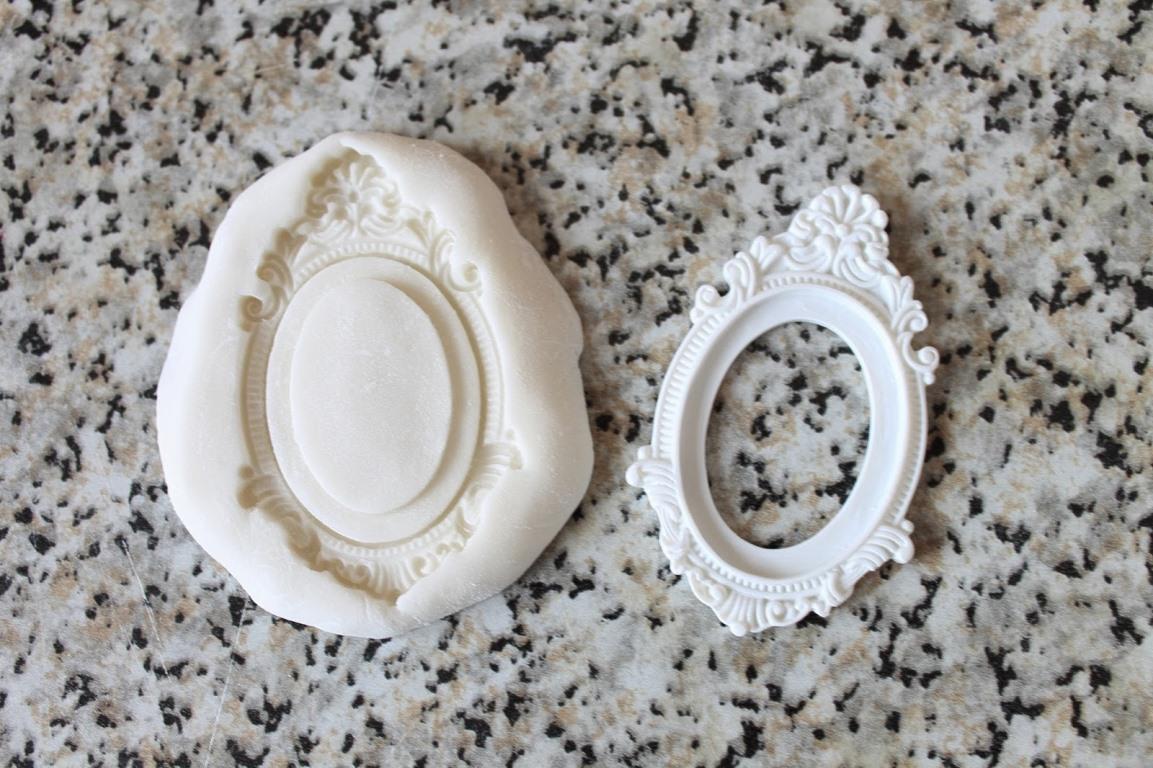
The invention of silicone was a real godsend for housewives. After all, this material is used to make excellent kitchen tools, potholders, brushes and a host of other useful devices such as oven mats, which perfectly replace parchment paper for baking. However, what modern needlewomen appreciate most are silicone molds, with which you can easily create figurines for decorating cakes, fancy-shaped soaps, and candles. What is the peculiarity of Moldova? What types are there? Is it possible to make them yourself?
Silicone molds: what are they?
Silicone molds are special forms for obtaining the necessary impressions from various materials. Outwardly, they resemble molds from children's sets. Thanks to the strength and plasticity of silicone, they can be used to create not only flat bas-reliefs, but also three-dimensional three-dimensional figures.
In cooking, silicone molds are most often used for mastic, marzipan, jelly, caramel and chocolate. In addition, molds are used for making candles, curly soap, products from epoxy resin and polymer clay.

Types of silicone molds
Due to their versatility of use and ease of production, silicone molds of almost any shape are available for purchase today. However, they differ in only a few parameters.
First of all, molds differ in the material from which they are made. Both non-food and non-food products are used in their production. Forms made from food grade material are always more expensive. The scope of their application is almost unlimited: they can be used not only for making chocolate figurines, but also shaped soap. But cheaper molds (made of industrial silicone) are intended only for working with non-food materials.
Molds are used in the production of both one-sided figures and three-dimensional products.
Silicone molds are also divided into solid and collapsible (consisting of several interconnected elements).
There is also a special type of moldov - weiner. These molds are made of a harder rubber-like silicone. Their purpose is to create textures. As a rule, weiners consist of two parts, between which a sheet of mastic or foamiran is clamped to give it the desired texture.

Advantages of silicone molds over other molds
In addition to silicone molds, there are a lot of other interesting devices on the market for confectionery products. Namely: plastic plungers, metal molds for cookies or dough, pastry syringes with specialized nozzles, plastic or wooden rolling pins for adding texture to mastic, etc.
Despite the convenience of all these tools, silicone molds for mastic are superior to them in most respects.
The fact is that, unlike other tools, silicone is not afraid of cold, heat, does not break, does not rust, is easy to clean, easily transported and takes up little space in the kitchen. Thanks to its softness, it is easy to remove finished products from it.

How to use silicone molds
Despite the variety of forms for silicone impressions, the method of using them remains unchanged:
- Before use, you need to make sure that the mold is clean and dry, because if there is moisture in it, voids may form in its place and then the resulting print will be defective.
- Before use, the inner surface of the mold must be lubricated to make it easier to remove the finished print. If the mold is used to make food products, edible fat is suitable as a lubricant. For inedible materials, Vaseline is used. If the weiner is used when working with foamiran, there is no need to lubricate it.
- The residence time of a substance in the form depends on its type. If it is mastic, then the mold with it should be placed in the freezer for 5-15 minutes to allow the print to harden. After time, carefully remove ready product and continue to work with him. If molds are used to make chocolate figurines, candles, products made of epoxy resin or plaster, the impression needs several hours to harden. The hardening time of each material is indicated separately on the accompanying instructions.
Do-it-yourself silicone molds: what can they be made from?
Since creative people, as a rule, do needlework in their free time, at some point they will definitely want not just to use ready-made molds, but to create an original form for the impression.
For such cases, there is a special silicone paste on sale that can be used to make molds. Dental molds are also used to make food molds for impressions. Unfortunately, all these materials are quite expensive, so many needlewomen try to make molds from improvised materials.

The main component from which craftsmen make molds is technical silicone sealant, sold in construction stores. In some cases, one of the types of polymer clay is taken instead.
Molds made from such materials are, of course, worse than factory ones, but they are excellent for making molds. At the same time, everyone should remember that you cannot make silicone molds for mastic with your own hands from technical silicone or polymer clay: these materials are toxic.
The only non-specialized material that you can try to use for culinary molds is gelatin. It is mixed in equal parts with glycerin and this mass is boiled in a water bath, after which it is poured over the desired item. The resulting gelatin mold is very plastic and can be used for food products. However, unlike silicone and clay molds, gelatin molds are afraid of rising temperatures and begin to melt.
Do-it-yourself silicone molds: a master class using improvised materials
Once it has become clear what materials are most often used to create molds with your own hands, it’s worth looking at how it’s done.
In order to make a mold at home, you will need a package of technical silicone, starch (potato or corn) and items that will serve as a pattern for the future mold.
- The first step is to prepare the place of work. It must be a clean, level, dry surface. For example, a table covered with film or parchment paper.
- The required amount of starch is poured onto the table. Next, the same amount of silicone is added to it.
- From these two components you need to knead a silicone “dough”. This will take 10-15 minutes. The kneading process should not be delayed, as silicone quickly hardens when it comes into contact with air, especially warm air.
- The finished “dough” needs to be rolled out, but not very thin. Objects for impressions are pressed into the rolled circles and left in this form for several hours. Or better yet, for the whole night.
- After this period, the necessary items are carefully removed from the blanks and the mold is ready. A blank is molded from silicone right in the same water. It is taken out of the water and the silicone is pressed into the object for the impression. Then they leave it for several hours - and then continue according to the above scenario. American manufacturers, when producing silicone molds, process the material in a different way. Instead of kneading the “dough” with starch, the silicone is squeezed into water with a glycerin-containing detergent liberally dissolved in it.

Having considered the various ways of creating molds, you can now use the acquired knowledge in practice, choosing a method for yourself at your discretion.
The invention of silicone was a great find for needlewomen. After all, excellent kitchen tools are made from this material: potholders, brushes and a lot of other important tools like carpets for special cabinets, which can perfectly replace parchment paper for baking. However, it is silicone molds that are truly appreciated by modern craftswomen, with the help of which they can easily make products for decorating cakes, unusually shaped soaps, and candles.
Silicone molds are some forms for obtaining the necessary impressions from different materials. Outwardly, they are similar to the forms from sets for children. Thanks to the properties of silicone, they can be used to create not only simple bas-reliefs, but also three-dimensional large figures. In cooking, such molds are mainly used for mastic, marzipan, jellies, sweets and chocolate products. In addition, they are used to create candles, special soaps, beautiful plaster figures, products made from special resin and polymer clay.
Due to the versatility of use and ease of operation, special molds of almost any shape are now available for purchase . However, they differ in only a few characteristics:

Procedure for working with molds
Despite different shapes for silicone impressions, the method of application remains unchanged. Before use, you need to make sure that the mold is clean and not wet, because if moisture gets into it, voids may appear in its area and then the created impression will be bad.
Before use, the inner surface of the mold must be lubricated to make it easier to remove the finished print. If the material is used to create food products, edible fat can be used as a lubricant. For inedible products, Vaseline is used, it's much more convenient.
If the weiner is taken when manipulating foamiran, there is no need to lubricate it. The time a substance remains in the form will depend on its type. If it is mastic, then the mold with it must be placed in the freezer for fifteen minutes to give the print time to harden. After 15 minutes, you need to slowly pull out the finished product and then work with it. If this is used to make chocolate figurines, candles, products made from special resin or plaster, the print needs a couple of hours to harden. The hardening time of any material is separately indicated on the special instructions for it.