Iris folding turns out beautiful and... Iris folding. Master classes, diagrams and templates for children. Preparing for the creative process
Do you want to learn how to do it for real? original postcards, the creation of which does not require special knowledge in one form or another of creativity? In this case, the iris folding technique was invented especially for you!
What is iris folding?
The unusual technique was first noticed in the Netherlands, where craftsmen liked to create works from paper.
Literally, the name of the work is translated as “iris folding” - and indeed, works made in this way resemble the iris of the eye, especially if paper of the same color is used for the execution. Some craftswomen also notice that finished cards give the impression of weaving from paper strips.
In fact, everything is much simpler: the master prepares a diagram in advance, onto which paper ribbons are glued in the right order, creating the impression of a twisting spiral. A single-color sheet is glued on top, in which a window of a certain shape is cut out. Through this hole you can see the work you have done using the Iris folding technique.
Iris folding is often used as an auxiliary technique to create three-dimensional cards in the style of scrapbooking, decoupage, origami and even quilling.
This type of creativity is so simple that you can do it even with children! Rest assured: kids preschool age will be seriously interested in how to make original cards and colorful pictures with your own hands.

Most often, iris folding is used to decorate the following things: postcards, photo albums, paintings, panels, women's bags, pillowcases, furniture.
The list can be expanded endlessly - just show your imagination and use this style to decorate almost any flat surface.
Materials and tools
Traditionally, for the Iris folding technique, different types of paper are used: regular office paper, colored paper, thick paper, crepe paper, papyrus paper, and watercolor paper. Don’t forget also about regular and corrugated cardboard in different colors and densities.

IN Lately craftsmen began to use other materials both for the strips with which the pattern is laid out and for the base covering them on top.
For example, now a design can be made from fabric, lace, cardboard, plastic strips, and foil. Some even use dry leaves, trying to diversify appearance products.
The two main components of working in the iris folding technique are a diagram and a template. The diagram allows you to correctly arrange multi-colored lines in a spiral-shaped intertwining pattern. A template is needed to cut out a beautifully shaped window through which the work will be viewed.
Both of these things can be purchased in special art stores, found on the Internet and printed or drawn yourself - in this case, your work will receive a touch of originality and uniqueness.
In addition, choose an adhesive that is suitable for the selected materials: for example, regular PVA can glue paper, while silicate glue can help with fabric.
Scissors are also needed for cutting strips and cutting out window shapes from paper. Use any convenient model of scissors.

Some craftsmen also use curly scissors to make a carved patterned edge on the stripes.
How to draw a diagram?
It is better for beginning craftsmen to use drawings for iris folding, which are offered in various master classes, but there is nothing difficult in creating a diagram yourself. All you need: a couple sheets of paper required format, a ruler, a simple pencil and an eraser, just in case.
- Select a template for the future drawing, draw or print it on 2 sheets of paper: you will need the first one as the basis for the diagram. From the second, the picture will need to be cut along the contour to cover the iris folding. In this master class, the drawing of a bunny from the cartoon “Smeshariki” is taken as a basis.

- Draw the ears and paws with identical parallel lines in an order convenient for you - since these parts of the picture are very small in size, you simply won’t be able to lay out a spiral in them.
- Frame the body with an equilateral figure, for example, a square, as in the figure.

- On each side of the square from the left edge, put pieces of the same length - they are called a step. As a rule, 1 step is approximately 1-1.5 centimeters, but you can change the size at your discretion.
- Connect the points of the segments with straight lines - you should get another square inscribed into the first one at an angle. Immediately number the resulting figures in the direction of “twisting” the future spiral - this will simplify the work.

- Repeat the previous 2 steps until you have a diagram with a sufficient number of figures to fill.

You can choose any desired shape instead of a square: triangle, rhombus, polygons - they do not have to be equilateral. Over time, you will get the hang of quickly drawing beautiful, intricate iris folding patterns before making a card.
Master class: postcard using iris folding technique
If you have already prepared everything necessary materials and tools for the iris folding technique, try making a simple one yourself beautiful postcard in the shape of a heart.
When doing the work you will need 2 sheets of cardboard of the same color, colored paper red in two shades, scissors, glue and ruler.
- Cut 2 large squares from cardboard sheets. On the back of one of them, draw the diagram shown in the photo - you can also print it on a printer, simplifying your task.

- From another square, cut out a large heart without cutting the outlines.

- Prepare the required number of colored paper strips so that one half of them is one shade, and the other half is another.

An important point: the strips should be slightly wider than the sectors on which you will apply them. For example, for a sector 1 centimeter wide, you need a tape 1.5 centimeters thick. This is necessary so that when laying out the strips slightly overlap each other at the back - this way you will not have any random gaps in the picture.
- Attach the template and diagram with their right sides facing each other using paper clips. Guided by the drawing, begin to gradually lay out the colored stripes in the desired order, gluing them to the frame with glue.
- You need to lay the strips as follows: cover the top and bottom sides of the pattern with one shade of red, and the sides with another. Other options: use different tones alternately on the same side or lay out ribbons in a checkerboard pattern.

- When finished, trim off any edges that extend beyond the frame. The back of the work can be covered with a sheet of cardboard with a diagram, gluing it to the work with the drawing inward.

Your card using the Iris folding technique is ready! You don’t even have to sign it - such an original image of a heart on the cover will say everything for you. If the frame seems too simple to you, decorate it with additional elements using the quilling technique.
You can study the principle of operation in detail by watching the following video, which will tell you how to make a cute picture in the form of a turtle:
Iris folding or "rainbow fold" – unusual technique applications. The image is obtained by placing strips of colored paper on top of each other - at an angle in the form of a twisting spiral according to a template or diagram. It’s not at all difficult to master – use the examples from this section, they are suitable for beginners. Master classes from experienced craftsmen will help you make a fairy tale with your own hands. Original crafts using this technique will make a good gift.
Contained in sections:
Showing publications 1-10 of 161.
All sections | Iris folding. Master classes, diagrams and templates for children
To the day Iris folding on MAAM.RU Creativity in style Iris folding is akin to art. But this skill accessible to everyone and does not require talent. Unique postcards, paintings or books, designed using technology, amaze and excite the imagination. Ease of learning and...
 Today, August 3, is declared Olympic Bear Day on the MAAM website. As colleague Zhelonkin S. writes in his review publication.
: “On August 3, 1980, the closing ceremony of the Moscow Olympics took place in Luzhniki. For many people it has become one of the most impressive...
Today, August 3, is declared Olympic Bear Day on the MAAM website. As colleague Zhelonkin S. writes in his review publication.
: “On August 3, 1980, the closing ceremony of the Moscow Olympics took place in Luzhniki. For many people it has become one of the most impressive...
Iris folding. Master classes, diagrams and templates for children - “Rainbow Whale” postcard using the iris folding technique for World Whale and Dolphin Day at MAAM
Publication “Postcard “Rainbow Whale” using the iris folding technique for World Day...”  Good afternoon, dear colleagues and guests of my page. As you know, any creativity is interesting for both children and adults. For myself, I tried a new artistic technique, iris folding, and supporting the wonderful theme of educational portal MAAM, for World Whale Day and...
 Image library "MAAM-pictures"
 Postcard "Dolphin" using the iris folding technique for world day whales and dolphins. Good afternoon, dear colleagues. I would like to start this publication with a statement from Albert Einstein: “Creativity is contagious. Pass it on to someone else!” And so, admiring creative works Natalia...
 In Tatyana Varnavskaya’s review about Ladybug Day at MAAM, there are the following words: “Harmless and cute ladybugs are often found in nature.” The ladybug can be caught, the black dots can be counted. One, two, three... I didn’t have time! My ladybug has flown away! Rebrikova O....
 Such a baby crawls - One leg and horns, Along a thin blade of grass, A spiral house on the back. By leaf, by flower, By stone, by sand, By paving slabs The snail crawls and crawls. Shemyakina N. Some information about snails A gastropod with an external shell, and in common people...
Iris folding. Master classes, diagrams and templates for children - Master class “Iris folding”
 Municipal budget preschool educational institution « Kindergarten combined type No. 29 "Caramel" Master class Topic: "Iris folding" Performed by: teacher Polyakova S.V. Yurga 2019 Good afternoon, dear colleagues! Today I will introduce you to a new interesting...
 Objectives: 1. To develop students’ knowledge and skills in making three-dimensional postcards. 2. Development of a sense of beauty, harmony and spirituality, instilling respect for elders. Objectives: 1. Educational: - formation of a knowledge system in this area of activity;...
Master class on working with paper using the Iris folding technique
Iris Folding- filling the picture cut out along the contour with multi-colored stripes.
Iris folding originated in Holland. This technique is also called "rainbow folding".
Its principle is as follows:
1. The selected fragment of the picture is cut out along the contour.
2. On the reverse side, strips of colored paper are glued onto the drawing strictly in a certain order, in accordance with a pre-prepared template or a diagram drawn up by you.
3. The wrong side is sealed with a clean sheet of paper.
4. The application, if necessary, is supplemented with details.
There are many diagrams, templates and pictures for technology. At the same time, the schemes for iris folding are quite simple to make yourself. You can get acquainted with the principles of their manufacture by viewing this master class.
To work in new technology will appeal to all children who can hold scissors. For small children (5-6 years old), it is better to prepare a diagram, but older children can draw it themselves.
Application “Magic ball” using the iris folding technique
Target: develop aesthetic taste, cultivate patience, accuracy, teach to work according to a given plan.
To work you will need:
Colored cardboard
Colored paper (printer friendly)
Checked notebook paper
Scissors
Ruler
Before you start working, you need to learn how to build a template diagram yourself.
1. So, let's start making the diagram: for this you need to choose the geometric figure that is most suitable for your drawing - square, triangle, rectangle, polyhedron...
A square with a side of 14 cm is suitable for our ball. ( For younger students It will be more convenient to draw a sheet of paper into a box).
On each side of the square from the left corner we set aside 15 mm - a step.
We connect the resulting points with straight lines.
.jpg)
Now inside the large square we have another one of a slightly smaller size. From the left corner of this square on all sides we again set aside 15 mm and connect the resulting points.
On the resulting smaller square, we again plot the width of our step. And so on until a small square remains inside. The scheme is ready.
.jpg)
2. On the back side of the colored cardboard, preferably in the center of the sheet (if you have no idea how to complement the application), draw a circle with a diameter of 12 cm. To do this, you can use a compass or a suitable template. Then carefully cut out a circle along the contour; we won’t need it anymore.
.jpg)
3. Using paper clips, fix the prepared diagram from below so that it is completely visible in the hole.
.jpg)
4. Prepare strips of paper. You need to decide how many colors the ball will have. Since the ball is magical, it is necessary that it be bright and cheerful. We will prepare red, yellow, green and blue paper. The width of the strips is determined by the width of the step used in the circuit. Our step width is 15 mm, which means the width of the strips will be 30 mm. (Step*2).
.jpg)
We place the sheet vertically and use a ruler to draw out the stripes. The length of the strip should be such that it goes through the entire picture, with an overlap of about 1 cm at the top and bottom of the picture (so that it can be glued freely). Then fold each strip in half lengthwise, colored side up.
.jpg)
5. Start gluing the strips with a fold in the center along the lines of the diagram. Apply glue only to the ends of the strips that extend beyond the design. Move in the same direction all the time (here, clockwise) and maintain an exact alternation of colors.
.jpg)
Strips that are too long can be trimmed. So fill the entire circle according to the diagram. Don't forget to seal the center.
.jpg)
6. Remove the paper clips to reveal an amazing pattern!
.jpg)
7. The wrong side is sealed with a clean sheet of paper. Its size can be slightly larger than the base and then the work will have an elegant frame. The application, if necessary, is supplemented with details.
You can make many different pictures using this technique. Photo 11,12.
.jpg)


Iris folding came to us from Holland. This technique got its name due to the fact that ready product, created with its help, its structure is visually similar to the structure of the iris of the human eye or the diaphragm of a camera. Initially, iris folding was used as one of the ways to decorate greeting cards. Gradually, this technique spread to many countries around the world and became more complex and diverse.
What materials and tools will be needed when working with the iris folding technique?
Paper, cardboard, magazine pages, fabric or ribbon. Now you can find paper specially designed for this technique on sale.
Templates for creating a drawing. These patterns determine the order in which the paper or fabric strips are laid out, their color and location. There are many ready-made iris templates on the Internet, but it’s not difficult to learn how to create them yourself - then the composition will be perfect in every sense words unique.
.jpg)


Stationery knife, scissors, ruler and pencils, glue, double-sided tape. When working with fabric you will also need
What should be the procedure for using the iris folding technique?

Introduction
For the first time, the iris folding technique (from the English Iris Folding - translated from English means folding of the iris, iris folding) appeared in Holland. Dutch masters used colored paper, which was laid out at a certain angle in the form of a twisting spiral onto pre-prepared templates. The end result was very colorful work. The iris folding technique does not require special tools, which makes it accessible to everyone.
When performing this technique, attention, accuracy and patience are required. Thanks to this technique, there is an additional unique opportunity to decorate notebooks, collages, album pages and greeting cards with new bright decorative details and elements.
There are quite a few advantages of Iris folding in the development of a child’s creative abilities. Iris folding classes help develop attention, observation, creative imagination and spatial thinking in children, while simultaneously nurturing in them diligence, accuracy and precision in work, useful work skills and creative independence. In parallel with this, children’s sensory development occurs in the process of becoming familiar with the color, shape and size of an object.One of the advantages of iris folding is that children improve their fine motor skills and train their eye. Iris folding develops constructive thinking and artistic taste, and allows children to develop the ability to think logically.
Materials and tools
Template making – paper, graphite pencilHB, ruler.
Making iris – folding – cardboard, colored paper (foil, velvet, coated, etc.), fabric, glue (PVA, glue pencil, tape), scissors, stationery knife, paper clips, oilcloth.
Safety instructions for using tools
Before you begin the task, remember that you cannot swing the scissors, do not point them towards your neighbor, and hold them above the table with the blade facing away from you.
Use the cutter only on the board, do not make sudden movements when working, do not swing it, and retract the blade after finishing work.
Use liquid glue carefully, do not pour a lot on the product, but only a drop
Building a circuit
You need to choose the geometric shape that is most suitable for your drawing - square, triangle, rectangle, polyhedron...
The sequence of constructing the circuit:
Construct a triangle of the dimensions you need.
Moving clockwise, place an equal length on each side of the top. This segment is called a step; it is usually the same for the entire construction of the template. Most often it is 10-15 mm.

Connect the points marked on the sides with straight lines. You've got a new triangle. On this new triangle, again lay out segments of the same length, moving clockwise from the vertices.

Connect the new dots. The result is a new triangle. Continue building in the same way.

As a result, at the end you will get a small triangle, and the constructed lines will create an interesting effect of twisting spirals.

Iris folding technology
For work we will need: a template, thick paper or cardboard, which will be the basis for the work, and colored paper from which the drawing will be composed. Since it will turn out to be voluminous, the thinner this paper is, the better. Origami paper, colored printing paper, and wrapping paper are ideal. You also need a breadboard knife, scissors and glue or tape (not double-sided, regular).When creating a postcard or any other work using the iris folding technique, you will need a template, prepared cut sheets of paper or fabric, a cardboard backing for the outline, and glue.
Execution sequence (option No. 1):
Prepare a diagram, ruler, scissors, sheets of colored paper for work.

Prepare colored stripes (the number should correspond to the fragments of the diagram).

Place the reverse side of the colored strip on the diagram (make sure that the strip matches the diagram number).

According to the order of the diagram, stick the strips on top of each other. Trim excess strips with scissors.

Glue the resulting “rainbow” to the cardboard base and insert the photo into the frame.

Execution sequence (option No. 2):
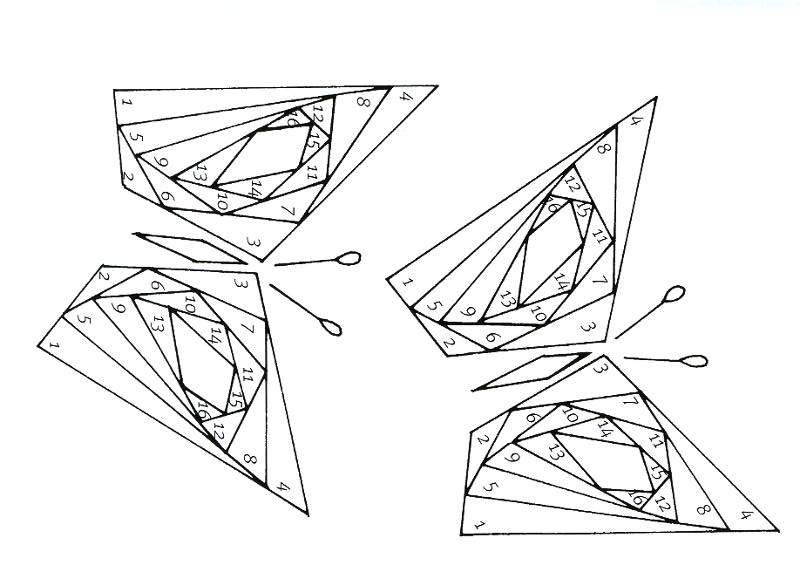
We select the desired scheme, in this case it is the sheet scheme.

On the cardboard from the wrong side, using a template, we apply the outline of a maple leaf.

Cut out the outlined shape to make a window.

Place the sheet diagram under the cardboard (face up), secure the template with paper clips.

We cut the selected strips of paper and bend them in half lengthwise.

We begin gluing the strips from the edge (from number 1), position the strip with the edge (fold) to the line on the template. We apply glue to the cardboard, it should not get on the diagram.


We continue to glue the strips, alternating colors. Cover the remaining small window with a piece of paper.


Carefully remove the template. If necessary, place the finished work under a press and dry. The finished work can be inserted into a frame.
