Crafts for school on the theme of birds. Ideas for making birds from different materials. Birds from bottles
Bird crafts have always been very popular among hobbyists. home creativity. Figures of feathered creatures are especially relevant on Bird Day, which is celebrated in the spring on April 1 in kindergartens and schools. The holiday is dedicated to the return of migratory birds and marks the onset of spring and the renewal of awakened nature. On this day, children of all ages make bird crafts, and older schoolchildren make birdhouses and hang them on trees.
Bird crafts can be made from a wide variety of different materials: cotton pads, colored paper, plastic bottles, salt dough, natural and any available materials. There are many options for creating birds - from simple ones for small children to complex ones that schoolchildren can easily master with the help of adults.
We bring to your attention several lessons on creating birds with your own hands with step by step instructions, diagrams and tips. We hope that they will help you learn all the intricacies of this fascinating process and be filled with new bright ideas.

We will need: plastic bottles of various colors, polystyrene foam, a wooden block as a stand, a metal rod, foil and thin colored plastic, a glue gun.

Step one: Cut out the peacock's body and head from foam plastic, not forgetting to make small indentations in place of the eyes. We attach it to a wooden block using a metal rod, which plays the role of legs.

Step two. We make enough peacock feathers from plastic bottles of different colors. We will need three types of feathers: long for the tail, short for the neck and a little longer for the body. To do this, cut off the bottom and neck of the bottle and cut it lengthwise into 3 parts.
We round one end of each strip with scissors and cut its edges into thin strips so that it looks like a bird’s feather. We decorate the rounded end of the feathers intended for the tail with two or three multi-colored ovals made of foil and plastic. You can attach them using a stapler.


Step three. Cut from red plastic bottle beak and fasten it in place. Next, using a glue gun, we gradually glue the feathers onto the body of the bird, starting from the tail and ending with the neck. Attach the feathers slightly overlapping, as shown in the photo. Do not forget that medium-length feathers are intended for the body, and meek ones for the neck.

Step four. We cut out a tuft of any shape that our imagination dictates from colored plastic and glue it onto the head. Using acrylic paints, draw the peacock's eyes. You can glue eyelashes cut from a transparent plastic bottle to them.

Step five. Let's start making the tail using an abrasive mesh. We make holes at the base of the feathers and attach them to the mesh using thin wire.
We start making the tail from the end, gradually layering feathers on top of each other in rows until the bird’s luxurious long tail is completely formed. After that, we attach it to the body and place the peacock, made with our own hands from plastic bottles, in an area among flowers and greenery.
DIY firebird made from salt dough - master class

For Bird Day, you and your children can make a three-dimensional firebird from salt dough. The work will take little time, require very few materials and will provide the children with a fun and festive mood.
We will need: salt dough, gouache or watercolor paints, colorless varnish.

Step one. Making salt dough. To do this, mix a glass of flour with a glass of salt and knead the dough by pouring 100 ml of brewed starch into it. We prepare it as follows: dilute a tablespoon of starch in 100 ml of cold water and pour a glass of boiling water into this mixture.

Step two. Divide the salt dough into 5 pieces and color them different colors. To do this, add gouache or watercolor paints to each piece and lightly knead it again. Next, we draw a sketch of the firebird and sculpt the bird’s details on it: wings and body. Dry them in the oven at low temperature.

Step three. Making the tail fairy bird. We draw stencils of feathers and use them to sculpt them from pink and blue salt dough. Dry the feathers in the oven. Next, we paint all the parts of the bird with paints, cover them with colorless varnish, and connect them. We decorate a colorful festive panel with crafts. The salt dough firebird is ready!
Birds made from cotton pads - master class

Another very cute craft that is perfect for decoration. kindergarten on the wonderful holiday Bird Day. It's easy, fun and very fast. Young children can be introduced to making birds from cotton pads.
For creativity we will need: cotton pads, wooden skewers, colored paper, narrow colored ribbons, plastic eyes, glue and scissors.
Operating procedure:
- To create one bird we take 5 cotton pads. We cut one disk into two halves, and leave four whole.
- We fix two pairs of cotton pads on a skewer with glue so that it is inside. One pair of disks plays the role of the bird's head, and the other - the body.
- We glue the halves of the cut cotton pad to the body on both sides - these will be our wings.
- Glue the eyes and beak, cut out from a piece of colored paper, to the head and decorate the bird with a ribbon. A cute chick made from cotton pads for Bird Day is ready!
Owl made of colored paper - master class

You can make cute owls for celebrating Bird Day at school with your own hands from colored paper. We will need the colored paper itself, scissors, double-sided tape and glue.
Operating procedure:
- We make a cylinder from a sheet of colored paper, glue its edges on one side, as shown in the photo, and press down the middle so that we get ears.
- Cut out a heart from paper and glue it to the bottom of the cylinder - these are the owl's feet.
- We cut circles of equal size and glue them onto the central part of the cylinder as feathers. In order for the circles to give volume to the craft, it is better to stick them with double-sided tape.
- We cut out a triangle of the same color as the legs and glue it to the top of the plumage - this is the beak.
- Lastly, glue on the eyes by cutting out circles for them from black and white paper. Your handmade owl is ready!
DIY bird of paradise made of polymer clay - master class

Delightful birds of paradise made from air-hardening polymer clay. This modern material is also familiar to us under the names “self-hardening plasticine”, “modeling mass” and “velvet plastic”. To make charming feathered creatures, we will need aluminum wire with a diameter of 1 mm, polymer clay, foil, scissors, pliers, a stack, a glass for rolling out clay, a little patience and diligence.


Operating procedure:
- We create three birds at once - while we are sculpting one, the rest are drying out. We cut the wire twice as long as the planned tail. We wrap half the wire with foil, crumpling it and forming the body of the bird.
- We make legs from wire, as shown in the photo, and insert them into the body. We take a piece of clay, shape it into a sausage shape, then roll it out and flatten it. Carefully remove the wire from the bird, place it inside the clay sausage, rolling it up using a glass. We insert the finished colored tail back into the body. In the same way we prepare the remaining two birds.
- We take a piece of blue, yellow and red clay, roll them out and gradually, smearing them with our fingers, stick them around the birds until the entire foil is covered. We will get three blanks of bright birds.
- Starting from the center, we stick around the paws. Then we take a piece of clay of the appropriate color and make the cheeks, crown and beak. We sculpt eyes from balls of black clay, not forgetting to squeeze out the upper and lower eyelids around them.
- Create a tail and crest. To do this, we cut off several wires of the length we need and roll them into clay. When it dries, we round off the ends using pliers and insert the tail parts into the bird’s body. We make shorter feathers from thin clay sausages by twisting the ends.
- We create the plumage effect by placing pieces of clay rolled out in the form of droplets on the body and working with a needle in the direction of feather growth. Using a needle, we create featheriness throughout the bird’s body. To make the eyes shine, you can coat them with varnish. A wonderful hand-made bird of paradise is ready!
More ideas and patterns for bird crafts made from various materials
For needlewomen familiar with the isothread technique, it will not be difficult to create paintings with beautiful white swans with their own hands and decorate a holiday with them, dedicated to the Day birds. For creativity, it is better to use floss or iris. On the wrong side of the cardboard we draw a swan and draw waves. We divide the drawing into details, drawing figures of different sizes, and embroider using the isothread technique.


Woolen threads make a very charming feathered creature. You can easily create it with your own hands according to a simple and understandable scheme.


And according to this scheme, by introducing children to creativity, you can make a bird of happiness from a beautiful bright fabric.

Even small children can create such a colorful bird from circles of colored paper.

You can even make a charming bird from a strip of colored paper and a clothespin.

A bird you made yourself for Bird Day can be placed in a nest made from paper plates.

Simple clothespins in the hands of a craftswoman can turn into an extraordinary fairy-tale bird.

And finally, ideas for bird crafts made from natural and improvised materials: cedar or pine cones, painted feathers, cardboard and plasticine.


Good afternoon, today we have prepared for you a selection of crafts in the form of paper birds. We have collected all the ways to make a bird that are suitable for kindergarten and school. That is educators and teachers primary classes They can take any idea and it will be within the power of children’s hands. Here you will find birds made of colored paper and cardboard birds in different techniques. We also have a special article for those who are interested in crafts from paper origami modules
Let's see what bird crafts you can now make with your children.
Simple birds made of cardboard
For children.
Here is the simplest DIY spring craft in the form of birds. Here silhouettes of birds are cut out of cardboard and wings are cut out separately from colored paper. The wings are glued to cardboard. A hole is cut out on the back of the bird with a hole punch and we hang the bird on a branch with a string.

You can glue the silhouette of a bird from several layers of colored paper (or a colored napkin) and then the tail can be fluffed up - separate these layers, as in the photo below).

You can make an accordion fan out of a napkin. Make slits in the silhouette of the bird and insert a fan like the wings and tail of our paper bird. A simple craft for children.

Here is a stencil template with beautiful silhouettes of birds for such children's crafts made from cardboard or paper with their own hands.

Birds are two-sided
From cardboard with your own hands.
The essence of this craft is that a round piece of cardboard is bent in half. And we get a semicircular double-sided blank for the bird. Further inside - along the fold line of the workpiece - we glue a strip of paper (also bent in half lengthwise) - on one side this strip is cut into feathers (this is the tail), on the other side the strip is cut obliquely (this is the beak). Next we glue the wings and eyes, the craft is ready. If desired, you can glue on a semicircular part of the breast. A beautiful and simple DIY bird.

We can improve this craft and add a variety of elements to it. For example, make the wings not from a flat part, but in the form of a fan inserted into a slot on the back of the bird. And decorate the tail part in the form of painted chicken feathers. Feathers are painted in colored water (food coloring or gouache).

Using this technique you can make any bird with your own hands. Depending on the color of the breast and plumage, it may look like a sparrow, bullfinch, or titmouse.
Here's an interesting one master class on titmouse made of paper and cardboard. We bend the cardboard round in half. On the fold line we place a rectangular long strip of paper on the glue so that so that its tail part sticks out. After gluing, we lift this tail part of the black strip up - we turn the bend outward. Next, we glue round pieces of black paper on both sides (this will be the head), and glue the wings on the sides of the bird. And what remained was the beak, eyes and white cheeks of the plumage.

Here's another thing - in the photo below we see birds. They are made using exactly the same technique. Only here it’s not just a circle in half – but changes have been added to the shape of the circle. Below I specially drew you a drawing of this bird - so that you can see for yourself how such changes were created.

Firstly, we slightly changed the shape of the circle - we made it more oval (since part of the circle will go on the back of the bird). Secondly, appendage details were added to the circle - in the tail, in the beak, and where the legs are. We cut it out of cardboard and use colored paper to cover the beak and paws of the bird. And bend along the fold lines. There is a secret how to bend cardboard in half with a perfectly straight line without creases or wrinkles - place a ruler on the intended fold line - from the tip of the beak to the edge of the bird's tail - and, pressing the ruler firmly, bend the cardboard upward. The line turns out straight and smooth like in a factory.

Here's another craft - figured bird made of cardboard or thick paper. Here the bird is also made from a ROUND PIECE of cardboard, which was folded in half into a half-disc in the same way - but then worked with scissors to give the cardboard half-disc the shape of a bird.
Let me draw too diagram for assembling such a bird from paper. That's a really good idea. Don't be too lazy to tinker with the graphics. So that you can quickly make these birds with your own hands in classes with children.

Using the same principle of SLOTS and inserting new parts into the slots, you can make a wide variety of birds.
For example, such swifts or swallows (see diagram below).


You can hang your paper birds on a spring tree branch. Or make a mobile pendant to decorate a child's room. Dilute the birds with flowers, leaves, clouds.

Or you can place our homemade paper bird inside a new craft - a cage made with your own hands.
To create a cage, we need one wide strip of paper (this is the bottom part of the cage). We twist it into a ring and attach it with glue or a stapler.
And we also need 4 narrow strips (these will be the rods). We make a hole in the center of each narrow strip with a hole punch. We thread a rope into it and tie it so that the twigs stick to each other in the central part. Leave the end of the rope dangling (we will tie the bird to it later).
We glue the ends of the narrow strips in a circle to the lower wide ring-base of the cage.

BIG bird crafts
from corrugated cardboard.
Here's an idea for a craft where birds are cut out of ordinary gray corrugated cardboard packaging left over from boxes. We cut out bird silhouettes, round heads, tail petals, oval wings and long strips of legs. We fasten all the parts with a stapler or glue. And after that, we take either gouache paints or colored paper - and decorate or paste over the bird with bright details.
The good thing about this bird craft is that each child comes up with their own bird design. And it turns out that with his own hands he creates a new, author’s bird, reflecting his idea of beauty.

You can cut out a bird with open wings from cardboard, and cut many, many feathers from colored paper, and methodically cover the wings with feathers, starting from the bottom row and gradually rising to the top rows. Bird breast cover with wavy strips of colored paper. The tail part is made of long narrow feathers.
In kindergarten, such a craft can be a collective one, when the whole group of children cuts out feathers in one lesson, and in the second lesson they cover the bird with them. You can make a long-lasting DIY craft.

Of course, you may not have a large cardboard box, then your bird craft can be simpler and smaller. For example, like the one in the photo below. And by the way, you can make a nest for it. Make several of these birds - one per child - and let them paint them during drawing lessons. Carton boxes There is always plenty in the kitchen of the kindergarten (they bring food to the children) - go down and ask the cooks, they can supply you with such material at least every day.

Paper birds
using the VEER technique.
As we said above, a paper fan looks like the wings of birds. Therefore, we can use it in various bird crafts. For example, beautiful duckling– the beak for it can be made two-bladed so that it opens. You can make a whole duck family with your own hands with these wing fans.

A long narrow strip folded into an accordion can become a long neck ostrich, and his own feet.

If we take several sheets of colored paper, fold them like accordions and glue them side by side, we will get a large colored fan, which can become a fluffy tail for a turkey or peacock made of cardboard.

But it can be done more economically. This one is perfect for kindergarten peacock bird craft. When a peacock's tail is made from ONE sheet of paper. The accordion folds - and then bends in half - into a semicircular arch. The tail of a cardboard bird is inserted between the halves of this arch fan. This is the fastest way to make a peacock bird. You don’t have to draw the spots, but cut them out of colored paper - it will be more elegant.

Using a similar principle of a “fan bent along the floors,” the wing of the bullfinch bird is made in the children’s craft below. In the photo we see that a triangular piece of paper is folded into an accordion. Then this accordion is bent in half and its halves of blades come together (like the peacock above) - and we get an oval pointed wing. An excellent bird craft for kindergarten, easy and quick to do with your own hands, even for small children.

And if you take a long strip for a fan, then an accordion from a long strip can be folded into a circle. And this circle can become a fluffy wing of a paper dove. Or this round fan will become the body of a bird.

Paper birds
in loop technique.
And here are children's bird crafts, where the plumage is made using the paper loop technique. An ordinary strip of paper is folded edge to edge with glue - we get a paper loop. Such paper loops can become the feathering of a peacock's tail.

You can even make entire birds out of paper loops. Or loops can become an element of flat swan appliqué.

Below, you can take a good look at what parts such a paper bird consists of.

DIY birds
from paper rolls.
Wide strips of paper can be rolled up. Make two rolls like this - one for the head, the other for the body of the bird. The rolls can be left hollow, or they can be filled, for example, with rolls of smaller diameter (as in the right photo).
Below we see several handmade designs of such paper birds.

The body of the bird can be made not in the shape of a round roll, but in the shape of a paper loop. And then a long tail extension can be glued to such a body. You can glue layers of paper curls onto the tail as in the photo below.

You can attach wings to the side. The wing consists of one whole strip, it is glued inside the roll and its two ends stick out from different sides - you get two separate wings.

You can make a whole family of birds out of paper with your own hands in a nest, also made from paper strips.

A strip of paper folded into a wide ring can become a source for new bird crafts. This is such a beautiful white paper swan. But what a bright turkey.

Craft birds
from paper plates.
Ordinary disposable paper plates can also be a source of inspiration for bird-themed crafts. A round plate can become a nest-basket for a family of chicks.

The plate can become the curve of a swan's neck, or the round, lush tail of a peacock.

Paper birds
from toilet bushings.
Rolls (sleeves) from toilet paper can be a source of inspiration when creating paper birds. Children love such crafts - turning an unnecessary object into a beautiful thing is interesting.
You can simply paint the roll with paint. You can paste it over with a sheet of colored paper. And add accessories: feathers, beak, etc.

Or you can cut a cardboard sleeve from the top on both sides - and insert the silhouette of an owl into this cut, and then the sleeve will become its tummy.

The sleeve can be turned the other way - placed horizontally. And then your imagination will go in a different direction and you will see new ideas for birds. Here is a chicken made of paper, here is a cheerful parrot.

Volumetric cardboard crafts
DIY birds.
If a sheet of cardboard is rolled into a tube and secured with a stapler, then we will get a blank - the body of the future bird. Feathers, beak and eyes make this template a beautiful bird. And here your imagination is free to do what it wants.

The cardboard can be rolled not in the shape of a tube - but in the shape of a cone, also fastened with a stapler. Based on the cone, you can also come up with your own bird crafts.

We also have other articles, with interesting crafts on bird themes.
These are the ideas for paper birds. Now you can not only take a ready-made craft from this article, but also, based on any technique described here, CREATE your own bird. After all, copying is boring, but creating something new with your own hands is very interesting.
Good luck with your bird crafts. Best wishes to them and you.
Olga Klishevskaya, especially for the site
If did you like this article
And you want to thank our free author for this painstaking work,
then you can send any amount convenient for you
For many years now, bird crafts have been particularly popular among home-creativity enthusiasts. This is explained by their versatility, because feathered creatures will look equally harmonious both on the shelf of the nightstand and on any of the home’s green spaces. Unfortunately, there are people who do not know how to make a bird with their own hands, and our task is to help them figure it out.
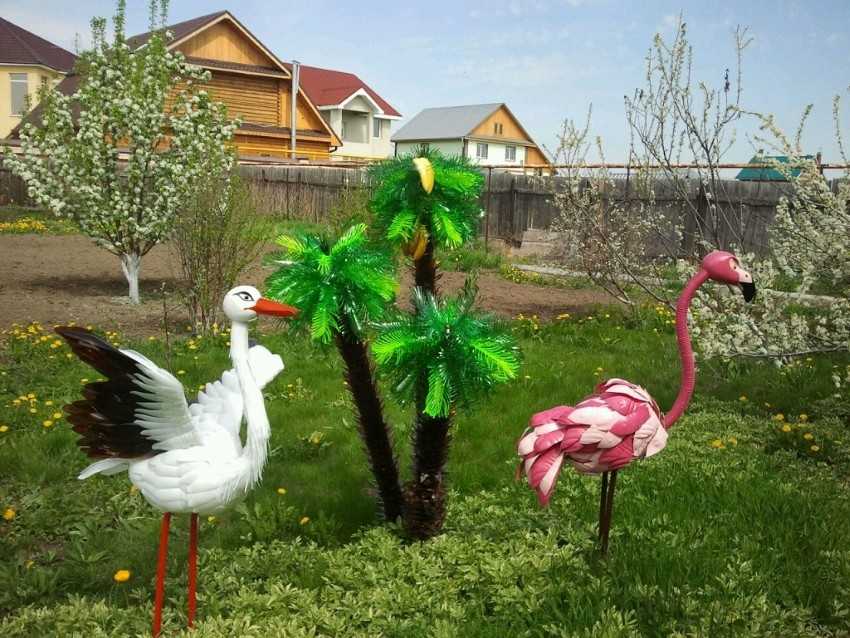
Peacock from bottles
To create a peacock from bottles, you will need the following elements:
- multi-colored plastic bottles;
- Styrofoam;
- a piece of log that will be used as a stand;
- metal twig;
- foil;
- thin multi-colored plastic;
- glue gun

The body and head of the peacock are cut out of foam plastic; small holes need to be made in the eye area. Using a metal rod, you need to attach the body and head of the peacock to a wooden block.

Bird feathers are created from colorful plastic bottles. In total, three types of feathers will be required: long ones will be attached to the tail, short ones will be attached to the neck, medium ones will be used for the body of the bird.


In order to make feathers, you will need to cut off the neck and bottom of the bottle, and then cut it lengthwise into three parts. One end of each strip is rounded with scissors, after which the edges of the large strip are cut into thin strips, the result should be something similar to a bird's feather.

The rounded part of the feathers that will be used for the tail should be decorated with two or three ovals of different colors made of foil and plastic. They are attached using a stapler.

A beak is cut out of a red plastic bottle and attached to the place intended for it. Then, using a special gun, you need to start gluing feathers onto the bird's body. You need to start from the tail and end with the neck; the feathers of the bird are attached slightly overlapping, this can be seen in the photo.

You need to cut out a crest of any shape from plastic of different colors and glue it to the bird’s head. Taking advantage acrylic paints you need to draw the bird's eyes. If desired, the eyes can be supplemented with eyelashes, which will need to be pre-cut from a colorless plastic bottle.

You should start making the peacock's tail; for this, an abrasive mesh is used. You need to make holes in the base of the feathers, and then use thin wire to attach them to the mesh.

To make the tail, you need to start from the end, laying feathers in rows one on top of the other, actions are performed until the tail is completely ready. The tail is attached to the body. Such a bird will be an ideal decoration for any garden plot.


Chickens made from cotton pads
The birds presented will be wonderful decoration any preschool institution. To create chickens you will need the following elements:
- sponges;
- wooden skewers;
- colored paper;
- thin multi-colored ribbons;
- plastic eyes;
- scissors;
- glue.

Having prepared all these things, you can start making the birds:
In order to make one bird, you need to prepare five sponges. One of the disks is cut in half, and the rest are left whole.

Using glue, you need to fix four cotton pads on a wooden skewer, this is done in such a way that the skewer is inside. The first pair of sponges acts as the bird's head, and the second pair acts as the body.

Halves of cotton pads are attached to the already created body on both sides; they act as wings.

You need to attach the beak and eyes to the bird's head using glue. The beak is made of colored paper. The chicken's neck is decorated with a thin ribbon.

Above are only the simplest options for making birds. If you already have experience creating similar crafts, then you should pay attention birds of paradise made of polymer clay, owls made of colored paper and a firebird made of salt dough.

When using food paint in the latter case, the resulting bird can even be eaten, which will further lift the mood of a creative person.

DIY bird photos


Birds have always attracted the attention of others and many are attracted by their ability to fly. Their diversity is simply amazing. For example, swans or storks fascinate with their size and beauty, woodpeckers and jays – with their unusualness appearance, owl and crow - severity, and magpies - restlessness. Each has its own character and character! And there are so many birds that cannot be seen, but their sonorous singing can be heard over long distances.
It is not surprising that many needlewomen love to depict birds using different techniques. Today we will look at several options for making feathered friends from different materials.
From sand.
On the grass of the lawn you can make a beautiful composition of colored sand. A white dove, with delicate daisies along the contour, looks great on a blue heart.
From iris leaves.
This magnificent weaving of green iris leaves looks unusual. And the long tail gives the bird additional charm.

Made from polyurethane foam.
Polyurethane foam is applied on a hardboard base cut in the shape of a stork. It is easily painted with enamel and retains its beautiful appearance for a long time.

From plastic bottles.
Plastic containers are a fertile material for crafts. You can cut it into any shape and paint it in all sorts of shades. You can get such a bright cockerel from just a few bottles.

From feathers.
If you carefully collect the feathers, then you can make a magnificent craft that looks simply natural. The frame for the birds is made of plaster, which is covered with real feathers.

From paper.
Regular office white paper can be useful for. You just need to trace the child’s palm, cut out many of these blanks and glue them onto a three-dimensional base. Another dove of peace looks magnificent and majestic.

From disposable devices.
And this floating dove is made from disposable tableware. The frame is formed from a metal mesh onto which feathers from disposable spoons and forks are attached. Original and unusual.

From a milk bottle.
For this little bird you need to take white bottles in which dairy products are sold. Cut out all parts of the body and fasten them with universal glue. You don't even need to paint anything.

From fabric.
The splendor and texture of the craft can be achieved using padding polyester and transparent fabric. Such a bird can be easily sewn by a craftswoman who knows how to work with a sewing machine.

From dry grass.
Some people prepare hay for cows and horses, but for needlewomen it is fertile material for creativity. Such a bird, woven from grass and ears of corn, looks not only unusual, but also somehow magical.

Made from polystyrene foam.
Another beneficial material that is easy to cut and holds its shape well. Birds made of foam plastic look realistic and you don’t need to spend additional money to make them.


From flowers.
The main thing in this craft is the wire frame. And then you just fill it with flowers and you get this mother hen with chicks made from threads.

From hay.
This large crane is made from dry grass and looks absolutely amazing. You need to tie a haystack with thread and give it the shape of a bird. It is not often that you see crafts using this technique.

These beautiful birds can appear in your yard if you put a little effort into making them.
Marina Suzdaleva
Spring is coming into its own. return home from warm countries, build nests and prepare for the appearance of chicks. Such changes in nature could not go unnoticed by enthusiastic mothers and their babies. Participants of "" prepared 7 detailed master classes on making DIY bird crafts. Chickens using different techniques, birds made of paper and pine cones, a dove of peace and a bird's nest will make your spring creative activities with children even more interesting and varied.
Dove of peace with postcard
My daughter has turned into a little why. She is almost 3 years old and is interested in everything she sees. In anticipation, the main street of our small town was occupied. When asked what it is and why, I decided to tell about the great heroes who saved the world. Including about her great-grandfathers, one of whom reached .
At home we decided to make a card for my great-grandfather in the form of a dove of peace carrying a card.

We needed:
- Landscape sheet A4 format;
- Scissors;
- Glue;
- Colored paper (velvet);
- Paints;
- Satin ribbon;
- Felt pen.
The dove is made in origami style. In this video you will find detailed master Class:
When the dove is ready, cut out a small rectangle and bend it in half.
We make a slit on the card and under the pigeon's tail.
Insert the ribbon into the slots and tie the ends.
We hide the bundle under the pigeon's tail.

Decorating the card. We pasted a St. George's ribbon from orange and black velvet paper. The inside of the card was decorated using paints and a cotton swab. True, I planned to draw fireworks, but Nastya wanted flowers.
The result was an original handmade gift. I hope great-grandfather likes it.
Victoria Pechieva with babies Nastenka 2 years old. 8 months and Matveyka, 11 months old, Belorechensk
In the first week of May, we accidentally ended up in Nakhabino, Moscow region, so nature itself helped us in creating the craft!
We had white paper, colored pencils, markers and a glue stick. Collected at the site. We cut out a tail, wings and a muzzle from paper so that it could be folded in half. Colored with pencils and markers. The parts were glued to the bump.

Now the birds decorate the yard, waiting for us.
Olga Antonenko and Olesya 1 year 7 months, Yaroslavl.
Movable bird
We got a movable bird craft. Her wings move if you pull the string from below.
For the craft we used: cardboard, colored paper, scissors, awl, glue stick, brads, thread.

Manufacturing process: the body of a bird and two separate wings were drawn on cardboard. They cut it out, and made holes in the place where the wings and body were joined using an awl. Then they began to decorate the body and wings of the bird with “feathers” made of colored paper. Once completed, the eyes and beak were glued on. After this, we connected the wings together with a thread (folded several times to make it thicker). We made a loop (ring) of thread between the wings. The wings were attached to the body using brads. The bird is ready.

Let's pull the thread from below and the bird's wings will rise up.
Olga Salimova and daughter Alena (2 years and 4 months), Yekaterinburg.
Nest with a bird
For the craft we will need:
Tired of the mess in your nursery? Tired of endlessly collecting toys for your child?
- nest-shaped pasta;
- brown gouache and thick brush;
- plasticine of several colors;
- a Kinder Surprise box (can be replaced with a large piece of plasticine);
- sequins (beads).
We start by preparing the nest: we paint the pasta nests with brown paint.

While the nest is drying, we make a bird: we attach eyes, a beak, a tail and wings from plasticine to a Kinder Surprise box.
Roll another piece of plasticine into an egg and decorate it with sequins (and/or beads). You can attach decorations with your fingers or roll the egg over the decorations scattered on the table.
At the last stage, we assemble the craft: we place the egg and the bird in the nest using plasticine.
If the child still has the strength and desire, then you can make a second bird or several eggs.
Kudryashova Nadezhda and Misha 1 year. 5 months, St. Petersburg.
I didn’t have a question about what kind of bird to make - it means it’s a chicken. To make the bird, I discovered a new waste material - . This is ready-made papier-mâché - soak and mold. I took note of this, and for today’s craft I decided to take the cells themselves.

I cut out the parts necessary for the idea from the trays, and removed the rest. For the chicken, I took two recesses and connected them with masking tape so that it opened like a box.
Now all the blanks need to be painted, which my little son did with pleasure. While painting, they got a little wet, but we left them to dry and then continued to create.

I pre-cut out yellow wings and a beak from cardboard, and paws from orange. We glued all the blanks to the chicken, painted the eyes with gouache and our chicken came to life! For the cockerel and hen, I only cut out beaks and combs. I glued them with PVA glue. I also painted the eyes with gouache.

Here we have such a funny chicken family. You can use them as candy bowls, and the chicken as a surprise box.
Kosteva Oksana and son Sashenka 1 year. 11 months, Dolgoprudny.
First, we cut out two circles with a diameter of 8 cm from cardboard, and inside the large circles we cut out smaller circles with a diameter of 4 cm (we no longer need these small circles of 4 cm here).
 We fold two 8 cm circles together and wrap them with yellow knitting threads, the more you wrap, the more magnificent the pompom will be. Then we cut the threads along the outer circle with small scissors and at the same time put the thread between the circles of cardboard, pull this thread together and tie it. Remove the cardboard circles. The pompom is ready, it will be the body of the chicken.
We will make the chicken's head in the same way, only with a smaller pompom. To do this, cut out two circles from cardboard with a diameter of 6 cm, and inside them circles with a diameter of 3 cm, then proceed in the same way.
We tie two pompoms together. We glue eyes and a beak on the head from red leatherette or hard felt, or you can knit it from red threads. Glue the paws on the body. I made it from twigs, or you can also use hard brown felt.
This funny chicken is ready!
Postcard "Chicken"
For a card in the shape of a chicken that hatched from an egg, my daughter and I made handprints with yellow paint on a white sheet. It was possible, of course, to trace the palms with a pencil on yellow paper, but this is not at all interesting to my daughter.

While our palms were drying, we cut out an oval from yellow cardboard for the figure of a chicken, a semicircle for the shell from white cardboard, and a beak from red cardboard.
We have prepared the basis - our postcard, where we will collect the chicken. The palms were cut out along the outline and pasted onto the postcard, then a yellow oval was glued on. On the yellow oval - the shell, eyes and beak.
We sign the postcard as a keepsake and you can give it away!
Gavrilova Faina and daughter Taisiya, 1 year. 2 months, Arkhangelsk.