How to make accessories from polymer clay. Jewelry made from polymer clay: for true connoisseurs of beauty. How to make and using what technology
Every day more and more fashionistas give their preference to homemade jewelry. After all, a situation very often occurs when there is nothing suitable for an outfit in the store, but the image of the desired product has already been drawn in your head. What to do? Stock up on modeling materials and start bringing your ideas to life. Who knows, maybe this hobby will become a source additional income. In addition, handmade jewelry is an excellent gift for friends and loved ones.

First, let's talk about the basic rules and secrets of working with polymer clay. After all, the quality of the finished work depends on their compliance, and the process will become much more enjoyable.

1. Clean work surface. The table at which you work must be absolutely clean. Otherwise, any speck or speck of dust will ruin all your work. Or you will just have to cut off the whole layer when sanding. Therefore, it is very important to put things in order before starting work.
2. If you are working with different colors of clay, work on the white one first. If you take on bright shades, then be prepared for the fact that the material remaining on your hands may in the future spoil the whiteness of the light-colored parts when kneading. More good advice- Wipe your hands with damp, lint-free wipes every time you change the color of the clay you are using.

3. If the clay sticks too much to your hands, squeeze it between regular landscape sheets. The paper will absorb excess plasticizer and your work will become easier.

4. To make the hole in the beads even and neat, it should be made on both sides, and not right through.

5. To bake beads, you can make a special “dryer”. Take a piece of foil and make a ball out of it. Insert toothpicks into the resulting ball and carefully string beads onto them.

6. And the most important thing! Don't be afraid of experiments and everything new!

These simple rules are easy to follow. All that remains is to find suitable ideas and begin to implement them. We have put together several interesting master classes on making cute hairpins and other jewelry from polymer clay.

Remember that it is not at all necessary to follow from and to. You can always bring something of your own. What’s also very interesting: both a hairpin and a blank for a brooch can serve as the basis for your masterpiece. That is, a product molded according to a master class can be made in the form of absolutely any decoration.
Simple but very bright bracelet

A bracelet made using this technique is very fashionable, since the gradient has not left the covers of magazines and Instagram photos for many seasons now. Achieve smooth transition polymer clay colors are very easy. Then you can always use this technique when creating new masterpieces.
The basis of the bracelet is made up of bright beads and small medallions. This bracelet will appeal to both a young girl and a little princess. If desired, you can complement the bracelet with bright beads to match.
So, you will need:
- Polymer clay two different colors(you can do more if you wish);
- Stationery knife;
- Talcum powder (baby powder is fine);
- Coarse table salt;
- Toothpicks;
- Brushes and glue;
- Lace and metal rings.
1 Step. Take two colors of polymer clay that go well together. For example, an excellent combination of white with any other, and the gradient will be interesting, and the risk of error is minimal. By the way, as an experiment, try taking three colors; when you mix them, you will get an unusual transition from the first color, through the second to the third.
Cut two identical pieces (rectangular shapes) of clay of different colors. As a rule, clay bars sold in stores have special notches along which you can safely cut off the required amount. Cut the resulting rectangles diagonally, and then align the two triangles of each color with each other. You now have two two-color rectangles.
Step 2 Cut the rectangles into small equal pieces. There should be exactly as many beads as you planned to make. Depending on the ratio of the colors, the color of the beads will change. Each cut piece should be thoroughly mixed so that all the colors are well mixed.
3 Step. Dip each bead in salt and carefully roll it between your palms so that the grains of salt are imprinted into the clay. This needs to be done with each bead three times.
4 Step. Use a toothpick to make holes in each bead. Remember that it is better to do this from each side, and not all the way through.
5 Step. Now we are making small pendant pendants, which for your convenience should not be too many on the bracelet. Roll out a thin piece of the desired plastic. For greater beauty, you can add some texture to your future pendant by pressing the rolled piece onto corrugated paper, for example, or a special plastic blank, which can be bought at a specialty store. Then take the shape you like and stamp it onto the rolled out piece. This will be your pendant. The basis can be your favorite metal pendant, an unusual textured button, etc.
6 Step. When all the parts are ready, safely send them to the oven and keep them there for exactly as long as indicated on the clay packaging. Then take it out and let it cool. The beads also need to be rinsed with water so that all the salt is washed off from the surface. The result is unusual, rough beads.
7 Step. String the beads on a rubber thread (the main thing is that it is strong). And also attach the pendants to the bracelet using metal rings at the very end.
Such unusual beads can be assembled into various compositions and attached both to the base for earrings and for hairpins.
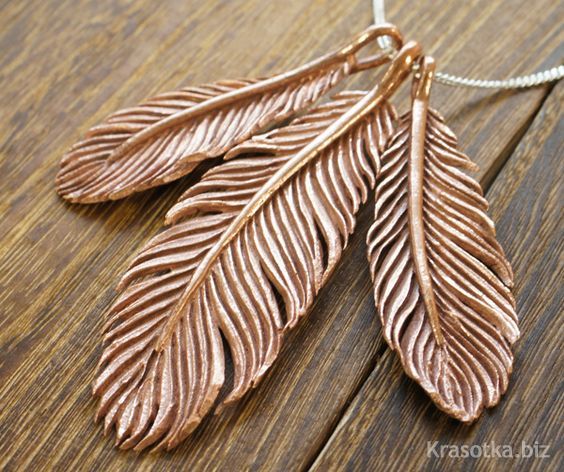
Real owl

This decoration in the form of a flying owl can be made in the form of a cute hairpin, an extraordinary brooch or a beautiful pendant.
To create it you will need:
- The clay is white and ivory;
- Acrylic paints are predominantly brown and gray shades;
- Stationery knife;
- Small beads (shiny, no more than 3 mm in diameter - these are the future eyes of the owl).
1 Step. Make a ball out of a small piece of beige clay and then turn it into a blunt-ended blob. This is the body of a bird. Depending on what size you want the product, choose the size of the ball. The sharp side of the droplet should be flatter. Where the head will be, you need to make a small indentation using a handy tool, for example, a pen cap or marker. Place a pre-prepared “cake” made of white plastic into this resulting cup.
Step 2 On the white cake of the bird's face, use the round edge of the pen to make two indentations for the eyes. You need to insert the beads into them at a slight angle. In place of the beak, draw two stripes with a needle or thin awl so that you get a triangle imitating the beak and two points (nostrils). Two small tiny pieces of white clay need to be rolled into sausages and made into eyelids, placing them around the beads. Use a needle to outline the eyes. You also need to use a needle to draw lines from the center of the face to the edges, imitating feathers. Just don't touch the beak.
3 Step. Wings. To make it you will need a standard rectangular piece (cut along the grooves) of beige plastic. We cut the rectangle diagonally and from the resulting triangles we sculpt two bases for the wings. Later we will attach feathers to them, so don’t worry about the perfect shape. It is important that the wings are reliable.
4 Step. Roll out a long sausage from beige clay and crumple it to form an elongated drop. Then cut thin pieces no more than 1 mm thick. Attach the feathers to the two wings at once to make them symmetrical. Large feathers at the bottom, then slightly smaller ones in the middle and very tiny ones at the top.
5 Step. The tail is also attached from feathers. Make the paws, attaching them just above the tail. Now you need to add texture to the feathers and body of the owl using a thin needle. Draw the feathers the way you want. The finished bird needs to be attached to a brooch pin or the base of a hairpin. Here as your heart desires.
6 Step. Pop your masterpiece in the oven and then paint it. You can use paints in natural shades to achieve the natural color of the owl or, conversely, a fancy color to make the bird unusual.
Creating such a decoration requires much more time, but the result will please you very much.


Material such as polymer clay began to be used recently, but many craftsmen have fallen in love with it. Jewelry made from this material looks great and is easy to create. Working with polymer clay is quite easy, it is flexible and easy to shape. the required form. Once it dries it becomes hard like plastic and looks great.
Each person can master several sculpting techniques and create masterpieces. You can make a huge variety of things from it - from luxurious jewelry to toys for children. The main thing is to show your imagination and try to make various products from polymer clay, after watching the master class.

Working with polymer clay
Many companies sell polymer material, so the price and appearance it varies. If you are a beginner and are not confident in your abilities, you should not immediately purchase expensive polymer clay. Buy basic colors and try to create simple jewelry from polymer clay, the master class will help you with this. As you work, you will understand how colors are mixed and what combinations can be obtained.

You can make amazing jewelry from polymer clay with your own hands. In order to make them, you need to use the following five techniques.

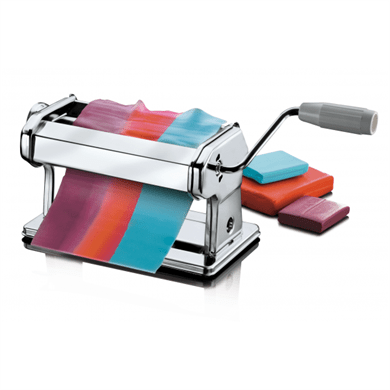
- Treatment
Polymer clay must first be processed and softened. Therefore, it must be warmed, kneaded with your hands, and then smoothed until it is thin enough to pass through a special machine. Folding and passing polymer clay through a machine helps prepare the material for later use.

If you don't have a machine, you can process the polymer clay by hand by folding it and straightening it several times. You can heat the clay with a hairdryer or heat lamp to loosen it and make it pliable.

- Forming the color
One of the most attractive features of polymer clay is the color. It comes in a huge number colors and can be mixed with an unlimited variety of colors. So mix colors to get the one you want. You can even imitate expensive materials if you learn how to mix colors correctly.

- Shaping
You can carve the clay, ruffle it, weave it, flatten it, fold it, texture it, stamp it, etc. Ceramic tiles and wax paper are ideal surfaces for working with polymer clay. One of the most creative methods of polymerizing clay is caning, which creates structures by rolling logs of different colors of clay and arranging them in a specific way.

- Baking
In order for the clay product to harden and your creation to be preserved, you must bake it in a special toaster for clay. This will be one of your most important polymer clay tools.

Bake the clay on parchment paper, cardboard, or ceramic tiles. Please note that curing the clay directly onto the metal will create shiny spots on it. First you need to preheat the oven to 12o degrees, and then bake the polymer clay pieces for 30-60 minutes between 121 and 129 degrees.

Note: Polymer clay may melt or release toxic fumes if the temperature exceeds 130 degrees. Make sure you have a good thermometer (don't rely on the oven setting and keep a close eye on it). Also, always work in a well-ventilated area.

- Finishing
Once your ceramic clay jewelry has been released and cooled, it can be finished to make it look even more attractive. You can sand it down with sandpaper or a sanding sponge and coat it with a thin layer of varnish or clear sealant to protect its surface or add shine. You can highlight certain areas as you wish.

In addition to polymer clay, you will need other tools. However, to begin with, you can make things from just polymer clay and use any available tools available in your home. You can use ordinary cutting knives, paper clips, toothpicks, rubber molds for cooking and anything with an interesting texture.

Try baking a piece of polymer clay and see how it behaves. If it has changed color or cracks have formed on it, then its quality is not very good. When heating in an oven, follow the instructions written on the box.

Wear medical gloves to avoid getting dirty. The surface you are sculpting on must also be clean.

We present to your attention crafts made from polymer clay; this master class will help you, especially if you are new to this. All of them can be made only by hand, using your oven, as well as using any everyday items that you use in your normal life.

Polymer clay necklace
A material such as polymer clay is perfect for making jewelry; this master class will help you make a necklace.
What you will need: polymer clay of any colors, waxed cotton cord, toothpick.
Start by warming the clay between your hands until it becomes soft and pliable. Take a small piece of clay, roll out the beads, and then make small balls with your palm. You can make them as big or small as you like.

Use a toothpick to make a hole in the center of each ball. If the clay you are using is soft, it is better to wear latex gloves. Place your beads on a baking sheet and bake according to the directions on the box.
Thread the beads onto the cotton cord. This is where you can get creative. You can place all the beads on one strand or make a bunch of necklaces and stack them. All this is at your discretion! Attach a magnetic clasp so they can be opened and closed.
Polymer clay bracelet
What you will need: polymer clay, razor blade. Mix the clay with your hands to soften it. Roll three long tubes using your palms. Place 3 sticks together and start braiding.
Weave a bracelet of the length you need, focusing on your wrist. You can cut off the rest with a razor. Connect the two ends together carefully so that you form a continuous circle.
Bake for 25 minutes at 245 degrees. You can make more than one bracelet, but several, it will look quite beautiful.

DIY earrings
Make these beautiful polymer clay earrings for yourself and your friends. They can be a wonderful gift for anyone.

Consumables: polymer clay, earrings, glue, acrylic paints.
Progress:
- Work the clay first until it feels nice and soft to the touch.
- Form a heart using the end of a needle or toothpick.
- Bake the hearts according to package directions.
- Once your figures have cooled, you can paint them with acrylic paint. After the earrings are dry, take glue and glue them to the earrings. It will look quite cute and will become one of your favorite decorations.


Decoration with a bow
What is necessary:
- polymer clay;
- cutter;
- spring rings;
- pliers;
- clasp;
- chain;
- oven;
- pencil;
- pin.
It's very simple. Follow these steps:
- It is best to work with clay on wax paper so that the surface does not get dirty. Wrinkle the material until it becomes soft and pliable. Shape a long stick into a log and divide into four. Take each one and smooth it out until it is flat.

- Pinch the sides as shown in the picture and then join them together. Clamp all the parts in this way and connect them together. Be careful not to ruin the folds!

- Then take some clay, roll it up and wrap it around the middle of the bow. Trim off the excess and smooth it out a bit. That's all - the beautiful bow is ready.
- Place a pencil inside the bow to give it a nice shape.

- Bake the clay according to package directions. Attach the jumping rings and necklace chains are done!

This is a summer or spring decoration, but it can decorate any outfit, regardless of the season.
The options are endless, you can make a ring if you attach it to a base or a pair of earrings. Attach them to your phone case to decorate it.

Headband with horns
It looks funny, and it’s fashionable now to wear a headband with horns.
To make such a headband, you first need to choose the color of your polymer clay. You will need at least one block of polymer clay, or more if you want to make large antlers.

Divide the block in half, remember it a little, and then sculpt two shapes into a cylinder. Pinch the top pieces and form them into a cone shape.

Take a wooden dowel (or pencil) and punch holes through them. Bake polymer clay according to package directions.

Cut a piece of ribbon that can be tied around the head. Thread the ribbon through the holes and make knots on both sides of the cone.

Tie the ribbon on your head so that the horns fit well on your head. Now you can go to any party to captivate others with your appearance.

Earrings “Friendly Monsters”
What you will need: Various colors of polymer clay, toothpick, sharp blade, ring, brush (optional), pink chalk pastel (optional).
Instructions:
- Cover the earring mold with clay as shown.
- To form the eye, place a small circle in the middle of the monster's forehead. Add a smaller portion of green and then a smaller portion of black on top of the green.
- Add cones if necessary.
- Using a sharp blade, cut a slit to form a mouth.
- Use a toothpick to smooth out your mouth.
- Take a piece pink clay and form a small tongue.
- Make a depression in the middle of the tongue with a toothpick.
- Use a brush to apply some of the chalk pastel to the monsters' cheeks (optional).
- Bake according to package instructions.

All is ready! Make as many little friends as you like and have fun! Cute monsters are fun and easy to make.
Polymer clay ring
You can also make a ring from polymer clay. For this you can already take ready-made form or shape it with your hands.
If you are making a solid ring, it is better to use a special silicone mold - a mold. You will need to bake it in a mold and then sand and varnish it.

If there is no mold, then you will need to purchase a base, which is usually available in stores that sell accessories for making jewelry. They already have tools for attaching plastic, so you will have to form it yourself from polymer clay. You choose any design according to your preference.
Don't be afraid to mix colors and get interesting combinations. Create and receive wonderful jewelry worthy of admiration.


The article will provide information on how to make jewelry from polymer clay.
You don’t have to buy beautiful, bright, juicy jewelry. You can make them yourself if you master the technique of working with polymer clay.
- Polymer clay is a material whose consistency resembles plasticine. But because heat treatment it hardens and turns into plastic
- Polymer clay comes in many colors, shades and textures. Colors can be mixed, glitter and paint can be added to them
- This material is non-toxic and even a child can work with it
- You can make almost any type of jewelry from polymer clay: earrings, pendants, bracelets, watch bracelets and much more.
- Fantasy is the main condition when working with this material. Flowers, fruits, animals, abstract elements - far from full list what can be realized with polymer clay
- First, let's choose a polymer clay manufacturer. It can be expensive or cheap, with a wide range of colors, and can be sold as a set or individual bars
- Manufacturers such as Fimo, Kato, Pardo are quite expensive. There are also domestic, cheaper analogues
- Do not immediately buy packaging of different colors. Buy 1 block and try it at home: how is its texture, mixability with other plastics and paints, bake the resulting material. Good clay should not crack or change color excessively.
- For sculpting, you will need standard colors, which can later be mixed. You also need tools and a small electric oven
- Usually on the packaging of polymer clay it is written how long it needs to be baked until ready and at what temperature
- Please note that you need to work with polymer clay carefully. To maintain color purity, work with medical gloves and on a clean surface.
- If you decide to make jewelry from plastic, then in addition to clay you will need accessories: earring earrings, fastening elements, decorative details and much more.

Flowers made of polymer clay: master class
- The most common and any flower is roses. At first glance it seems very difficult to do, but it’s not.
- Pay attention to the structure of this flower - there are many petals held together, which are larger at the outer base and smaller at the inner one
- Let's prepare the materials: we need plastic in the color of the future rose (red, pink, yellow or white), a modeling stack with a ball at the end
- Let's make preparations for future petals: pinch off a piece of clay, knead it and roll it into a ball. Large balls are for outer petals, smaller ones are for inner petals.
- Now we're missing a bud made from a thin layer of plastic
- We make each petal from a ball, using a stack we give it a curved shape (this can be done with your hands)
- We attach the petals to the bud one by one, adjusting the splendor of our flower
- The finished rose can be used for decoration. To do this, you need to cut the base and make a hole for fastening.
- Carefully place the flowers in the oven and bake until done. Then they can be opened with varnish if desired.

Now let's learn how to turn our roses into earrings. There are two ways. One of which is simpler, the second is more difficult, but the result is simply gorgeous
Simple earrings made of polymer clay (rose blanks)
- Remove the rose blanks from the oven. They already have a hole for mounting
- To turn them into earrings we will need: a pin with a double-sided eye, rings for fastening, earrings
- We string the rose onto a pin and fasten it so that there is an eyelet at the top and bottom for attaching it to the part.
- Attach a hook to the top using a ring
- On the lower part - a bead in the color of a rose (or as your imagination dictates). The bead will make the earrings a little heavier and they will hang down without twisting.

Earrings in the shape of a bouquet of roses
- We need rose blanks again. But now they are raw and very small in size. They can come in a variety of contrasting colors, such as red and white
- We make a ball base. We attach roses to it using a toothpick. Make sure that they are in good contact with the base ball and do not fall off after baking
- Gaps can be filled with small green plastic leaves
- Carefully make a hole in the ball where the pin will be attached
- We bake our flower bouquet. The baking time will be slightly longer due to the higher density of the clay.
- After cooling, we attach our ball to the wire. Spectacular earrings are ready!

Polymer clay bracelet
- First, let's figure out what elements the bracelet consists of: the base (chain, rope, wire or fishing line), clasp and decorative elements
- We purchase the base and clasp from a hardware store, but we make the decorative elements ourselves
- Let's make a bright berry bracelet from raspberries and blackberries. It will complement any summer look and looks very original.
- To make raspberries, we need pink clay and green clay for the leaves. Making berries is very simple. The base is a dense plastic ball. Small balls of a similar color are attached to it. The balls are smaller at the bottom and larger at the top. We attach leaves to the base of the berry and attach a wire. Bake the berries according to the instructions for working with clay
- We make blackberries in the same way, but from black or dark purple plastic
- To make our bracelet brighter, in addition to the berries, we will attach beads to the base
- For the base of such a bracelet, it is better to use a chain with a decorative clasp

Polymer clay ring
- A polymer clay ring can be made in two ways: solid plastic or based on
- A solid ring is made using a mold. A mold is a heat-resistant silicone mold that is filled with plastic and baked with it. The hard plastic is then simply removed from the mold, sanded and varnished
- For the second version of the ring you need a base. There are many such bases in hardware stores, where there is a niche for attaching plastic
- You can imagine endless ways to decorate a ring. There are a lot of options, but the simplest and most versatile option is flowers.
- A ring paired with earrings or a necklace looks especially original.


Polymer clay beads
- To learn how to make beads from polymer clay, first learn how to make smooth, neat beads
- Even ordinary beads are not so easy to make so that they are the same size and correct shape. Practice making even balls of the same size and making holes in them for fastenings
- Once the basics are mastered, you can begin making decorative beads
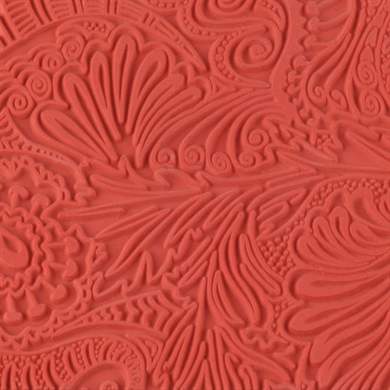
Polymer clay beads with metal effect
- Such beads are difficult to distinguish from metal ones. But thanks to your imagination they will be unique
- We will need gray or metallic plastic, an embossing element (for example, a button) and tools
- First, roll out a smooth ball of plastic
- Now we roll out the plastic into a dense layer and use a button to emboss it. To prevent the button from sticking to the polymer clay, moisten it with water.
- Then carefully cut out the embossed elements with a blade and attach them to the ball
- We decorate the joint with a decorative plastic cord
- Make a hole in the bead for fastening
- These beads can be used for beads, bracelets, earrings and much more.

- Making a massive summer necklace from polymer clay is more difficult and requires some skill.
- For it we need: plastic, decorative beads, chain and fastening
- First, draw a sketch and decide where which elements will be placed
- Then we will prepare individual flowers, leaves and beads
- For the base we need a piece of thinly rolled plastic of the desired shape. Choose only high-quality plastic for such work, otherwise a poor base simply will not withstand the abundance of elements and will break
- After preparation, we attach all the elements to the base according to the sketch. Don't forget to make holes for attaching to the chain

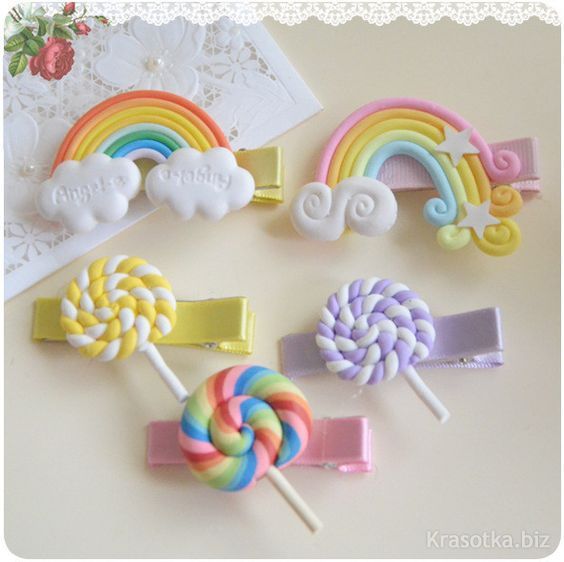
Hair decorations made of polymer clay
- Polymer clay can be used to decorate hair clips, headbands and garters.
- You can attach the elements to the base using special glue or invisible fishing line
- For any products consisting of several elements, you need to make a sketch, because imagination does not always correspond to the result
Delicate flowers for decorating hairpins and headbands
- We will need: polymer clay and stacks (you can use a toothpick)
- Knead a piece of clay of the desired color and roll it into an oval
- We make cuts, the same number as the number of petals planned
- Now we make each petal, bending it using a stack
- We give the flower the desired shape, trim off the excess plastic
- The middle can be decorated with yellow plastic stamens or simply filled with paint
- These flowers can be used for all types of decorations. They are very reminiscent of apple or apricot flowers

Clay headbands
- For clay rims, it is better to choose a thin base, plastic or metal.
- When securing the elements, make sure that they do not cling to the hair.
- Here are examples of headbands for inspiration:


Hairpins made of polymer clay
- The basis of the hairpin can be an old plastic hairpin, a regular automatic hairpin or bobby pins
- To ensure that the hairpin lasts a long time, do not choose elements that are too massive for small bases.
Jewelry made from polymer clay is very popular today. Thanks to a variety of techniques for working with this material, the products are unusual. Among them there are those that imitate well-known materials (precious stones, metals). And there are fruits and vegetables made from clay that are very similar to real ones. But in any case, these decorations turn out beautiful and bright, attract attention, and complement the image.
Kinds
Decoration is a harmonious addition to something in order to create a complete image or an aesthetically beautiful appearance.
As an object, decoration can be used to convey information, attract attention, disguise some defects, express protest or assert oneself.
Depending on the fashion trends decorations are divided into:
- jewelry;
- costume jewelry;
- accessories;
- makeup;
- tattoos and piercings;
- nail art;
- decorating fabric with embroidery.
Jewelry made from polymer clay in this classification belongs to costume jewelry. This material appeared recently and has firmly taken its place in the workshops of folk craftsmen. It is much easier to make original things from it than from ordinary clay.
To work with this clay, it is enough to master basic knowledge. Then, as you work on each item, your modeling skills will improve.
Polymer clay jewelry
Each of these decorations is a product self made made using special technology. It is unique and inimitable. The material is so malleable that almost anything can be made from it: fruits, figures, flowers in any style and in any color. By working with this clay, you can imitate precious stones. A varied color palette will allow you to achieve unusual shades.
Jewelry made from polymer clay turns out to be very bright and catchy, thanks to the rich colors of the source material. The products are very durable and at the same time light, which is explained by the structure of the clay itself. In addition, it combines well with other materials, which allows you to create real masterpieces. 
To understand what such products are, let’s look step by step at how to make jewelry from polymer clay.
Execution technology
There are many techniques or ways of sculpting such jewelry. Let's look at some of them.
Millefiori, or "sausage" technique. The name translates from Italian as “thousand flowers”. This method has been known since the fourteenth century. A pattern is made in the bar along its entire length in different colors, then the bar is stretched, and the pattern is preserved on each cut. Most often, vegetables, fruits, flowers, buttons, and flat beads are made using this technique. 
Stroppel cane technique. Its essence is that the remnants of previous sausage blocks are tightly laid out on a black layer. Then it is cut in half, the halves are connected and aligned with a rolling pin. Again cut, folded and leveled. The resulting block is cut into thin, 1.5-2 mm, plates, from which the craft is then made.
"Brick" technique". Two multi-colored sausages are made. Then they are cut into small pieces, which are laid out on a black layer in a checkerboard pattern. Then the layer is divided into two parts, which are folded together. Another black layer goes on top. Everything is trimmed with a rolling pin and cut into thin layers, from which parts of future products are then made.
This is only part of the ways to make jewelry from polymer clay. Each of them allows you to get a very original product.
If you want to learn how to make jewelry from polymer clay, then these tips will help you master this type of needlework:
- We need to buy everything necessary tools and materials. This will help you do the job correctly and avoid damage to the products.
- When starting to work with polymer clay, it is better to purchase only a few colors. As you master this needlework, the color range can be expanded.
- You need to wear gloves when working, as fingerprints remain on the clay. They will then need to be hidden under a layer of varnish, and this is difficult for an inexperienced craftsman to do.
- Before you start sculpting, you need to gain knowledge. Studying literature and lessons from experienced masters will help with this.

By following these tips, you can quickly master this technique and learn how to sculpt beautiful things.
Master Class
Now let's take a closer look at how jewelry is made from polymer clay. The “Sweet Bracelet” master class shows all the intricacies of working with polymer clay.
To make jewelry, we will take the following materials and tools:
- polymer clay, acrylic paints and pastels in the desired colors;
- base chain;
- toothpicks.
At the first stage, we will make a preparation for the future “cookie”. To do this, make two pancakes with a diameter of 1.5-2 cm from brown clay. Now, pressing with a toothpick, we make indentations along the edge. When both circles are ready, make a third one, contrasting in color, place it in the middle and connect all three together. All that remains is to make holes with a toothpick, insert a ring, which we will then use to attach the “cookie” to the chain, decorate and bake.
You can make all the “cookies” the same or, conversely, different. Fantasy will tell you what is best. 
When the individual elements are ready, all that remains is to attach them to the chain - and the elegant bracelet is ready. It will definitely attract attention to its owner, as it is original and bright.
Stylish gift
Jewelry made from polymer clay, created with your own hands, will bring pleasure not only to the master: they can become both a stylish gift and a means of earning money. These are things that are done manually, and therefore are not alike from one another, even if they are made using the same technology.
Jewelry made from polymer clay makes very interesting accessories. All the imagination and all the creativity make it possible to create things that exist only in one copy. This is why such products are good.
Working with polymer clay is very exciting. In addition, some techniques require attention and concentration. This allows you to escape from problems and surrender to the power of fantasy. And the end result makes you feel like a real artist.
Designer jewelry is always highly valued in the fashion world. Polymer clay allows you to make any decoration with your own hands, putting your warmth, energy and imagination into it. Costume jewelry made from polymer clay is very popular among the fair sex.
Polymer clay

Polymer clay is plastic material, which resembles plasticine, beloved from childhood. When heated to certain temperatures, it hardens and becomes like plastic. You can make any jewelry from it: earrings, rings, necklaces, pendants, hairpins and much more.
A huge color palette allows you to choose any shade. Colors can be mixed to create new ones.

The material is considered non-toxic and therefore safe for health.
Imagination, accuracy and creativity will ensure excellent results and will delight the author with new products.

Polymer clay is produced by many manufacturers, of different qualities and different price categories.
To begin with, you can choose soft types of clay, from which it will be easier for a beginner to sculpt.
You shouldn’t buy a whole package; first, it’s better to buy a separate color and try to make simple elements out of it and bake it. If the product has not cracked or changed color, then you can purchase a set from this manufacturer.
Before sculpting, you need to hold the clay in your hands - it will warm up from the heat, and it will be easier to sculpt.
It is better to roll out the clay in thin layers so that the resulting product is neat and elegant.

You should carefully read the instructions on the package, which indicate the baking time and temperature conditions. It must be strictly observed and in no case increased, otherwise the product will deteriorate.
In addition to clay and an oven, you will need various accessories and tools.
Tools

- a machine for rolling out clay;
- extruder;

- texture sheets;
- glue;
- stationery knife;
- brushes of different sizes;
- stacks of wood;
- surface for modeling;
- toothpicks.
Graceful roses

This master class will tell you how to sculpt flowers from polymer clay.
Roses look very beautiful and natural. They can be used to decorate earrings, bracelets, and hairpins.
Materials:
- polymer clay of any shade - red, pink, white, yellow for a flower;
- stack with a ball;
- device for rolling clay.
- First you need to create blanks for the flower petals.
To do this, you need to make as many small balls as the flower has petals. The sizes of the balls can be different, because a real flower has smaller petals on the inside than on the outside.
- Roll out the balls and cut into halves.
- Create the center of the flower: to do this, make a droplet from one ball with your fingers.
- Then gradually form a bud, alternately attaching the petals to the center.
The splendor and size of the rose will depend on their quantity.
- Bake according to the time and temperature indicated on the package.
The video below describes in detail all the stages of this master class:
Earrings

Using the technique of making roses as a basis, it is not difficult to make earrings.
Materials:
- roses made of polymer clay;
- rings for fastening;
- ear wires.
Before sending the flowers to bake, you need to pierce a hole in the petal, into which you can subsequently insert a ring and attach it to the earring, and enjoy beautiful new earrings, such as in the photo:

Beads
Handmade beads look incredible. They look very feminine and add originality to any look.

Materials:
- polymer clay of various pastel shades: beige, pearl, caramel, pink-brown, white.
- glitter;
- toothpicks;
- varnish for plastic (matte and glossy);
- cord or chain.

- knead the clay;
- divide into pieces based on the size of the beads;
- form beads of different sizes;
- use a toothpick to make holes in them;
- add glitter to several beads; to do this, dip your finger in the glitter and press it to the surface of the bead;
- bake;
- let the beads cool completely;
- coat part of the beads with glossy varnish and the other part with matte varnish;
- collect beads.

You can make any decoration that will complement your favorite dress, suit or blouse. It will harmonize with the outfit or, on the contrary, will become a bright accent in the image. Handmade jewelry made from polymer clay is a pleasure to give as a gift. For original work you need very little free time, creativity and imagination.

Video selection: