Full report (help) Anti-plagiarism. Report on checking the Anti-plagiarism.VUZ system How to make a report on anti-plagiarism
Checking texts (dissertations, diplomas, research work) for “anti-plagiarism” with the issuance of an official Certificate of originality
!! to the most frequently asked questions about checking texts for anti-plagiarism!!! How to INCREASE THE ORIGINALITY of a text?7 practical tips on “anti-plagiarism”
TIP #1. Formalize all borrowings as quotations
ALGORITHM:4. Form all fragments as quotes.
CLUE. The Anti-Plagiarism system recognizes a fragment as a quotation if it is highlighted on both sides with quotation marks (Russian!!) and after the quotation marks there is a link to the source of literature in square brackets:
"...FRAGMENT..." [
A COMMENT. As experience shows, if borrowing comes from a textbook or a well-known monograph, then the Anti-Plagiarism system is highly likely to recognize this fragment as a “white” citation and thereby increases the final score of originality.
If the borrowing comes from someone else’s dissertation, then this technique does not help much.
TIP #2. Convert interlinear bibliographic references to references to the List of References
A COMMENT. This technique “kills” two birds with one stone in the pursuit of increasing originality. 1) The list of references is not included in the main text of the dissertation, which, in fact, is checked for “anti-plagiarism”, but the entire text of the footnotes is included.
And a bibliographic reference, especially to famous articles or books, is defined as borrowing. By removing these links from the text of the notes, we increase originality.
2) A link to a source of literature using a footnote, as experience shows, is not recognized by the Anti-Plagiarism system as a quotation. The quotation should be formatted:
"...FRAGMENT..." [
That is, refer to the number in the “Bibliography”
TIP #3. Convert large borrowings into dissertation appendices
REFERENCE. “Anti-plagiarism” checks the main text of the dissertation, which begins with the first words of the Introduction and ends with the last words of the Conclusion.The list of references and appendices are not included in the main text.
COMMENT: If a large fragment of borrowing is placed in the Appendix (and there can be any number of Appendixes to the Dissertation), then we thereby remove the borrowing from the main text of the dissertation, and, accordingly, increase originality.
TIP #4. Provide all illustrative material as images
A COMMENT. Only the dissertation text is checked for anti-plagiarism.The illustrative material of the dissertation includes: tables, formulas, drawings, diagrams.
Therefore, if text from tables/diagrams/figures is perceived by the Anti-Plagiarism system as borrowing, then it makes sense to provide them as an image.
TIP #5. Convert borrowings into tables/figures
A COMMENT. Literature review, links to results of other researchers, etc. is often perceived by the Anti-Plagiarism system as borrowing.If you give this information in tabular form, and design the table as a picture, you can increase originality.
WARNING: Just don't use this technique on regular text!
1. Send us your text.
2. We will check using the Anti-Plagiarism system.
3. We will send you a “colorized” text, where all fragments of borrowings are highlighted.
4. Replace all large fragments of borrowing 1-2 with your own sentences.
This technique will not only increase originality, but also make the text itself clearer and clearer for understanding.
Don’t be afraid to shorten your dissertation, especially other people’s paragraphs.
The Higher Attestation Commission only gives recommendations regarding the upper limit of a dissertation (150 pages for a candidate’s thesis, 300 pages for a doctoral dissertation), but says nothing about the minimum volume.
Brevity is the soul of wit!
And if you “got” beyond the limits recommended by the Higher Attestation Commission, then even more so, “truncating” the text is useful and beneficial!
TIP #7. Rewrite borrowings in your own words
A COMMENT. The Anti-Plagiarism system operates completely formally - it only looks for LITERAL matches of texts. By rewriting a fragment of borrowing in your own words, you can easily increase originality.
It's labor-intensive, of course.
However, this skill, as experience shows, is a good help in life:
1) when you write reviews on your dissertation (few people now write reviews on other people’s dissertations), you will have to write the same thing several times in different words;
2) when writing website content, the process of rewriting texts in your own words is called rewriting, and there are always orders for it.
Now more DETAILS We will consider the issues of checking texts (dissertations, research work, diplomas, articles). look at it on this page.
Projects involved in the search for unfair borrowings can be divided into two types:(1) Anti-plagiarism;
(2) “Dissertation grinders.”
In this article, we are interested in the Anti-Plagiarism system, since dissertation councils and the Higher Attestation Commission rely on it when assessing the uniqueness of the work.
Anti-plagiarism
Projects of the “anti-plagiarism” type include paid services that offer clients services to search for plagiarism in various types of documents.
In Russia, the leader in this service market is the Antiplagiat.Ru portal, which has been operating since 2005. It invites any user to upload a document through a special form and find out which pieces are not original and where they were most likely copied from.
The procedure for using the Anti-Plagiarism system
Instructions for using the Anti-Plagiarism system (download doc)IMPORTANT! The largest verification base is the Russian State Library (RSL-Dissertations).
RSL specialists used it to check the originality of texts for the authors of dissertations (when this service was still available). Price in 2014 for individual was: 5000 rub. for 1 text (RUB 15,000 - urgent check, within 2 working days, not counting the day of application).
That is why the service of the EAC RAS “full check of your text for anti-plagiarism with the issuance of a Certificate of Originality” is popular, based on the use of algorithms of the Anti-Plagiarism system and 3 main checking databases:
1) "RSL-Dissertations",
2) "Internet (Anti-plagiarism)",
3) "Quoting"
since in fact not everyone has access to the Anti-Plagiarism system.
For universities, the “Antiplagiat.VUZ” package is offered, which is an extension of the website www.antiplagiat.ru, developed specifically for educational institutions. The package allows you to expand the number of search sources and organize educational institution a holistic process of checking student papers and dissertations for borrowings. The cost of the “Antiplagiarism.VUZ” package is, according to our data, 200 thousand rubles.
You also need to know that standard requirements to originality depend on the type of work. So, for a master's thesis the usual requirements are at least 70% originality, for candidate and doctoral dissertations - 80%, for an article - 90% originality.
What does this anti-plagiarism check look like?
Results of the analysis of text originality in the Antiplagat system
The results of the work of the Antiplagiat.Ru service are:
1) final table of borrowings (see Figure 1);
2) final assessment of originality (see Figure 1);
3) original text with highlighted individual pieces that were discovered somewhere (see Fig. 2), next to which are links to the original source.
Accordingly, based on this data, you have the opportunity to increase the originality of your text.
Increasing the originality of the text
So, let’s assume that 2-3 months before your defense you need to check your dissertation for anti-plagiarism and increase its uniqueness to a level that is acceptable in the Council where you are defending.To solve the problem of increasing the originality of the text, the check at the RSL did not give anything, because as a result of the check, only a certificate was issued about the final value of originality, but a “colorized” text was NOT issued (with specific fragments of borrowings highlighted). Namely, it is needed for editing text. Therefore, the EAC RAS, in addition to the certificate of originality, if necessary, provides an extended report when checking using the Anti-Plagiarism system.
After checking, you get a list of pieces of text that are questionable, and you need to increase the originality of the entire text by rewriting these specific pieces. If at the same time you conduct an anti-plagiarism check yourself, then you need to understand that it is difficult to increase originality to the minimum required level in one day, and several iterations will be required during the process of rewriting the text to increase originality. Therefore, you have to pay for a week or even a month, cooperating with someone to reduce costs.
What to do if originality turns out to be low? There are 2 ways: technical and intellectual
1. Technical path
.
We have removed from our website all recommendations for technical optimization of text originality.
we DO NOT RECOMMEND using this, it would seem in a simple way, because the Anti-Plagiarism system has learned to quickly identify artificial optimization techniques, including the use of macros to replace encodings.
2. Intelligent Path
. It is more difficult because you have to think and be completely “in the know.”
The intellectual path allows you to increase the final score of originality and reduce the length of the dissertation
The recommended maximum volume of a candidate's dissertation is 150 pages, a doctor's dissertation is 300 pages.
Usually the dissertation author writes more, so you can safely cut down those parts of the dissertation work that are defined by Antiplagiarism as borrowing.
Namely:
a) take the extended Anti-Plagiarism report on your dissertation;
b) unlike the “technical path”, it is now more convenient to work with multi-color report visualization;
c) rewrite all large fragments of borrowings highlighted by Anti-Plagiarism in your own words, much shorter, or throw them out altogether (especially with regard to the 1st chapter, where an overview of work in your field is usually given).
The larger the volume of the dissertation, the more borrowings can be discarded.
ANSWERS to the most frequently asked questions about checking for anti-plagiarism (FAQ, FAQ)
What should be the level of originality of a dissertation?
The ideal case is originality over 90%.Border (minimum level) of a sufficient degree of originality, in accordance with the recommendations of the Russian State Library, is 70%.
For a master's thesis or specialist's thesis, many universities set the lower bar at 85%.
The maximum value of the final originality score that the texts we checked showed is:
a) 95.75% - for candidate dissertations
b) 96.06% - for doctoral dissertations.
The minimum value of originality of a dissertation (and one that was successfully defended not so long ago), which we recorded, was 12.86%.
Is it possible to check a dissertation for anti-plagiarism? remotely without coming to Moscow?
Yes, we work with remote orders.The following is sent:
a) a scanned color copy of the Conclusion on originality and all working materials (Report on the implementation, List of identified sources of borrowing, “colorized” text) - by email
b) the original of the Conclusion - by regular mail.
Payment - by electronic payment.
Is it possible to check text of the dissertation from previous years, which has long been protected?
Yes, if text from previous years is submitted for anti-plagiarism check, then after the initial analysis sources dating later than the date are removed publication of the analyzed text.It should be taken into account that the “older” the text, the fewer sources of borrowing can be identified, because many scientific works of previous years did not reach the digitization stage.
Thus, in the oldest dissertation (dating back to 1992), which was sent to us for verification, only 2 sources of borrowing were identified.
The complexity of checking dissertations from previous years is higher than that of a “fresh” dissertation,
because for each source of borrowing it is necessary to determine the exact date publications
to remove publications with a later date than the analyzed text from the borrowing list.
Therefore, the cost of checking dissertations from previous years is higher than when checking “fresh” dissertations.
How to increase the originality of a text using technical means?
In general, we DO NOT RECOMMEND using technical (software) tools to increase the originality of texts.Now the Anti-Plagiarism system has begun to take into account standard techniques that most text “optimization” programs use:
- make part of the text invisible in the analyzed document
- "glue" words
- use "synonymizers"
- insert extraneous letters into words
- replace Russian letters with similar English ones
- replace the letter encoding (with macros), etc.
"The document contains features typical of artificially inflating the percentage of originality due to the peculiarities of document formats!!!"
And it refuses to issue a final assessment of originality, that is, it removes the text from the “anti-plagiarism check” with all the ensuing consequences.
Of course, there is a constant “struggle between shield and sword”; various people/groups come up with new ways to bypass the Anti-Plagiarism system.
In turn, the developers of the Anti-Plagiarism system are constantly improving their system, finding an “antidote” to the emerging methods of deceiving the system.
Particularly impressive was the March (2015) update of the Anti-Plagiarism system, which closed the popular bypass method by replacing the letter encoding with macros.
In addition, if at the moment it was possible to technically increase the originality of the text by deceiving the Anti-Plagiarism system, then there is absolutely no guarantee that such a result will be preserved by the time the dissertation is checked by the Higher Attestation Commission.
By this time, the Anti-Plagiarism system may well make changes that level out the technical methods used to increase originality, with all the sad ensuing consequences for the dissertation author.
Is it possible to send your dissertation for an anti-plagiarism check (with the issuance of a certificate) to a person other than the author of the work?
Yes, you can send it, the texts of dissertations are part of the common (public) space, so there is no legal violation in such a check.When the RSL (Russian State Library) still issued anti-plagiarism certificates, it was issued only to the authors of works in order to limit the flow of applications for verification. We accept any texts for verification, with the exception of those classified as confidential.
Do the results of checking a dissertation “for anti-plagiarism” become outdated?
Yes, they become outdated.Electronic libraries included in the “Internet Anti-Plagiarism” collection are now being intensively replenished, especially cyberleninka.ru.
Therefore, if you are going to defend yourself, then before posting (which has now become mandatory) the text of your dissertation on the website of your university/institute/Dissertation Council, be sure to CHECK!
According to the rules of the Higher Attestation Commission, the text of the dissertation cannot be changed after being posted on the website.
And, in our experience, authors experience a real shock when they learn about the low results of checking their texts “for anti-plagiarism”.
After all, when they checked their text 1-2 years ago, they were sincerely confident in their high originality.
How is self-citation taken into account when checking for anti-plagiarism?
Many questions are raised by the identification of borrowings from the author’s own, earlier works of the text being examined for “anti-plagiarism”.Formally speaking, the text of the dissertation work must be original in itself.
But what to do, say, when, for example, a doctoral work is a continuation of a candidate's dissertation?
Or when the dissertation author refers to his own monograph, published on the topic of the dissertation before the dissertation itself?
The current consensus is:
are excluded from the list of sources of borrowings after the initial check for “anti-plagiarism” own works author (but not more than 15% of the text), if:
1) these works were made without co-authorship (or in the cited article/monograph there is a distinction between authorship);
2) the citation is correctly formatted (clearly, in quotation marks, highlighted; the exact names of the authors and works are given).
The described actions help make borrowings “white” and correct.
The most important thing is that the assessment of the degree of originality of the text, issued by the Anti-Plagiarism system, INCREASES.
Are references to used sources considered borrowing?
Standard wording contained in the issued Certificate of Originality"The analysis of these sources showed that in the text under study there are correct matches in the form of names of publications, conferences, physical and legal entities, a standard description of the structure of dissertations and information about the dissertation, terminology and stable phrases adopted in this field of science, normative and legal acts, etc.
essentially means, mainly, that “The list of sources used in the anti-plagiarism analysis” is usually not included.
Candidate's/doctoral dissertations/Research reports analyze body text only, without applications and a list of used sources.
Theses (bachelor/master/specialist) are analyzed entirely due to the practice adopted in universities.
Can your assessment of originality after checking the text “for anti-plagiarism” differ from a similar check in the “anti-plagiarism-university” system of our university?
Yes, our assessment of originality may be higher than the assessment of the originality of the same text given by the “anti-plagiarism-university” system of a particular university.However, not by much (in our experience - no more than 1%).
The fact is that we use exactly the same “Antiplagiarism” system (collections of the RSL EDB and “Internet Antiplagiarism”) as the Higher Attestation Commission.
And a university can add internal documents, sources from its library, and sources from partner universities to the anti-plagiarism-university system.
For example, master's theses or specialist's theses.
To pass the dissertation check for anti-plagiarism, do you need to fill out the “Order a paper” form on your website or register somehow?
The "Order work" questionnaire is intended for more complex tasks such as research, assessment investment projects and so on.To check for anti-plagiarism, we only need:
a) send your coordinates (mail, telephone number for communication)
b) send the text of the dissertation to in electronic format.
Payment for work - upon receipt of the Conclusion (by courier or electronic payment).
How long does it take to check a dissertation for anti-plagiarism?
Typically the entire verification process takes 2 business days.For example, if you send the text of your dissertation electronically today, then tomorrow afternoon the certificate will be ready (ready certificates are delivered free of charge by our courier).
If you send the text of your dissertation in PDF format or some image format (JPEG, TIFF, GIF, PNG, etc.), then an additional 1 working day is required.
If you provide the text of your dissertation in paper form, an additional 1 working day is required.
Anti-plagiarism online The site allows you to check the text completely free of charge.
Efficient Algorithms anti-plagiarism online make the check in-depth and high-quality.
Procedure plagiarism checks is simple: just a few clicks - and you will find out the percentage of text uniqueness. If there are duplicate texts on the network, they will definitely be found. You can also check the text for errors using a spell check service.
When registering for the service, you will automatically have the verification restrictions intended for guests removed, and you will be able to check a much larger number of texts using our online plagiarism service.
New algorithm for checking for plagiarism
The website service uses an algorithm for checking texts for uniqueness, which analyzes texts using an improved technique. To make your work with the verification service transparent and comfortable, we will give some recommendations for interacting with the current algorithm.
What texts does the algorithm not like?
This algorithm for checking text for plagiarism online is fundamentally different from checking using the shingle method. What implications does this have for working with texts?
- The technique of low-quality rewriting is a thing of the past changing every fifth or fourth word. In texts written in this way, a high percentage of matches with the source will be found.
- We are also pleased to announce that our the algorithm detects plagiarism even after rearranging words, phrases and sentences in places.
- When working with anti-plagiarism uniqueness will not increase from changes in cases, tenses and other grammatical categories of words.
- “Adding” new words to the original sentence, the rewriter will also not get rid of plagiarism.
Thus our free anti-plagiarism online highlights matches most accurately and completely.
What texts does the algorithm like?
To achieve 100% uniqueness when rewriting, you must complete high-quality text processing.
- Please contact Special attention on densely illuminated areas- by getting rid of them, you will increase the uniqueness of the text.
- It is recommended to do deeper rewriting: replacing words with synonyms, reformulating phrases, etc.
Let's make the algorithm even more careful!
If in the results of the check you find an extraneous link, in your opinion, where the matches are random, or, on the contrary, the results do not display a link to a page where there are matches with the text being checked, then write to support@site (be sure to include a link to the check result ).
The manual contains information about the purpose, capabilities, features of the system, as well as a description of actions that ensure checking text documents for the presence of borrowings.
Terms and Definitions
|
Definition |
|
|---|---|
|
An online tool for working with text documents with a user interface on a website. |
|
|
Borrowing |
A fragment of the text of the document being checked that coincides or almost coincides with a fragment of the text of the source and is not formatted in accordance with the rules of citation, without providing complete bibliographic information about the source. |
|
Citation |
A fragment of the text of the document being checked, coinciding or almost coinciding with a fragment of the text of the source and formatted in accordance with the rules of citation, with complete bibliographic information about the source. Citations also include commonly used expressions, bibliographic lists, and fragments of text found in sources from collections of normative and legal documentation. |
|
Borrowing percentage |
The share of all borrowings found in relation to the total volume of the document in characters. |
|
Citation percentage |
The share of citations found relative to the total length of the document in characters. |
|
Percentage of originality |
The share of text fragments of the document being checked that were not found in any source used for checking, in relation to the total volume of the document in characters. |
|
The result of checking the text for borrowings:
|
|
|
Share in the report |
The ratio of the volume of borrowings, which is taken into account within this source, to the total volume of the document. If the same text was found in several sources, it is taken into account only in one of them. |
|
Share in text |
The ratio of the volume of borrowed text from a given source to the total volume of the document. Shares in the text according to sources are not summed up. |
|
Blocks in the report |
The number of borrowing blocks from a source, taking into account the intersections of all found sources. |
|
Blocks in text |
The number of borrowing blocks from the source, excluding other found sources. |
|
Search module |
A software module that implements the search for borrowings. The module uses a search index or a special computational algorithm to generate reports. The system may have several modules. After gaining access to several search modules, you are given the opportunity to conduct checks, build both separate reports and a single report for all search modules. Some modules perform searches in specialized databases with snapshots of the texts of source documents, but gaining access to the selected search module does not mean gaining access to the full texts of documents that this module can find. The received reports will contain links to documents (their names will also be given), and when viewing the source text, it will contain fragments that match the document being checked. |
|
Software that allows users to browse Internet sites, as well as access files and software linked to these pages. For example, Internet Explorer, Google Chrome, etc. |
|
|
Text metrics |
Semantic characteristics for each downloaded document. |
Purpose and conditions of use
The service is designed to check text documents for borrowings. As a result of the scan, users receive scan reports. The report contains information about the sources and indicators of borrowing by source, as well as detailed information indicating those fragments of the document being checked that were identified as borrowing. Identification is accompanied by the presentation of a matching fragment of text from the borrowing source and/or a link to the original (URL). As a result of document verification, the user is provided with information that helps to determine which part of the document was written independently and which part was borrowed.
To use the service you need:
- Connect to the Internet.
- Install a browser or use one of the most common types of browser built into your operating system (MS Internet Explorer version 11 and higher, Mozilla Firefox version 58 and higher, Opera version 51 and higher, Chrome version 64 and higher).
The results of working with the Anti-Plagiarism system are not the basis for claims of copyright infringement; the service is intended for use exclusively in informational purposes. In other words, we do not declare that a particular text is plagiarized, but only inform you that the same or similar fragment of text exists. It is possible that when working with the service you will find text with a copied fragment from other sources, including the possibility that the document you downloaded is the original source. In any case, when working with the service, be careful, try to be objective and do not rush to conclusions. Remember that the service is only a work tool, and only the system user himself can give a real assessment of the document.
Preparing for work
Workplace
To prepare a workplace when working with the Anti-Plagiarism system, just open your browser. To work with the service, the most common types of browsers can be used, such as MS Internet Explorer version 11 and higher, Mozilla Firefox version 58 and higher, Opera version 51 and higher, Chrome version 64 and higher.
To get started, go to the service website by entering the address of the system website in the address bar of your browser.
So, we have a ready-made workplace:
- files are downloaded to the computer;
- browser is open;
- The service website page is open in the browser.
User registration
To register on the site, open the registration window by clicking on the “Register” button on home page site.
“Register” and “Login” buttons
In the window that opens, you will be asked to read the user agreement and the agreement on the processing of personal data. To accept the user agreement, check the box next to “I agree to the terms...”. Acceptance of the agreement means that you have read, understood and unconditionally accept the terms of the user agreement and the agreement on the processing of personal data.
To continue registering in the system, enter your address Email and click on the “Register” button.
Initial registration form

After some time, an email with a password will be sent to the email address you specified; enter the received password to enter your account.
If your email was used for registration previously, you will not be able to register using this email again. In this case, use the login form to access the system.
If the letter does not arrive by mail for a long time, try the procedure again. Make sure your email is entered correctly.
Login and logout
If you are a registered user, then use the login form to access the system; to do this, click on the “Login” link in the upper right corner of the page.
Enter your credentials in the login form that opens. Click on the “Show Password” button if you want to check that you entered the password correctly. Next, click “Login.”
Login form

After logging in on any page of the site, the “Menu” icon is displayed in the upper right corner of the page. By clicking on the icon, you can navigate through the sections of your account. To the left of the “Menu” icon you will see brief information about yourself: your role in the system and e-mail.
To log out, click on the “Menu” icon and then select “Log out”.
You can use social networks to log into your account. More details in the next paragraph.
Social media
When registering or regularly logging into your personal account, you can attach your social network accounts. Attaching an account will allow you to quickly log into your personal account using your credentials from social network.

A special window will open to confirm sending data from the social network. If you have not yet introduced yourself to the social networking site, this window will prompt you to log in.
You will then be redirected back to the registration completion form. You can choose: to attach a social network account to an existing account on the system website or to register a new account by attaching a social network account.
If you select the “I am a new user” option, the site will offer a registration procedure. Register and click the “Create account” button. You will be sent a password as during regular registration. Enter the password you received and click “Create an account” again to complete registration.
Once registration is completed, you will be able to log in using your attached account.
Registration form after submitting credentials from a social network, “I am a new user” tab
If the entered email matches the email address of your account or was automatically entered using the data received from the social network, then entering a password will not be required - you will be logged into your account immediately after clicking “Create an account.” In case the social networking site fails, a password will still be sent to the specified email. Using this email and password, you will be able to log into your account in the usual way.
If you selected the “I already have a login” option, then you will be asked to log in using your credentials with which you registered.
Registration form after submitting your social network credentials and clicking “I already have a login”

Password recovery
If you cannot access your personal account because you have forgotten your password, use the password recovery procedure.
To recover your password, in the login window, click on “Recover Password”.
In the window that opens, enter your email and click the “Recover” button.
Password recovery window

An email will be sent to you with instructions on how to reset your password and a link. Following these instructions, follow the link. Next, an automatically generated password will be sent to you by email. Use it and your e-mail to log in to your account.
Profile
To go to your profile, click on the “Menu” icon in the upper right corner and select the “Profile” section.
The profile is special section an account in which you can view and edit your account credentials and additional information.
In the “Profile” section you can enter your personal data and upload an image to be placed in the information block. To do this, enter your data in the fields and click the “Change” button, and to upload an image to your profile, click on “Upload image”. To return the standard portrait image, delete the uploaded picture in your profile by clicking on “Delete”.
Account section - “My Profile”
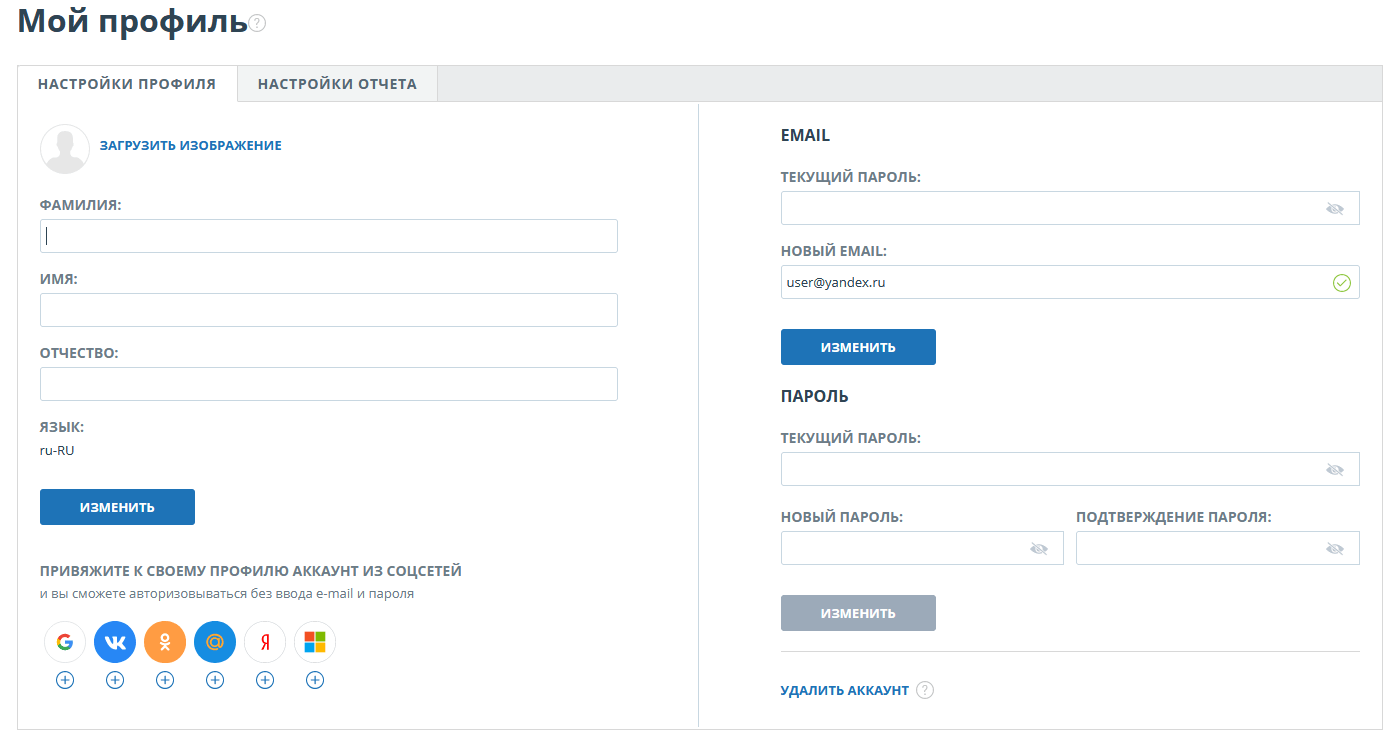
Change mail (email)
In order to change the email used to log in, enter your current password and your new email address and click the “Change” button.
By clicking on the button, you will see the message: “On new mail A link has been sent to confirm the email change.” Go to your mailbox, the address of which you specified as your new email, and then follow the link in the letter.
A letter received from the Antiplagiarism service website
Change Password
To change your password, you will need to enter your old password and then enter your new password in the appropriate fields.
You can first make sure that the password is entered correctly by clicking on the “Show password” button. After this, symbols will appear instead of dots.
If you are sure that you entered the password correctly, click on the “Change” button, and your password for accessing the Anti-Plagiarism service account will be changed to a new one.
If you made a mistake when entering a new password, you can use the password recovery procedure, but only if you have access to the mailbox specified in your profile.
Attaching a social network
You can log in to the system without entering an e-mail and password; to do this, you need to link your social network accounts to your profile. To attach a social network, just click on the “+” (plus) sign or the icon of the social network that you want to attach. After clicking, a social network window will open with a confirmation form for sending data; you need to confirm your consent to attach the social network.
Immediately after receiving your consent, the data necessary to enter your account is sent from the social network; now when logging in, you can use the “Login using a social network” icon.
On the “Profile” page, you can also perform the opposite action - unpin a social network account, to do this, click on the “X” sign located under the icon of the attached social network, or on the icon itself.
You can only attach one account from one social network. To attach a new account to a social network, you need to unpin the old account and then attach the new one.
Support
If you have not found answers to questions about working with the system, please contact the Support Service. To do this, click on “Menu” in the upper right corner and select the “Support Service” tab. The system will open a window with a form for sending a request.
Feedback form

Enter your question in the “Message” field and click on the “Submit” button. Our specialists will respond to your request via the email you used to log into the system.
Adding a site
Our Internet Search Module checks already explored areas on the Internet. If you find an interesting site or resource that is not included in the Internet Search Module, you can add it to our verification module. This will allow you to build more complete and reliable reports based on verification using the Internet Search Module.
To add a site for indexing, click on “Menu” and select “Add site”. Copy the link in the "URL" field and click "Add". You can also leave a comment about the site to which this link leads, for example, that this site hosts an open digital library or abstracts website.
Menu item “Add site”

If the site you specified is already known to our system, you will receive a message: “The site has already been processed by our system.”
Important! The submitted site will be included in the Internet Search Module over time in order of indexing queue.
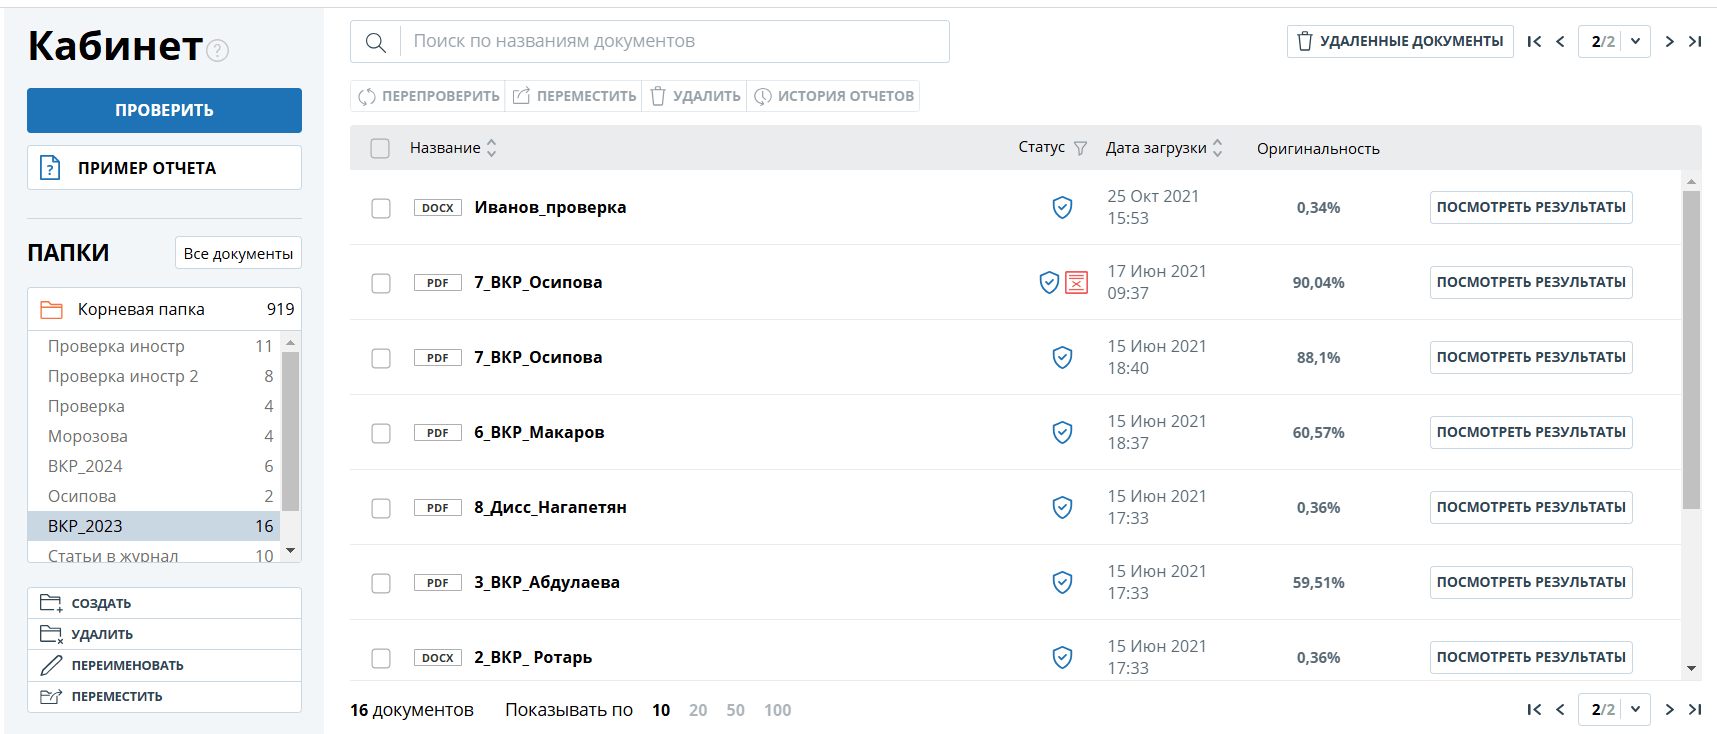
Cabinet
The account provides the ability to upload and check documents. To access document verification, click on “Menu” and select the “Account” section.
On the account page you will see the “Folders” and “Documents” panels, with the help of which all basic actions are performed with folders and documents in the account.
Cabinet
Document verification
To upload documents for review, click the “Add Document” button and select files on your computer or drag and drop the required documents into the “Add Document” field.
In addition to downloading individual files, it is possible to download an archive folder. An archive folder means a file in RAR, ZIP or 7z format. In this case, all documents from the archive folder are processed separately.
After selecting the files, a window will open to configure document verification parameters.
Window for adding one document
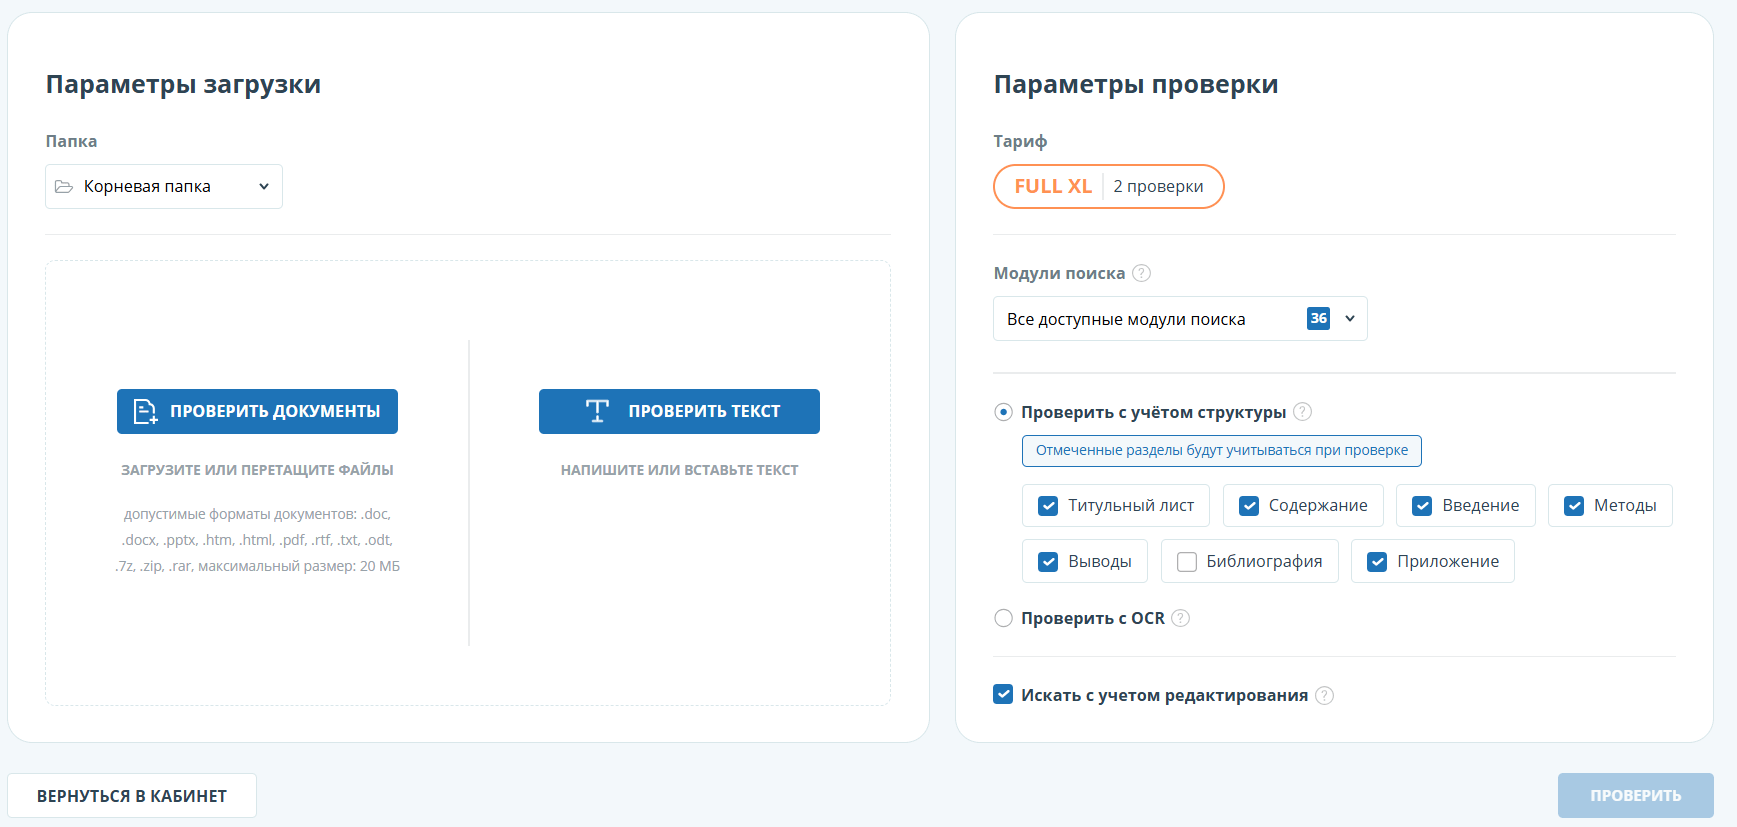
You can specify the parameters for saving the document and select the modules that will be used to check the document.
Important! For the title of the document, you can use the Russian, Belarusian and Kazakh alphabet.
If you do not enter parameters, the following default values will be applied to the document: the folder that was opened when viewing the user account is selected, the document type is not specified, the name is the file name, all possible verification options will be set for search modules (depending on the connected services ).
Next, click on the “Continue” button, the document will be added to your account and sent for verification. In the folder to which the document was added, you will see the added document; in the line with the document, the date the document was uploaded will be indicated. After the check is completed, the results of the check will appear in the line.
Text checking
In some cases, it is more convenient and faster to use the text verification function; to do this, click on the “Add text” button. In the form that opens, enter or paste text into the field, select the modules for which the document will be checked, and then click the “Continue” button.
Adding text
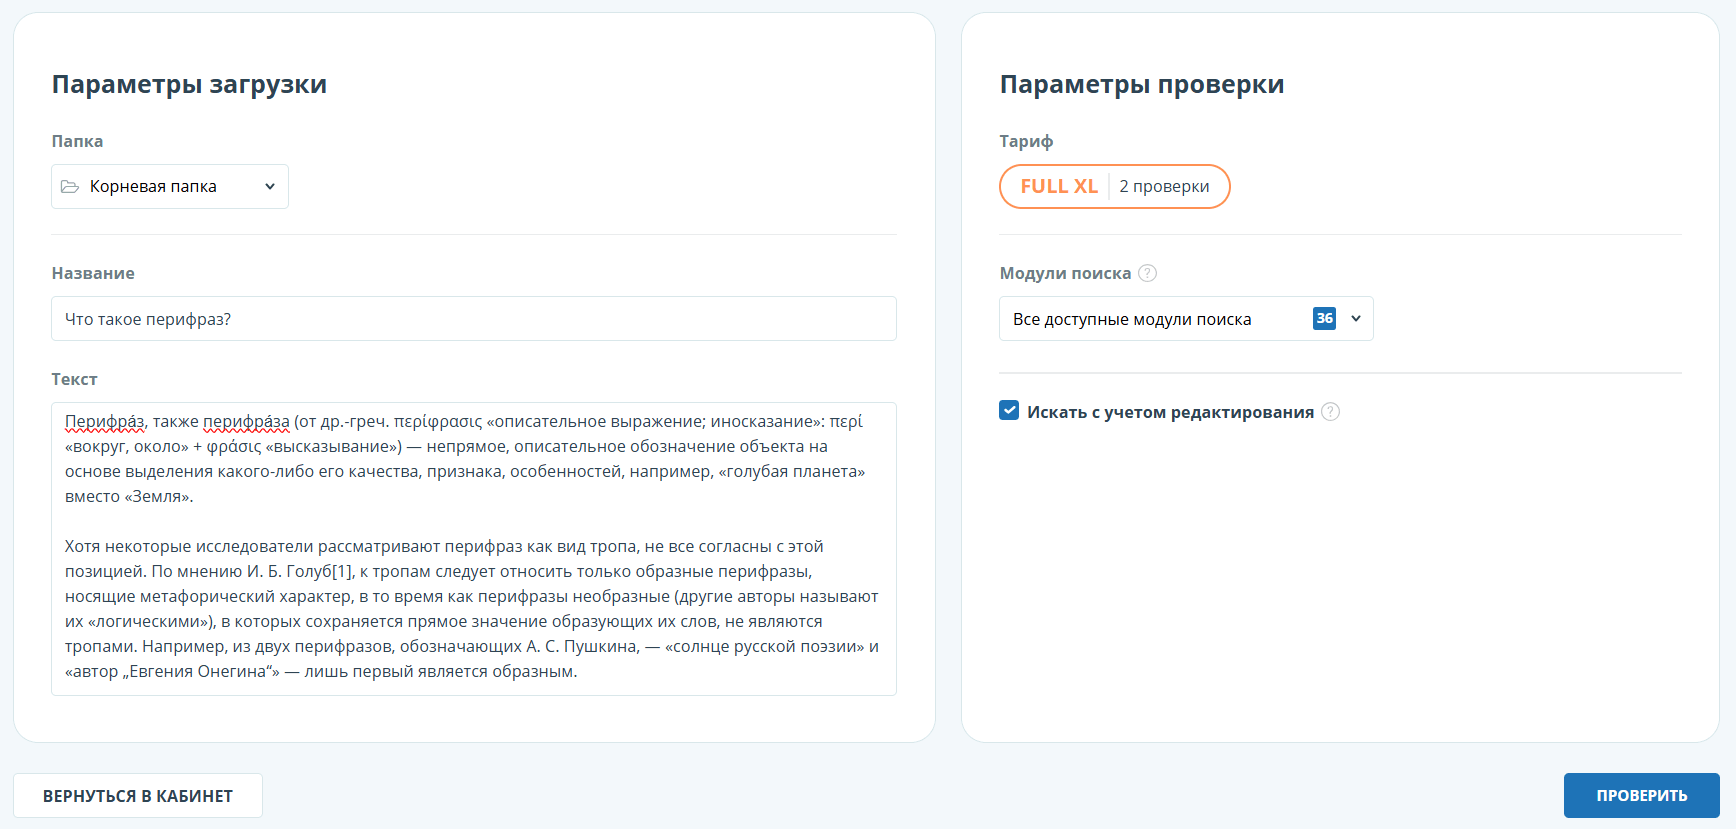
After clicking the “Continue” button, a document will appear in your account, its name will be the same as the first word in the entered text (no more than 15 characters), then a check will start against this document.
Re-checking the document
If you want to check a previously downloaded document using other search modules, then you can use re-check. Mark the selected document with a checkmark, then in the top menu click on the “Recheck” button.
Marked documents for re-checking

In the window that opens, select search modules and click the “Continue” button.
Rechecking the document

The document will be sent for verification and after a while the results will appear in the document line. It is impossible to send a document for re-checking if it is still being checked.
Viewing and editing document information
Each document, when added or moved to the office, must be placed in some folder in the office. By clicking once on the name of the folder that contains documents, you will see the documents located inside the folder.
General view of the user account with uploaded documents and created folder structure

Documents are arranged in the form of a list. Each line of the list displays information about the document, the result of the check and a link to the report.
The assessment of originality in a document line is intended for an initial, superficial acquaintance with the results of the verification. To receive a detailed assessment of the inspection results, go to view the inspection report by clicking on the “Report” button.
To view information about a document, open the folder, select the document you need with a checkmark and click the “Information” button in the top menu. A window will open with document attributes and information about the date and duration of the download.
To view the text of a downloaded document, click on its name in the list of documents. The Reading Version page opens, displaying the text of the document in page-by-page mode.
To navigate through pages of text, use the paging bar located above and below the text field. You can display all pages of a document at once by clicking the “Show all pages” button under the text field.
Also on this page you can view the document attributes and change them if necessary by clicking on the “Change name and type” button.
View information about a document

The same operation can be performed by selecting the checkbox required document in your account and in the top menu by clicking the “Change name and type” button. In the window that opens, you can change the document name and assign a document type.
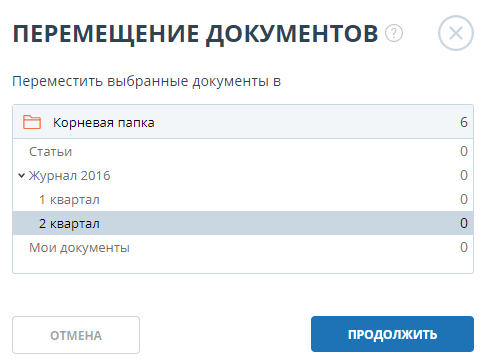
Move a document
For reference hierarchical structure folders, use the Folders panel displayed on the left in personal account. The “Folders” panel contains active elements and buttons that allow actions with folders: adding, deleting (if the folder contains documents, they will also be deleted), renaming and moving the folder, as well as navigating through folders.
By default, a “Root folder” is automatically created in each account; all other folders are created in it; this folder cannot be deleted, moved or renamed.
To the right of the folder names you will see a numerical value - this is the number of documents in the folder, so you can further navigate the distribution of documents in the folder.
To move a document from one folder to another, select the document with a checkmark (you can select several documents to move), then click on the “Move” button in the top panel.
A navigation window will open showing the folder structure. Select the destination folder and click Continue, then the document will move to another folder.
Window for moving document(s)
Search for a document
To search for a document, enter the name of the document in whole or in part in the search bar, and then click on the button in the form of a magnifying glass or the Enter key.
Document search string

After starting the search, the list of documents will display the found documents for all folders nested inside the root folder. You can navigate through folders by leaving the request in action, then only documents on request will be visible in the folders.
Deleting a document
To delete a document from your account, check the box and click the “Delete” button in the top panel.
Removing a document from your account

Text metrics
The system provides for the calculation and display of various semantic characteristics for each downloaded document. This functionality allows you to evaluate the scientific nature of the text, determine the presence of certain sections of the document and calculate some indicators
Metrics are calculated automatically when loading a document. List of calculated semantic characteristics:

Borrowing check report
Full report
Once the document has been downloaded and verified, the user can proceed to the report. To go to the viewing page full report you must click the “Report” button located on the line with the verified document.
The full report includes:
- assessment of originality/borrowing/citation;
- assessment of suspiciousness and the ability to go to the suspicious page;
- a list of sources of borrowing with the ability to edit and go to a report on the source;
- continuous or page-by-page display of the full text of the document being checked, highlighting the borrowed blocks found;
- date of document verification;
- displaying report adjustments.
The figure below shows general form full report.
Full report

- report export;
- go to the user manual;
- saving the edited report;
- receiving a direct link to the report;
- viewing text metrics;
- View report history.
View the report
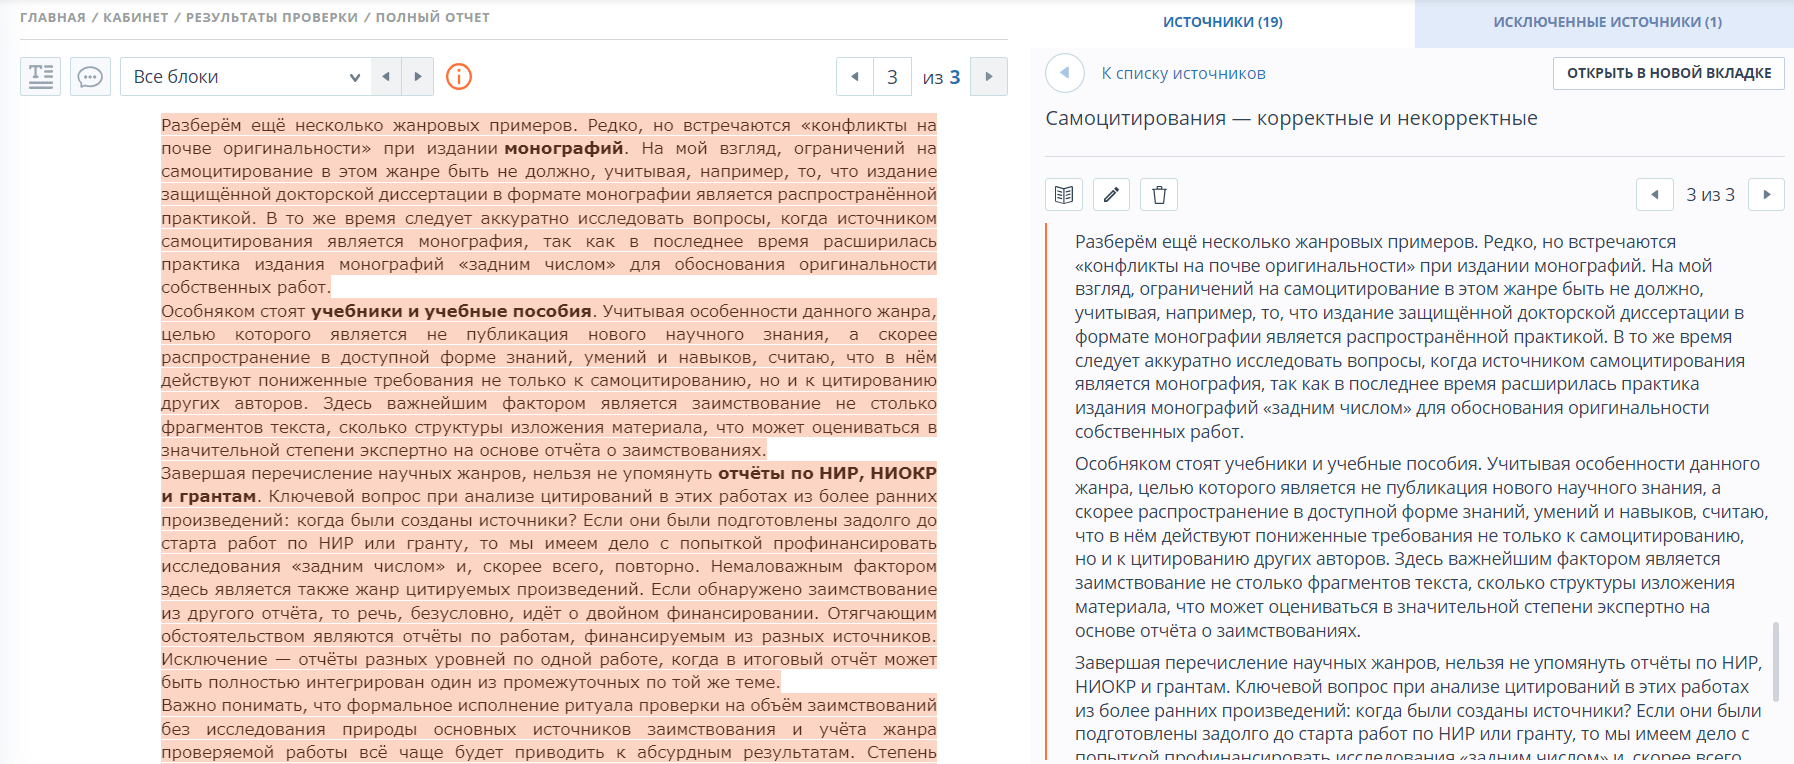
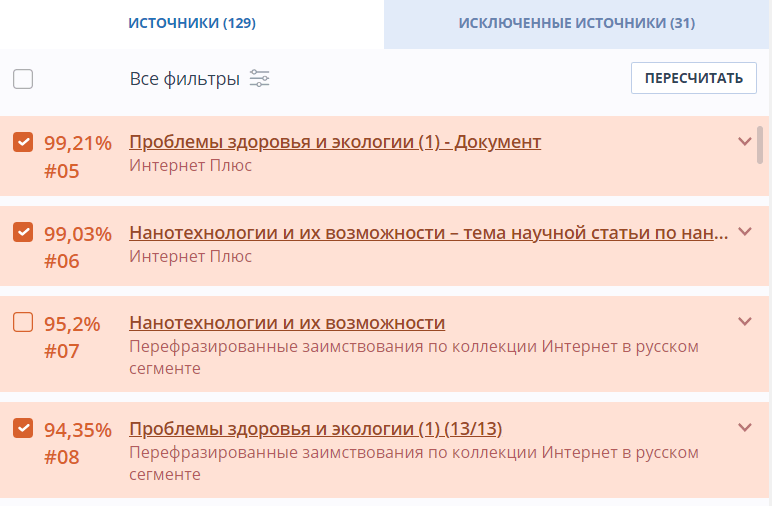
The report page consists of the text being checked, in which blocks of borrowings are highlighted, a list of sources, aggregated test results and navigation through blocks of borrowings (search by block).
To navigate through pages of text, use the paging bar located above and below the text field. To display all pages of a document at once, click on “Show all pages” at the bottom of the document page.
To see which specific fragments of text were borrowed and from which specific source, in the system all blocks of borrowings are highlighted in color, and at the end of each block there is a label with the serial number of the source.
When viewing borrowed blocks in a report, you can use block navigation (block search). Using it, you can go to the next or previous block by clicking on the “Previous” or “Next” buttons. You can also choose which blocks to navigate through – the quoting or borrowing blocks.
View source information
To view information about a source, expand the source you are interested in in the list of sources and click on the icon.
Source information in the source list

Parameters such as the share in the text, the number of blocks in the report, the number of blocks in the text are customizable. To do this, click on “Menu”, select the “Profile” section and go to the “Report Settings” tab. You can choose which options will not appear in the report by unchecking one of them.
Report settings

Another way to view information about a source is to click on the source number in the text of the full report. A window will appear containing basic information about the source.
Information about the source in the text of the full report

External source link
For most sources, an external link to the online location of the document or source text is available in the report source list.

A situation may arise when, when following a link, the source is unavailable. Perhaps the site administrators deleted the text, or the page “moved”. But in any case, this text was available at the specified address when the site was added to the index of the search module of the Anti-Plagiarism system.
The fact that one or more references given in the report to open sources on the Internet at the time of viewing the report are not working, this is not a reason to remove these links from the system index. The texts at these addresses were indexed; before they were deleted/moved, they were available to third parties and could be read, copied or otherwise used. In particular, they could be stored in the caches of search engines and web archives, where they can still be found.
View a report by source
To view a report by source, click on the link in the source name in the list of report sources. A page with the text of the source with which there was a match will open in a new tab in the browser. Instead of text that does not overlap by source, you will see a certificate about the number of missing characters.
If you want to view the source text in full, open the source link by clicking on the “Go to source site” button.
Source report
Click on another source in the Sources panel on the left to view a report for that source at once.
You can choose to view the report by source - page by page or in continuous text. By default, the source report is displayed page by page. To switch viewing mode, click on “Show full text”. When you switch to continuous text view mode, the button will change to “Show text page by page.” Click it to switch to page view mode.
Another way to view the source report is to go to the source report from the in-text citation block. Click on the source number at the end of the block, then click on the source name.
Go to the source report from the citation block

The Source Report page will open and the corresponding borrowing block will be shown at the top of the page.
Viewing report history
When you recheck a document or edit a report, all previous versions of reports are saved in the system. To view the report history, click the “More” button and select “Report History” in the top menu of the full report.
Viewing report history

A separate window will open where you will see brief information about all generated reports for this document. Reports in history are sorted in descending order of creation date.
To go to a detailed view or adjustment of one of the reports, click on the “Open” button. The report will open on a new page.
Report history

You can also view all report adjustments, go to a specific adjustment and change it. The adjustment is created automatically when editing the report.
Information about the edited report in the report history

Editing the Source List
In the full report, actions with sources are available, allowing you to make some changes in the calculation of the test results.
- Adjusting the list of sources taken into account in the report – allows you to take into account or not take into account the sources you specify in the report.
- Change Source Type – Allows you to change the source type of your choice.
To ignore sources, in the list of sources, uncheck the lines of these sources, and then click the “Recalculate” button. After recalculation, the overall score for the report will change, and the text of the report will no longer display citation blocks for this source.
To take the source into account again in the report, return the checkboxes and click “Recalculate”.
Adjusting the list of sources taken into account in the report
The system divides sources into two types: “Citations” and “Borrowings”.
When generating reports, the system automatically sets the source type: “Borrowings” - orange and “Citations” - green.
Important! The service only produces preliminary assessment, only the user can give a real assessment of the source.
You can change the source type from “Citation” to “Borrowing” and vice versa. To change the source type from Borrowed to Cited, in the list of sources in the report, click on the orange percentage. The “Mark as correct borrowing” item will appear next to the cursor; click on it, then the “Recalculate” button.
Changing the source type

If you are satisfied with the current version of the report, you can save the report by clicking the “Save” button in the top panel of the document. A window for saving the edited report will open, in which you can leave your comments, for example, information about changes made to the report or the reason for the changes. After saving, a new adjustment will be created in the report history.
If the report was edited and the editing results were recalculated, it will be saved automatically; you can find the autosaved report in the report history and continue working with it. In the report history, autosaved reports have the following inscription in the comments: “Autosaved version.”
Brief report
The summary report presents the distribution of percentages of originality, borrowing and citation, as well as a list of sources of borrowing.
Brief report

For most sources, the report source list displays an external link to the location of the source document or text on the Internet. To go to the Internet page, click on the icon next to the source name.

In the top panel of the page you will see icon buttons that allow you to proceed to the following actions:
- outputting the report to a page for printing;
- downloading this report;
- viewing report history;
- link to user manual;
- return to the office to the list of documents.
To get more detailed information about the results of this inspection, open the full inspection report by clicking on the “Full Report” button.
Suspicious document
A suspicious document is a document in which signs of technical means of changing the text or format were detected, for example, replacing characters, inserting invisible text, etc. Such signs may indicate that the author tried to circumvent the system in order to hide borrowings and artificially increase the percentage of originality. If such signs of bypass were found in the document, then in the user’s account and general list company documents, a special mark will be placed for it.
Displaying a suspicious document in your account

Important! If a suspicious flag appears, we recommend that you carefully read the scan report and any suspicious fragments found in the document. The functionality for detecting suspicious documents is an auxiliary analysis tool. The final decision always remains with the inspector.
Information that a document has detected signs of system bypass is displayed in scan reports, printable versions, and downloadable reports. The summary report for a suspicious document displays the page numbers on which potential attempts to circumvent the system were detected.
Brief report for a suspicious document

The printable version of the test report provides information about potential attempts to circumvent the system. The types of crawls and pages on which suspicious fragments were found are displayed here. Similarly, information is recorded in downloaded versions of reports.
Version for printing a report on a suspicious document

In the full report for a suspicious document, a special block is displayed with a mark of suspicion and a link to the “Suspicious Document” page - to go to the page, click “View”.
Full report for a suspicious document

Important! If the uploaded document does not have formatting, then instead of a link to the “Suspicious Document” page, the full report displays the page numbers on which potential attempts to bypass the system were detected.
The “Suspicious Document” page displays detailed information about the suspicious fragments found in the document. Here you can view the text of the document in the form in which it was loaded into the system (with the original formatting preserved). If a fragment is found on a document page that may be an attempt to bypass the system, it is marked in red.
Suspicious Document page

To view information about suspicious fragments for the entire document, click on the “In Document” tab in the right panel. To view page numbers, click on the desired crawl group name. To go to any of the listed pages, click on the desired number.
In Document Tab

The “On Page” tab provides information about suspicious fragments on the selected document page. To display certain types of walkthroughs, check the boxes for them, and uncheck the rest for others. Selected types of bypasses are highlighted in red on the page, and removed bypasses are underlined with a red line. To highlight all suspicious fragments on a document page at once, click on “Show all”. In order to deselect all suspicious fragments at once, click on “Hide All”.
It is also possible to view the crawl text if it was extracted during document processing.
View crawl text in the On Page tab

If the document does not contain crawls, you can unmark it as suspicious. To remove the mark, use the enable/disable button in the upper right corner of the Suspicious Document page. You can leave a comment explaining why you removed the suspicious flag. If you view the “Suspicious Document” page via a direct link, you will not be able to uncheck the suspicious flag.
Removing the suspicious flag

If you uncheck the suspicious flag:
- the corresponding icon will not be displayed in the account;
- the summary report will not display information about crawls;
- in the downloadable report forms and in the printable version, in the “Suspicious Document” section, information will appear that the suspicious mark has been removed and a comment will be displayed;
- in the full report you will see that the suspicious flag has been removed - the corresponding icon will turn gray;
- Access to the “Suspicious Document” page is maintained.
Uploading a report
Report upload confirmation window

The Export Report page opens. To start generating a report, click on the “Export” button. After a while, the button will change to “Download”. Click on the "Download" button to download the file. The download will start automatically, or a dialog box will open to download and save the file, depending on your browser settings.
In the downloaded report you will see information about the report and the downloaded document, a terminological block with the meaning of the concepts “Borrowings”, “Citations”, “Originality”, a list of sources and text with markings of citation blocks (if the user downloads the full report).
Direct link to the report
To get a direct link to the report, open the report and click on “More” in the top menu, then click on the “Direct link to the report” button. A new tab will open with the report in view mode. Copy the address in your browser's address bar to pass the link to someone else.
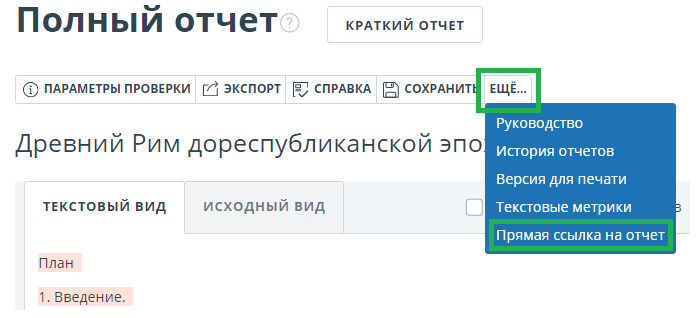
An external user who follows a direct link will be able to view the report and text metrics (if this function is enabled), display the report on a page for printing, and export the report (if this function is enabled). You cannot edit a report using a direct link.
Purchasing services in the office
The free service is provided with limited account capabilities. As part of the free access, you get the opportunity to check for borrowings using the Internet search module and view only brief reports. If you want to get acquainted with the full functionality of the service or expand the functionality of your account (receive full reports, connect additional search modules, etc.), we recommend that you first familiarize yourself with the tariffs; to do this, go to the “Tariffs” page.
Go to the “Tariffs” page

Purchasing a subscription to a tariff
In the "Tariffs" tab you will see tariff schedule to familiarize yourself with the functionality of the tariffs. In the “header” of the tariff schedule you will see our line of tariff plans. Each tariff plan is connected for a certain period with a certain maximum number of checks; tariff plans may also differ in functionality.
Tariff plans and tariff schedule on the “Tariffs” page
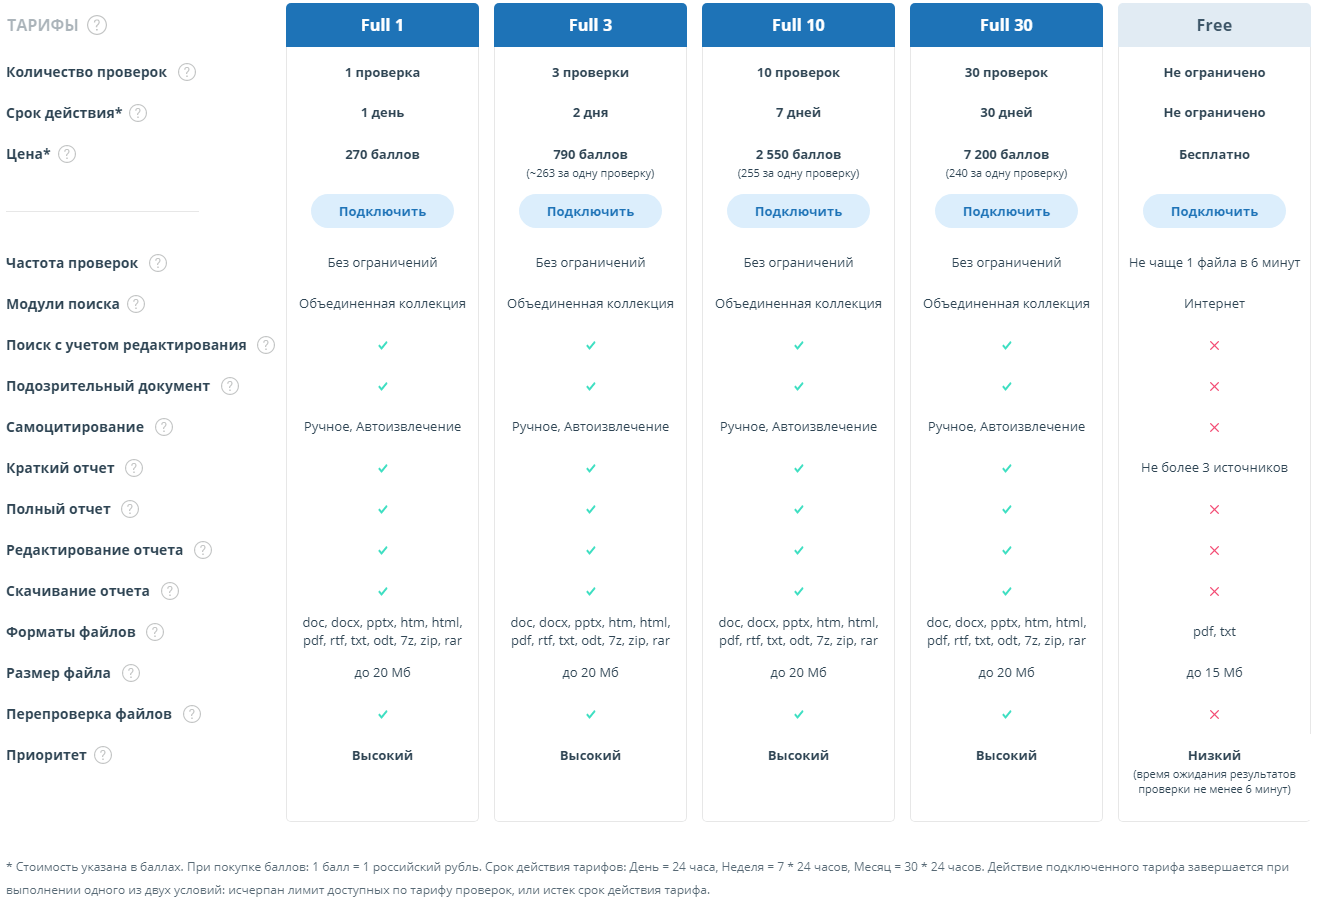
To purchase a tariff subscription, select a line tariff plan and expiration date by clicking on the switch, and then clicking on the “Connect” button.
After clicking on the “Connect” button, a window will appear with a message about a successful purchase, and at the same time, as many points as the subscription to the tariff cost will be debited from your account.
After subscribing to a tariff, you will see the name of your current tariff in the upper right corner.
Information about the status of the user account to the left of the menu
After you top up your balance, return to the “Tariffs” page and select the tariff again.
You can get more detailed information about the purchased services in your account and current tariffs on the “Statistics” page.
Important! Only after connecting to a paid tariff, you will be able to connect additional services and search modules.
Connecting a package of additional services and search modules
If you want to access all possible functions of the system and get the maximum quality, then the easiest way is to purchase a combined collection that includes all available search modules and additional services by clicking one button.
Top up your account with an amount sufficient to connect and go to the “Tariffs” page in the “Packages of additional services and search modules” tariff schedule.
United collection

Select a tariff plan and click on the “Connect” button. The system automatically activates all available services and search modules.
Important! To connect to the full package of additional modules and services, you must have the "Basic", "Advanced" or "Highload" tariff activated.
You can also purchase additional services and search modules of your choice.
Connecting an additional text recognition service (OCR)
This service allows you to recognize and check for borrowing scanned documents, photographs from a digital camera and graphic images containing text data.
To activate this service, go to the bottom of the “Tariffs” page, you will see the tariff schedule for additional services. Select the tariff plan line and validity period by clicking on the switch, and then click on the “Connect” button.
Additional services on the “Tariffs” page

Connecting additional search modules
To view additional search modules, go to the bottom of the “Tariffs” page. There you will see a line of additional search modules with brief description and connection conditions. Additional search modules are connected for a certain period and have a maximum number of checks per connection.
Connecting additional search modules is only possible in paid plans.
Additional search modules on the “Tariffs” page

After connecting the additional search module, you will see its name next to the “Menu” icon.
Top up your balance
To go to replenish your balance in the top panel of your account, hover the cursor over the number of points, then the “Top up” button will appear, click on it.
Proceed to replenish your balance

After proceeding to payment, a page for replenishing your account will open in front of you. Enter the amount to top up in the input field, and then click the “Next” button.
Important! After confirmation of payment, payment must be made within 24 hours, otherwise the payment application will be canceled. Also note that when you top up your account, you purchase points, and the cost of 1 point is indicated.
You can view all transactions with your points, as well as the status of completed payments, on the “Balance” page.
You can also go to replenish your personal account on the “Statistics” or “Balance” pages. To go to these pages, click on “Menu” in the upper right corner and select the page you need. After that, click the “Top up” button.
View your balance
On the “Balance” page you can see the history of transactions performed with your points in your account.
To go to the “Balance” page, click on the “Menu” icon, and then select the “Balance” menu item. After going to the page, you will see a page with a list of all purchase transactions, debiting points for subscribing to tariffs and connecting additional search modules.
List of transactions on the “Balance” page
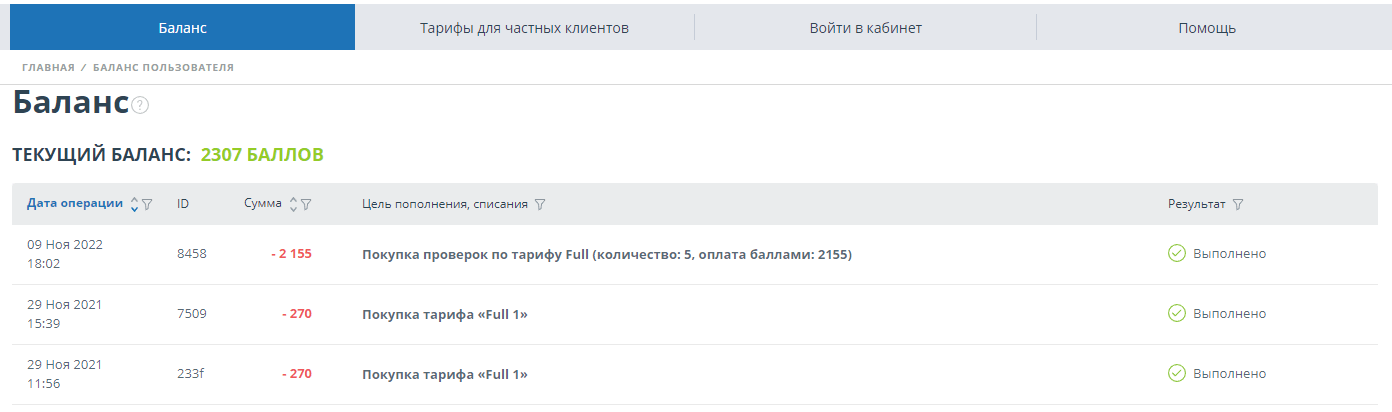
To find out in detail the result of the operation, hover the cursor over the icon in the “Result” column; after hovering over it, a note with an explanation will be displayed. Information about the payment status will be especially useful if problems arise when making payment transactions.
If a lot of transactions have been made in your account, you may find it convenient to use the transaction filter. By default, the list of transactions is sorted by transaction date in descending order. You can change the sort order in the table header; the direction of the arrow will change, indicating the sorting method, and the column currently sorted by will be highlighted in bold.
View usage statistics
On the “Statistics” page you can view detailed information about the purchased services in your account.
To go to the connection statistics page, click on the “Menu” icon in the upper right corner and select “Statistics”.
To prove the uniqueness of the text, sometimes certain difficulties arise, which help from Anti-Plagiarism can help solve. Next we will talk about what kind of “certificate” this is and how you can get it.
Currently, writing texts is very important for many companies. Of particular importance is that the finished text must be unique (not similar to other texts on the entire Internet).
You can check the uniqueness of any text (document or picture) using special services designed to search for similar texts. Among such services: Text.ru, Content-Watch, AntiPlagiatus, ETXT, etc.
The concept of anti-plagiarism
What is anti-plagiarism? Anti-plagiarism is a thorough online check of your text against a copy on the Internet. If, when checking the text, the system finds a matching part or the entire text is identical on another site, the Anti-Plagiarism system will notify you about this.
Today, Anti-Plagiarism has become a truly national program that can evaluate the uniqueness and quality of written works. To check your work, you need to register on any service convenient for you - this will allow you to check the uniqueness as many times as you need.
But you need to take into account that each service has its own number of verification attempts. First of all, you need to learn how to work with such services. It’s worth understanding the algorithm of the service you choose.
After your work has been polished, the verification system offers you the percentage of uniqueness of your text. Most often, such services are used by students to write coursework, diplomas or dissertations, or by copywriters, whose texts they transfer to companies/employers.
In some situations, users need confirmation that their robot has passed uniqueness. This confirmation is also called a certificate from Anti-Plagiarism. Such a certificate can be ordered from companies that themselves check your work, after which they will provide you with an official conclusion on originality.
Of course, this service may not be free. But you can do such a certificate yourself - it is a fairly simple procedure, and it consists of several steps.
Structure of creating help from Antiplagiarism
- First you need to register on the Antiplagiat website (antiplagiat.ru). But if you have another program, then you just need to download and install it on your PC, and you don’t need to register;
- Next you need to upload your work;
- after which it needs to be checked (run the check);
- when the robot has already been checked, you receive a detailed report (number of words, total number of characters, number of characters without spaces, presence of spelling errors).
In the Antiplagiat.ru system you can take a screenshot of this report. If you have paid according to the tariff, then you have additional opportunity download the report in pdf format. Other services may offer you to save the file in docx format.
Paid or free
Please note that in order to receive a full inspection report, you will need to make a payment. Payment can be per day, week or month. It is important to remember that Antiplagiat.ru checks texts exclusively in Russian.
If you need to check the text, for example, in Ukrainian, then it is best to use other services, for example, ETXT. If you need a certificate for Antiplagiarism.university, you can check the document only at the university, and only with the teacher.
If you need an official certificate from Anti-Plagiarism, then you can order such a document from companies that specialize in this. Their task is not only to check your work for uniqueness, but upon your request they will also be able to issue you a certificate of uniqueness.
The letterhead will contain complete information about the robot, as well as a stamp and signature. This is what the official Aniplagiarism certificate looks like.
Many students don't know how make a certificate for anti-plagiarism on one's own. We will tell you and show you, with examples, the entire procedure for creating this certificate. To get an anti-plagiarism certificate, you need to do everything as shown below.
2. To download a help report from free version antiplagiat.ru you need to select "Print version" in the window that opens "File" - "Print" - Microsoft Print to PDF printing tool and your help report will be saved in PDF format.
Sample inspection report Antiplagiat.ru
The anti-plagiarism system, after checking your work, issues inspection report.
This report will contain all the information: originality in %, borrowing %, citation %, date of verification (for example: 04/04/2017), sources.
Let's decipher each value separately.
1. Originality is the percentage of original text in your work. The higher it is, the better. Each university may have different requirements. But more than 65% originality of the text is recommended.
2. Borrowing- this is the percentage of text in the work that you borrowed from any sources. In simple terms, what you took and copied into your work. The lower the borrowing percentage, the better.
3. Quoting- This direct use text from some source, i.e. conveying the author's thoughts without distortion.
4. Date– this is the day, month and year when the system was checked. (For example, 04/04/2017).
5. Sources– these are the sources where the system found matches with your text. Here also, the fewer there are, the better.

Sample test report Antiplagiat.VUZ
In the paid version of Antiplagiarism.VUZ you can download a report with the full content of the sources. The figure shows an arrow on a button, by clicking on which you can save the report. It will be in the format