How to make a bluebird with your own hands. Bird craft - ideas for making birds with your own hands from different materials. from paper plates
Summary: Paper bird crafts. DIY bird craft. How to make a paper bird. Spring crafts for children. Children's spring crafts from natural materials.
Spring's most faithful friends are birds. In spring, nature awakens from hibernation, the trees are filled with life-giving sap - life is everywhere! And the birds are the first to remind us of this. The hubbub of birds greets the revival of nature with victorious force. For this reason, we could not help but include in our section “Do-it-yourself spring crafts with children” a selection article “Crafts of birds from paper and fabric”. We will teach you how to make paper birds. Taking advantage of our ready-made templates And detailed instructions, you can make an original spring craft - the “Spring Birds” mobile, which will decorate the interior of your home. You will also learn how to sew beautiful birds from fabric.
1. Bird crafts. Paper birds
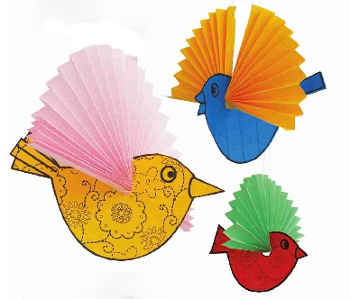
A very simple spring craft for kids. To make these cute paper birds you will need scrapbooking paper, colored paper clips, glue and a hole punch.
Download the bird template from the link >>>> Print and cut out. To make one bird you will need two mirror pieces. Before gluing them together, take two paper clips and straighten them to create “bird legs”. Place them between the two sides of the bird and glue the sides together. Make the eye using a hole punch. Children's spring craft is ready!
2. Crafts bird. How to make a bird out of paper
We present to you another simple spring paper craft. You can make it in literally 10 minutes.

And one more spring craft - a mobile from the well-known blog madebyjoel.com. On this site you will also find video instructions. The template can be printed using the link.

4. Children's crafts spring. DIY bird crafts
If you don't know how to make a paper bird, be sure to visit the Bulgarian website Krokotak.com. There you will find two great spring crafts for children: a white stork and a swallow.
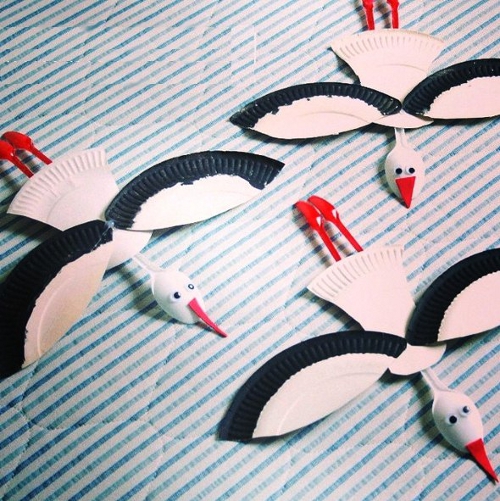
White stork made of paper. How to make a paper stork

The white stork is an extremely positive symbol among most peoples of Europe, Asia, America and Australia, an emblem of the sun, peace and goodness. The stork, arriving from warm regions at the end of March or at the beginning of April, is quite naturally associated with spring and the beginning of a new life. Since the large, proud bird is not at all afraid of humans and builds nests on the roofs of houses or on the tops of nearby trees, returning annually to its old, habitable place, people are accustomed to viewing it as a guardian angel of the hearth, as a peaceful symbol of constancy and well-being.
The storks in the photo below are made from disposable cardboard plates and disposable plastic spoons. The birds' feet are made from small coffee spoons. To make this DIY spring craft you will need a glue gun.
A swallow made of paper. How to make a swallow out of paper

The grass is turning green
The sun is shining;
Swallow with spring
It flies towards us in the canopy.
(Alexey Pleshcheev)
The swallow is probably second only to the white stork in popularity. The attitude of the people towards her is especially warm and kind. And of course, she is a symbol of spring, the return of the sun. The Hermitage houses a Greek vessel - a pelica with a wonderful design: an adult man, a young man and a boy joyfully greet the swallow that has returned with spring.
Note: the swallow's eyes are glued on purchased ones (so-called "doll eyes"). You can buy such eyes, for example, in the online store Read.ru. See link >>>>
5. Crafts on the theme of spring. Bird crafts
From an ordinary paper plate you can make an original craft on a spring theme - a bird in a nest. It is appropriate to use decorative feathers for decoration.

Of course, it’s not good to keep live birds in a cage; it’s better to let them fly free. We will make a spring craft, a bird in a cage, from paper and a plastic lid. Detailed wizard class see link.
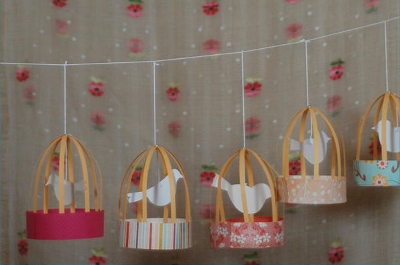
Look at what cute birdhouses you can make together with the residents from the so-called. waste material. This spring craft would be appropriate to decorate a wall in a child’s room. The birdhouses themselves are made from cardboard milk or juice cartons. The outside was painted with acrylic paints. The birds were made from plastic containers from kinder surprises.

These bright spring birds on wires can be easily and simply drawn using fingerprints.


This spring bird applique is made using paper cupcake liners. Even a small child can make such a spring craft. The molds need to be folded (or cut) in half, glued to paper, and then finished drawing the birds’ legs, beaks and eyes.

6. How to make a bird from fabric. How to sew a bird from fabric
Birds can be made not only from paper, but also from fabric. Felt is best suited for these purposes. You can decorate a bouquet of spring twigs with ready-made fabric birds.
You can make an incredible number of different crafts.
In this collection of master classes you can learn how to make various birds from plastic bottles.
Here you will find simple ways to make beautiful birds that you can use to decorate your home, cottage and/or garden.
You can involve children in the process of creating birds from plastic bottles - they will definitely enjoy doing something new and interesting, and you will be glad that you took them away from the computer, tablet or phone.
DIY chicken from plastic bottles
There are several ways to create a chicken from a plastic bottle. It all depends on the size of the bottle itself and its shape.
If you turn on your imagination and involve children in this creative work, then there are a lot of options.
Here, for example, is chicken, the base of which requires a 5-6 liter bottle.

1. Paint the bottle yellow (on the inside). You can use regular paint.
2. You can cut out a beak and a comb from other bottles.
3. Use a knife to make holes in the bottle and insert everything you did.
4. Take toy plastic eyes or just plasticine and make eyes. You can also color the chicken's eyes.
How to make chicken from plastic bottles

To make this chicken you will need:
Plastic bottle
Scissors.
DIY peacock made from plastic bottles

You will need:
Scissors;
Plastic bottles;
Synthetic foam;
Glue gun;
Wooden post;
Abrasive mesh;
Metal rod.
At the end of the text instructions you will find video instructions.
1. We make blanks for feathers.

First you need to make a blank from cardboard;
The feathers should be made semicircular, solid, with cuts of different lengths.
2. We make blanks for the tail. They should be long.
Cut the bottle lengthwise and cut out a strip of the width you need.
* It is advisable to sort feathers by size. Prepare bags and place feathers of the same size in each bag.
* If at the end of creating a peacock there are not enough feathers, just finish it some more.
3. Create a peacock model.

Prepare synthetic foam and cut out several necessary parts from it (torso, neck and head);
Use a glue gun to connect all these parts;
Take a wooden post and insert a metal rod into it;
Secure your bird's body to a metal rod;
Cut a circle from a new plastic bottle (in this case it is a red bottle);
In this circle, make one cut going from the edge to the center, then twist the part into a cone - you will get a peacock’s beak;
Use a glue gun to secure the beak to the foam.
4. Glue the feathers.

It is worth starting at the bottom, where the longest feathers are glued, and the higher you go, the shorter the feathers.

* Glue the feathers overlapping.
* After the breast, go to the back.
5. To make a crest, cut strips from plastic bottles onto which feathers are glued.

6. To create eyes, you can use plastic bottles of a different color, as well as plasticine, paint or toy plastic eyes.
7. To make the wings, use an abrasive mesh. Feathers are glued onto the wings cut from it. The tail is made in the same way.
8. Attach all the remaining parts and you're done!

Video instruction
DIY bird made from plastic bottles: swan
This swan will not only decorate your garden, but will also become a beautiful flower bed for one or more flowers.

You will need:
Plastic bottle with a volume of 5 l;
300 ml milk bottles;
Wire;
Scissors;
Black marker;
Lighter;
1. Making the torso.

Take a 5-liter bottle and draw lines on it with a marker as shown in the image;
Cut holes along the lines
Insert a wire into the hose, and insert the hose itself into the bottle through the neck - you will get a neck frame
2. Making the plumage.

Take a white bottle (milk) and cut off the bottom and neck;
Now cut feathers of any shape and size from this bottle;
Small cuts can be made on the edges of the feathers;
Each feather should be carefully treated with a lighter (from the outside);
Now start stringing two feathers onto the wire.
3. Putting everything together.
For the neck, white bottles with the bottom cut off are used (in this example there were 16 of them);
For the head, use the top of a large bottle with the neck cut off;
At the place where the hose ends and the beak begins, make two holes on opposite sides (in the plastic bottle and in the hose), then use wire to secure the entire structure;
Make a beak from a plastic bottle painted with red paint or use a bottle of a matching color;
Start attaching the feathers from top to bottom and in a circle.
How to make a dove with your own hands from plastic bottles

You will need:
Plastic bottles;
Styrofoam;
Scissors;
Wire;
Toy plastic eyes or plasticine.
1. Cut off the neck of the plastic bottle (see image). This blank will serve as the body of the dove. Make the breast.
2. Make cuts on the bottle as shown in the image. Press the cut part inward to form the body of the dove, then tighten the workpiece with wire.
3. Cut out the head of a dove from foam plastic.
4. To make feathers, you should cut the middle part of a plastic bottle. The strips should be of different lengths, and their ends should be rounded.
5. Make 2 holes at the base of each feather.
6. Using wire, screw the feathers to the mesh.
7. Attach the pigeon’s tail to the pigeon’s body.
8. All that remains is to color the dove’s head and make the eyes (glue plastic ones, draw with a marker or use plasticine).
DIY children's crafts from plastic bottles: rooster

You will need:
Plastic bottles
Plastic plates
Plastic glasses
Plastic spoons.
1. Cut off the top of the plastic bottles and secure them with tape as shown in the image.

2. Cut the plastic cups into fringes and place them on the bottle one by one.
*You can use cups different colors and alternate them.

3. The rooster's tail can be made from plastic plates. After this, attach the tail to the plate.


4. Wings can be made from leftover plastic plates.
5. You can make a rooster's head from a plastic ball. It is attached to a cut cup glued to the bottom of the previous cup.

6. You can cut out a beak and scallop from colored paper. They are attached with tape or hot glue. Eyes can also be made from colored paper, plasticine, or use toy plastic eyes.
Learn to make a wicker decoration on cardboard, a bullfinch from threads and other birds. Learn how to shape chickens and bunnies into pom poms using thread.
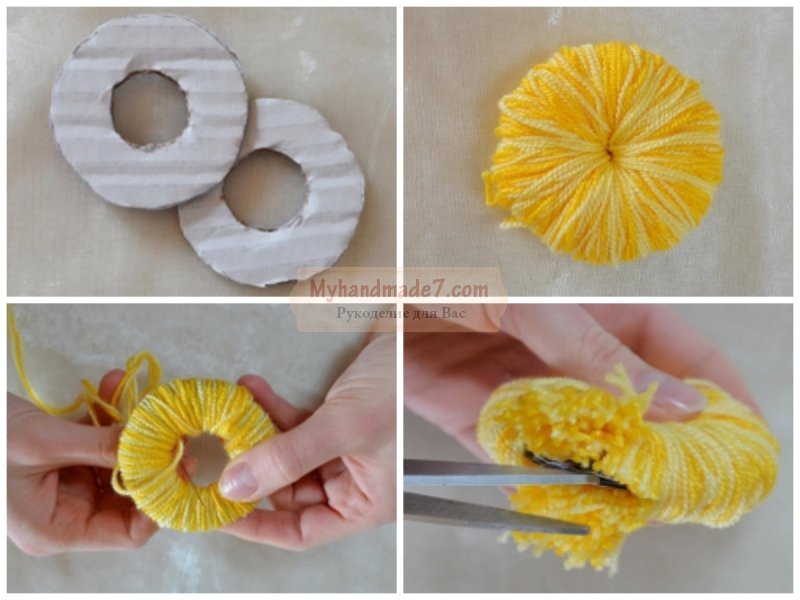
How to make chicken?
Let's start with poultry. In the year of the Rooster, such a craft will be very relevant. You can make an adult bird or chicken. To create it you need to take:
- yellow and white yarn;
- yellow thread;
- scissors;
- beads for eyes;
- apple seeds for noses;
- foam;
- red threads for paws;
- glue;
- cardboard for templates;
- scissors.

Cut out 3 templates from cardboard in the form of squares with sides of 8, 7 and 6 cm. Wind threads around each of them, cut them on one side. You got 3 bunches. We design them differently. Wrap yellow yarn in the center of the longest one (chest), and leave the second largest (back) the same. The third one will soon become wings, tie it with a thin yellow thread in the middle. Cut a piece of foam rubber and wrap yellow yarn around it. This is a head preparation.

Connect the parts of the chest and back as shown in the photo, intertwining them.

Tie the resulting knot on one side and the other with a thin yellow thread. Soon this round center piece will become the head.

Here's how to make the chicken next. With your own hands, unfold the back and breast so that the bird’s head is at the bottom, put the wings on top, and on them the foam ball that you wrapped around the beaches.

We don’t touch the wings yet, but we lift the tufts of the back and breast to cover the foam rubber blank with them. We tie it at the back with yellow yarn to designate the tail.

The little chick continues to form. Separate about half of the wings while working on the first part. Press these wings on the sides, without pulling them too much, also rewind them in the tail area. Now take the remaining strands of thread, place them on top of the created wings, and also rewind the thread at the tail.

If during the process you cannot immediately grab the required amount of yarn, at this stage of work, tuck them with a hook under the thread that marked the tail.
Use scissors to trim it to give it a nice, slightly rounded shape.
Sew the beady eyes into place, and glue the seed nose.

Isn't it true, the little chicken looks great anyway, but if you want, give it legs. You can take pieces of wire, form legs from them, make three fingers from the same material on each, then wrap them with wire.
If small children will play with the chicken, then sharp objects are not needed. In this case, cut off the red threads, gluing them, form the same blanks with three fingers, after which you can glue them to the chickens.
See what else a New Year's chicken made from thread or made for Easter can be.
To create this adorable bird that looks like a ball of fluff, you need to take:
- yellow knitting threads;
- scissors;
- a piece of cardboard;
- colored paper;
- eggshells;
- glue.
Do the second one in the same way, but wrap it around 3 fingers. Also tie with a thread, connect the threads of 1 and 2 pompoms, tying them together.

From colored paper, cut out two eyes and the beak of a New Year's chicken. Glue them on his face.

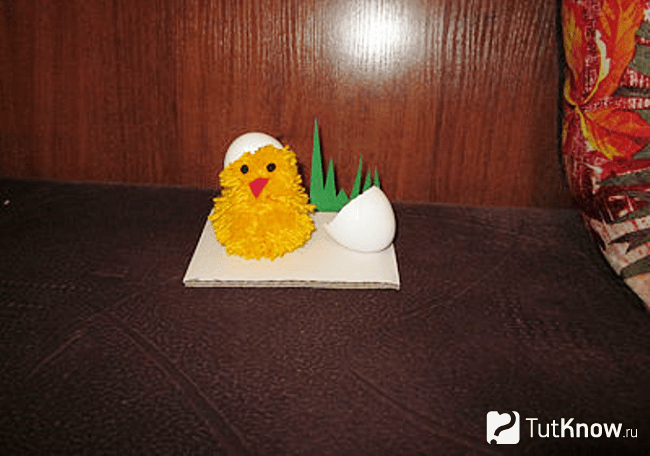
Wash the eggshells and dry them. Place one half on his head, attach the second half next to him on the flooring. Cut out grass from green paper, glue it on, thereby completing an interesting work.
If you want the chicken toy to be openwork and airy, then watch the corresponding master class.
For this lesson take:
- foam egg blank;
- yellow threads;
- cling film;
- scissors;
- PVA glue;
- colored paper;
- pins.
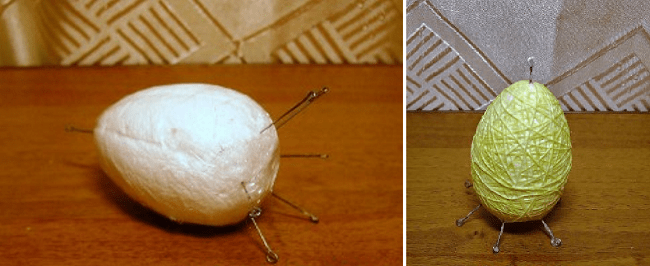
Let the product dry completely, cut the threads on one side of the egg, and remove the foam blank from this hole.

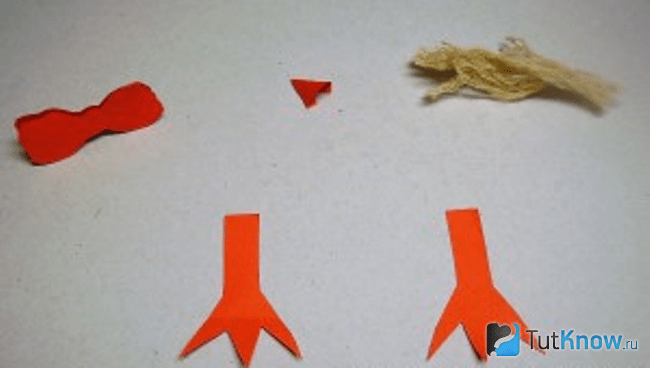
Now you need to sew up the cut area with the same yellow thread; you can additionally secure it with glue. Make a beak out of red paper. You will need a small square, which you need to fold diagonally in half, then bend its corner and sides, as shown in the photographs.

Make bangs for the fluffies from threads, a bow for the girl from red paper, and legs for both chickens.
You can make a top hat for your chicken boy. To do this, cut out a ring from black paper, glue a strip onto it, gluing it to the side. The bottom of the hat is attached to the top.
These are the wonderful and cute chickens you will get.

Other birds and animals made from threads
Very relevant in winter creative work, which will tell you how to make a bullfinch from threads. For it you will need:
- threads of red, black, gray;
- scissors;
- apple seed for beak.

- Using template cardboard or your hands, wind identical pieces of black thread, the same amount of red thread you will need.
- Place black ones on them, tie them in the middle with dark thread. Remove the black threads from one half to the other, secure them here, in the area of the future tail, using a piece of gray yarn.
- Then you will need to wind threads of this color and place them under the central part of the bird.
- We fix this part by wrapping it on one side with red threads. Bring these gray wings back, tie them with thread in the tail area, and trim them with scissors.
- Glue a bone onto the nose, this is what a wonderful bullfinch you have made from threads.

The basis for it is created from pieces of white and yellow thread. Blue ones are placed crosswise under the center of these two blanks. Then the white and blue ones need to be lifted and twisted. Blue and black yarn will become the bird's wings.
Using this technique it is easy to make a sparrow and other birds.

Here's how to make a rabbit from the same material.
The list of necessary items consists of:
- gray and white threads;
- thick brown and pink fabric;
- cardboard or special blanks for pompoms;
- fishing lines;
- beads;
- scissors;
- needles.
- Wind gray yarn onto special blanks for pom-poms; if there are none, cut them out of cardboard and shape them into a half ring. For one pompom you will need 2 pieces.
- First, a thread is laid between them, then the yarn is wound tightly in several turns. When this is done, the threads on the larger side of the semicircular workpiece are cut, you need to remove them from the device and tighten the main thread.
- In this way, two pompoms of different sizes are formed. Tie them to each other using the threads on these parts.
- Cut out the semi-oval ears and their inner parts from pink material. Glue these two types of elements together. Form a fold at the bottom, also fix it, and then the ears themselves on the head with glue.
- You can make a hare's tail from a small white pom-pom or fill a light circle of fabric with padding polyester and gather it around the edges with a thread. The tail is sewn or glued.
- Thread several turns of fishing line into the pink bead, which will become the animal’s whiskers. Sew his shaped nose and eyes into place.

A hedgehog made from threads will not be prickly at all, even soft.

To create a hedgehog, you will need a special tool used to make pompoms, but if you don’t have one, you can use a regular cardboard blank in the form of a ring.

Either of these tools is wound with 3/4 brown wool and 1/4 gray wool. Once the pom pom is formed, give your face and nose a hedgehog shape. natural shape using scissors. Sew on the eyes and nose. You can create a whole family of these funny hedgehogs.

It is also not difficult to make a lion from threads. To do this, take:
- two identical cardboard semicircles;
- threads of black, yellow, orange, pink, white;
- scissors;
- two pencils.

- As shown in the photographs, first wind a pink thread in the center on two blanks, and a little black thread on the side.
- Now the black one needs to be covered with white yarn. A thick layer of yellow is wound on top of it, and a little black in the middle.
- Place two pencils crosswise on the workpiece. First wind an orange thread on them, and on top of it 3 rows of pink.
- Cut the threads of yarn on one side, tighten this multi-layered “pie” with the warp thread. Using scissors, give the lion's head the desired shape.
Easy DIY crafts for the New Year
As you may have guessed, they will also be based on threads. Let's start tinkering with Santa Claus.

First, prepare everything you need, these are:
- foam cone;
- PVA glue;
- cotton pads;
- red threads;
- tailor's pins;
- scissors;
- 2 shiny chenille wires;
- cling film.
Now wind a thread around the workpiece, moistening it with glue. You can pass it through a bottle containing glue.

At the end of this work process, leave the workpiece to dry completely near the radiator or other heating device. Then it needs to be decorated with cotton pads.

Make sleeves using a cone as well, but in a smaller size. To make the threads dry faster, make two cones and form both sleeves at once.

Their edges also need to be decorated with cotton pads, then glue these pieces of clothing to the fur coat. Cut out 4 blanks for mittens from felt, and also use PVA to attach them in place.

Cut the cotton pads into two parts and decorate the collar of the fur coat with them.

Create Santa Claus' staff from 2 twisted chenille wires, glue it to our hero's hand.

To make his hat, wrap a foam egg with cling film and place pin stops. Wrap the round part of the egg with threads, also securing them with glue. Make a face out of foamiran and glue some eyes for toys here. Attach the hat, trim it with cotton pads, and the mustache, eyebrows, and beard are made from light wool for felting. This is the wonderful result your efforts will lead to.

For another New Year craft that you will create step by step, you will need:
- threads;
- PVA glue;
- ribbon;
- cling film;
- a plastic cup;
- scissors;
- narrow and wider braid;
- cardboard;
- hot glue gun;
- a piece of wallpaper.

Make 2 holes in a plastic cup, one opposite the other, thread a thread through them. Pour glue into this container.

In such a device, the desired section of the thread will be lubricated with glue, so it will be convenient to shape the cone with this material. Cover it with thread, then move on to the second bell.

Also dry these elements near the battery, then you can start decorating them. Apply hot glue to the wider shiny braid and attach it along the edge of the bell. We further decorate the bell with a thinner ribbon.

If you have New Year's beads, cut the required length from this strip, twist them, and glue them in the form of a snowflake on the bell.

You can make bows yourself from shiny fabric or purchase ready-made ones in the store.

Thread strips of braid into the top hole of both bells and tie a knot on the inside.

Next, for this craft on New Year which we cover step by step, you need to make a beautiful bow. To do this, you need to glue thin tinsel to a wide ribbon and tie it in a bow using braid.

All that remains is to tie a bow to both bells and decorate the Christmas tree or room with them.

How to make wicker jewelry yourself?
You will find out the answer to this question right now. We will also make them from threads. Here are the stages of creating a beautiful ornament that can easily turn into a brooch if you pin a pin on the back or into a pendant if you attach a braid of thread to it.

To make this decoration you will need:
- 4 toothpicks;
- threads of white, yellow, blue, pink;
- scissors.
- Iris threads are perfect for this needlework. Take a pink ball and wind the end of the thread into the center of the toothpicks crossed together. Now tie the end of the yellow thread and form a quadrilateral out of it.
- Place 2 more toothpicks inside between the data so that there are 4 of them. Tie the edge of a blue thread to one, wrap it around the wooden sticks as shown in the photo.
- The next rows of the pattern are formed from white or light pink thread. Due to the fact that you now have 8 toothpick tips, the pattern becomes more voluminous.
- Next comes a yellow, then a pink thread, from which we form quadrangles lying crosswise in relation to each other. The creation of the brooch is completed with yellow, then blue thread.
pliers;

Thread a colored thread through a needle and make the first top row, passing the tool either from above or from below the laces. Complete the next row in a checkerboard pattern, in relation to the top previous one. Having made a fragment of the required width from a colored thread, take a black one; golden-colored jewelry looks good on it. By threading them through the needle, form such a beautiful row.

The next fragment consists of white threads; against their background, golden beads also look great. When will the decoration be formed? the right size, cut off the main threads at the back, tie them in the form of a knot on a pendant.

Wrap gray threads around two fingers, remove them from your hands, tie the piece to the bottom of the decoration, wind it just below the middle with gray yarn, trim the edges to make a beautiful, even tassel. Make a few of these.

Using pliers, attach two rings for the chain at the top of the pendant, thread it here and secure it.

The wicker decoration is ready.

At the end of the article, we invite you to read in a simple way, which will tell you how to quickly make a wicker decoration.
Another highlights the process of creating a bird from threads.
Can be used in the design of a garden or playground, when decorating a children's room or setting a festive table. birds, do it yourself made from the most different materials- from wood to simple plastic bottles. In addition, you can knit any bird you like using the amigurumi technique; you may end up with a penguin or a feathered cartoon character. Don’t forget about another fascinating type of needlework - creating various figures from rainbow loom rubber bands, for example, this is how you can make original Angry birds keychains.
DIY bottle birds
A beautiful well-kept lawn or a small impromptu garden in your yard can be complemented by figurines birds from bottles, do it yourself Any family member can make them, but it’s better to make this creativity a collective one, because during the process you can have fun, communicate with the children and learn together with them new technology doing crafts.
DIY bird made from plastic bottles will look perfect against the backdrop of a green lawn or in a flower bed, so you can start making this craft, but be prepared that in the process you will need special tools and materials, because this craft will not be easy at all.
The most beautiful DIY bird made from scrap materials, which will become a real decoration for any garden plot and playground, is a beautiful peacock with a painted tail. Plastic bottles you need to stock up on large quantities, and you will also need five-liter eggplants. Materials also include blue garbage bags, foil, and tape. We will make crafts using scissors, a stapler, and to decorate the finished peacock we will also need acrylic paints and a brush, varnish is used to fix the result.
When all the materials are prepared, you can begin the creative process: let's start with processing plastic containers. All bottles that you have prepared must be thoroughly washed inside and out, remove the labels, and dry. It is necessary to wash the containers in order to get rid of the adhesive trace on the outside, as well as any remaining liquid inside, otherwise your hands will become sticky when cutting bottles, which will complicate and slow down the work.

The most difficult thing is to make the peacock’s tail, so we’ll start the process with that: the middle part must be cut into three oblong tongues. The neck and bottom must first be cut off.
One end of the plastic tab needs to be rounded so that it looks like a feather, and then small cuts need to be made along the edges. On each rounded tip you need to attach a blue oval from a plastic bag and a circle of foil. You can secure them at the tip using a stapler. Since the tail should be fluffy and voluminous, you need to make a lot of such blanks.

DIY birds for the garden
For the next step, we need a five-liter eggplant: we need to cut off the neck and bottom, and cut out a semicircle from the middle part, to which we will attach the prepared feathers using a stapler.
Now let’s make the body of the bird: cut off the neck from a five-liter bottle, cut off the bottom from a two-liter bottle, and fasten the prepared parts together with wide tape.
The next step is to make the peacock's head: cut the neck and twist them into an oblong funnel, where the long point will be the beak. The prepared part must be connected to the cut bottom using tape, and then the workpiece is fastened to the rest of the body.

DIY bird made from material It will delight you for many years, because all the materials used can withstand bad weather, plastic and polyethylene will not deteriorate in rain or snow. In addition to the fluffy tail, it is also necessary to make plumage for the body. For this we will use blue plastic bags It is recommended to take garbage bags. They need to be cut into strips, the tip made pointed, and then attached to the body. The strips should be fastened in rows, overlapping, moving towards the neck from the tail.
Body and tail DIY birds for the garden you need to fasten them together with a rope; to do this, you first need to make a hole in the place of fastening. So that the finished peacock can be fixed on the lawn, a stick should be firmly attached to the bottom of the body. The eyes and beak can be painted with paints, securing the result with varnish. You can decorate the bird with a crown made from foil. To prevent the plastic figurine from being blown away by a strong wind, it should be weighted down by pouring sand inside.
Eat DIY birds for kindergarten, which are much easier to make, for example, penguins, to create them you will need paints, because we will draw a penguin on the basis. You can complement the penguin with a hat made from socks or thread. And if in your creative process If you have enlisted the help of men, you can make more complex designs with a metal mesh as a base and foam plastic to decorate the head. And don’t forget that crafts for decorating a playground in the shape of birds can be made from a car tire.

DIY birds
If you look at possible options creation DIY birds photo, then pay attention to the variety of materials and techniques used. The most common figure is a peacock, which is not surprising, given the beauty of this bird, which amazes the imagination with its painted tail. It is the bright tail that inspires needlewomen to use the most interesting techniques.
A beaded peacock tail can become a stylish pendant or earrings, but to make it work, you need to choose the right accessories. Using a wire base, you can also make a voluminous peacock with a fluffy tail, which is made using the French weaving technique.

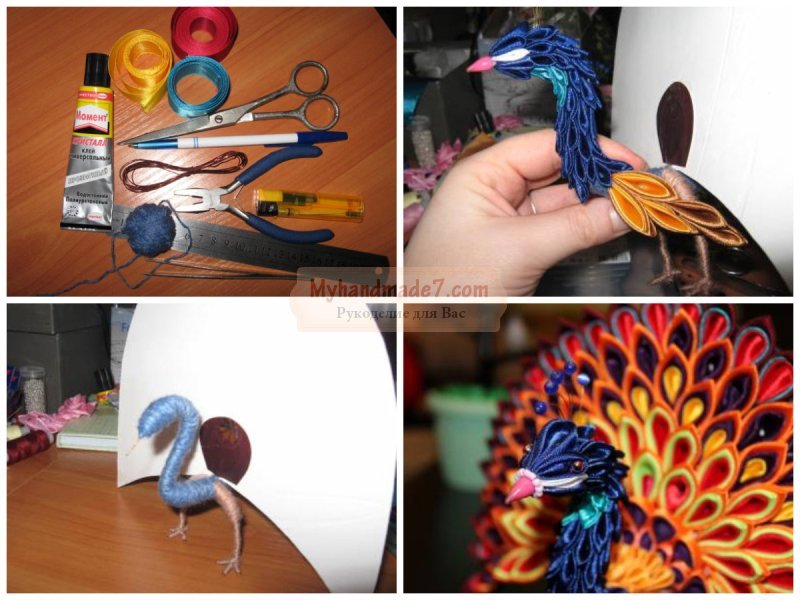
Let's not forget about another popular technique for creating stylish jewelry - kanzashi, which is widespread among needlewomen today. It is used not only for hairpins and flowers, but also for other original crafts. To make a peacock using the kanzashi technique, you need to make a wire frame and wrap it with threads, and the basis for the tail will be a cardboard semicircle.
Even when going to a masquerade, do not forget about such a bright peacock tail, which can be made in a few hours. The skirt will be asymmetrical: the front will be very short, made from strips of brown tulle interspersed with green, but the back will be long, for which it is better to use bright tulle - green, light green, turquoise. The main decoration of the ponytail, of course, is the “eyes”, which are created separately and then sewn to the tulle. To create the “eyes” you will need felt or fleece in four colors: brown, light green, light blue and dark blue. You can sew it for a boy.

How to make a bird with your own hands
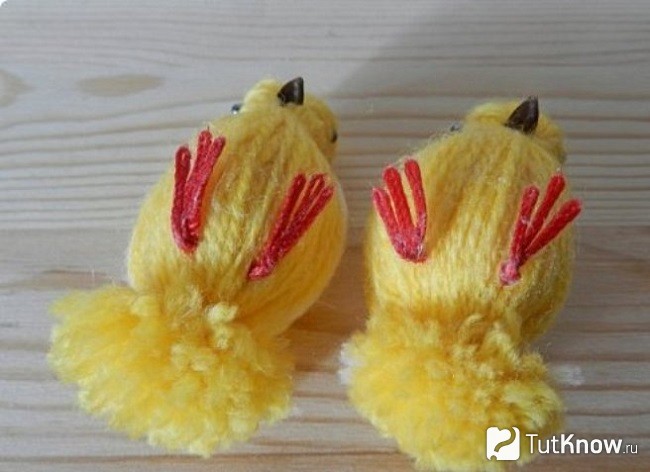
Solving the issue how to make a bird with your own hands, let's not forget about . For example, you can make a cute yellow chicken, and the craft is quite simple, so even a preschool child and his mother can do it.

For this craft, your skills on how to make pom-poms from yarn will be very useful. First, you need to make paired blanks from cardboard: a large one with a diameter of 45 mm and an internal diameter of 15 mm, as well as a smaller one with a diameter of 15 mm. You can take any thread, but, of course, yellow. Threads must be wound around the workpieces so that the inner hole is completely filled. To make winding the thread more convenient, you can use a long, thick needle. Then cut along the outer edge, thread a thread between two pieces of cardboard and tie a tight knot. Straighten the strings to make a fluffy ball. Using the same principle, you need to make a smaller fluffy ball.
The two balls must be connected using the threads left over from the knots. And you can start decorating: cut out a comb and beak from felt, carefully sew them to the head, as well as two black beads for eyes.

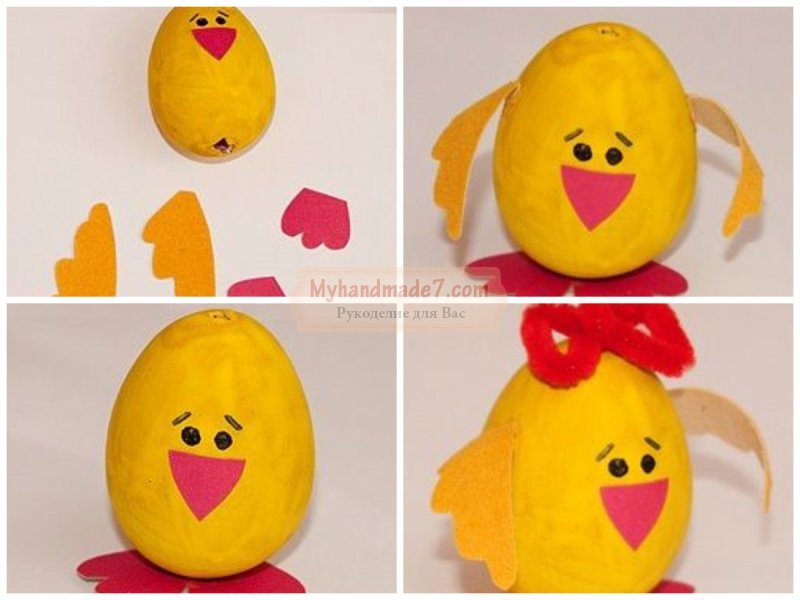
The chicken will become the main decoration; such birds can be used to serve the festive table. For this craft we will need a chicken egg, glue and colored cardboard, scissors, a marker, plasticine and gouache paints.
In a raw chicken egg, you need to make a neat hole at the bottom and top so that the shell does not crack. Then you need to blow the contents into a plate and rinse it with running water so that there are no traces of protein left inside. The empty egg should be left in a warm, dry place to dry, after which you can begin the craft.
The shell must be painted with yellow gouache, left until completely dry, and during this time you can cut out the beak, legs and wings for it from colored cardboard. The legs and beak will be attached to the base using pieces of plasticine. You can draw eyebrows and eyes on the top of the egg with a black marker.
The cut out paper wings must be rounded and glued to the body. You can complete the craft with a neat bow or a stylish top hat.
DIY wooden bird
DIY wooden bird- this is a craft that can only be made by a real master who knows how to work with special tools. It is called the “bird of happiness” and, according to popular belief, it brings happiness to the house and protects the hearth. For example, if a person came into the house, they immediately looked at the hanging amulet: if he turned his tail towards the guest, it means that the person was bad, if he turned his head, he was good. Since ancient times, such a talisman was considered the best gift for relatives.
For crafts, we usually use pine or spruce wood; we will need a block about 30 cm long, from which we need to chop off two bars. One will be used for the body, the second for the wings.
You need to draw the outline of the wings on the block, and perform further actions with a chisel: make locks and round the tips of the wings. If the wood is fresh, then the wings can be split immediately, but dry wood must first be steamed. Creating wooden amulets is a labor-intensive process, but everyone will be delighted with such crafts.
If you don’t have time for complex crafts, an excellent option for winter creativity would be original feeder DIY for birds, which will also decorate your garden, and in winter the child will be able to watch the birds that will flock to feast on the grains.
Today we will tell you in detail how to make birds from threads or leftover yarn with your own hands quickly and beautifully. The idea is very simple and kids will definitely love it. Birds made from threads can be brought as a craft to school or kindergarten or decorate her children's room. The main thing is to understand the principle of creating such a bird and, by changing the colors of the yarn, you can create different kinds birds, even a bullfinch, a tit or a sparrow.
How to make birds from threads
Materials:
- threads of three colors (black, red, gray)
- wire
- cardboard
- almond nut for nose
Wrap the cardboard with threads as indicated in the photo.
Gray - 30 turns, black - 50 and red - 60.

Now let's assemble the bird step by step:
- Tie the red and black threads together exactly in the middle
- Throw the black threads to one side and tie them with a thread together with the red ones
- Place strands of gray yarn under the red threads.
- Tuck the remaining red threads to the tail from below.
- After that, also throw the cheese threads to the tail and tie everything with thread.
- Place a spout of half an almond on a wire in the center.

To secure the beak, you can use a small nail, pin or toothpick. Use glue to better secure the beak.

As a result, you can make a whole flock of birds from threads

If desired, you can make the bird's legs out of wire and sew on eyes.
There is another way to make birds from threads by forming a head.
How to make a tit from threads

First, wind yarn of different colors onto cardboard blanks